Kite Design Basics
From DT Online
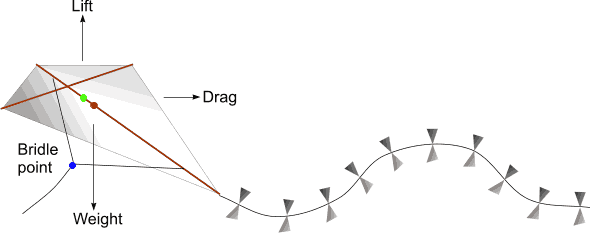
Like an aircraft, Kites have three main forces acting upon them:
- LIFT – this is generated by air pressure on the flying surfaces and acts through the Centre of Pressure (CP) (usually the Centre of Area or ‘Centroid’ of a flat kite)
- DRAG – this is the kite’s resistance to being pulled through the air and also acts through the Centre of Area.
- WEIGHT – this acts though the Centre of Gravity (CG) or balance point of the kite. Kite weight should be minimised as much as possible by using lightweight materials. The CG can be found by simply balancing the kite on one finger (for most flat shapes like KItes, this will be the same as the Centre of Area - i.e. only the small weight of the Spars might change it slightly).
In addition, kites have a Bridle Point where the kite line (or control line) is attached. The Bridle Point acts like a hinge or pivot and one aim of kite design is to ensure there is enough ‘lift’ and to keep the CG below the CP such that the kite does not tend to tip forward and become unstable. Kite tails are sometimes used to increase drag and lower the CG to achieve more stability.
Aircraft wings (aerofoils) usually have a curved (or cambered) upper surface and achieve LIFT by being slightly tilted upwards towards the wind. As the wind meets the ‘leading edge’ of the wing, some air passes straight under the flat part of the aerofoil but some has go over the top. Since the top surface is curved it is a longer distance and so the air flowing over the top of wing has to travel faster than the air passing under it.
The Dutch born scientist Daniel Bernoulli established by experiment that, where air is flowing fastest, pressure is least. It follows that aerofoils are partly pushed up by the airflow and partly drawn up by the effects of the ‘Bernoulli Principle’.
Try holding one end of a small sheet of paper in both hands. Keep the held edge horizontal while the other end sags under its own weight. Blow steadily over the top of the horizontal edge and observe what happens!
The angle at which an aerofoil is presented to the wind is known as the ‘angle of incidence’ or ‘angle of attack’. Aircraft wings have only a small angle of incidence, about two or three degrees, but kites fly at a much steeper angle – usually about ten times this.
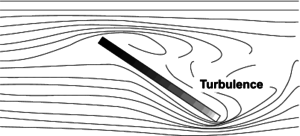
An aircraft could not maintain such a steep angle but kites can because they are tethered to hold the kite stable against the forces of wind pushing against it and the effects of the turbulence created behind.
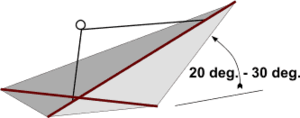
The angle of attack for a kite can be set by adjustment of the bridle. The normal method is to loop the bridle over one finger and suspend the kite upside down as shown. The position of the finger is adjusted until the tail of the kite hangs at an angle of 20 to 30 degrees to the floor.
The general rule for bridle adjustment is:
- High angle for low wind speeds
- Low angle for high wind speeds.
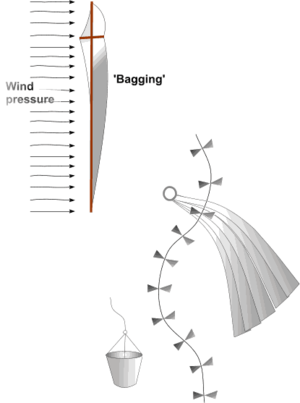
In practice, the surfaces of a kite are not completely flat – if they were, the kite would be unstable. Instead, the kite covering is pressed by the wind into curved depressions between the spars. This creates a curved or cambered surface not unlike an aerofoil.
Kite stability can also be improved in other ways. Tails can be added to increase ‘Drag’ and to change the ‘Centre of Gravity’. These should initially be about seven times the length of the kite and adjusted by trial and error. Drogues (e.g. made from paper cups) can also be used.
The ‘Bridle’ can be partly covered or made entirely from sheet material to form a solid, stabilising Keel to the bottom of the kite (e.g. see Roller Kite).
‘Keels’ can also be added to the top of the kite to create a Dorsal Keel – this would need extra spars to support it.
The 'Cross Spar' of a kite can be bowed by stretching a bowstring across it. Alternatively, the ‘Cross Spar’ can be made in to halves, joined at an angle to form a Dihedral. The effect is to make the kite more stable in that it may float on the air much as a boat hull on water.
A kite’s Aspect Ratio is the relationship between the ‘span’, or length, of the kite and the ‘chord’, or width, of the kite.
A kite of high ‘aspect ratio’ is considerably wider than it is long and. Although capable of very buoyant flight, they can be difficult to stabilise and fly best in light wind conditions – ‘stunt kites’ which use two ‘control lines’ to overcome this, often have a high ‘aspect ratio’.
A kite with a low ‘aspect ratio’ is longer than it is wide and, although very stable, it has a high sink rate. This is an example of the kind of situation that engineers and designers commonly experience and have to optimise the various components to reach a working compromise.
 |
 |
 |
 |
 |
 |
 |
| Traditional Diamond Kitet |
Cody Box Kite |
Delta Kite |
Stunt Kite |
Sled Kite |
Kite Line |
Kite Reel |


