Tudor Street Scene: Difference between revisions
From DT Online
Created Article |
mNo edit summary |
||
| (8 intermediate revisions by the same user not shown) | |||
| Line 14: | Line 14: | ||
Notice also that many present the steeply angled roof [https://en.wikipedia.org/wiki/Gable '''Gable'''] to the street, but several | Notice also that many present the steeply angled roof [https://en.wikipedia.org/wiki/Gable '''Gable'''] to the street, but several others are 'side on'. This observation suggests that at least two types of relief model will be needed to create a credible street scene. | ||
=====Materials Available===== | =====Materials Available===== | ||
* A sheet of '''[[Paper and Card|A4 Card | * A sheet of '''[[Paper and Card|A4 Card]]''' ''(medium or thick)'' provides a good starting point: use '''Portrait''' for '''Gable-ended''' houses and '''Landscape''' for others. | ||
* The timber frames can be modelled at this scale by 8mm square '''[[Stripwood Technology Materials|Stripwood]]''' and glued in place using '''[[Glues and Pastes|PVA Glue]]''' | * The timber frames can be modelled at this scale by 8mm square '''[[Stripwood Technology Materials|Stripwood]]''' and glued in place using '''[[Glues and Pastes|PVA Glue]]''' | ||
* Infill panels can be painted, covered with brick patterned paper ''(either downloaded from the internet or purchased)'', or a pattern printed on using simple [https://en.wikipedia.org/wiki/Relief_printing sponge printing or potato printing] type techniques. ''(<span style="color: green">'''Note:''' paint, cover or print the A4 Card before any cutting out or other modelling.</span>)'' | * Infill panels can be painted, covered with brick patterned paper ''(either downloaded from the internet or purchased)'', or a pattern printed on using simple [https://en.wikipedia.org/wiki/Relief_printing sponge printing or potato printing] type techniques. A brick pattern printing block can also be made by gluing small rectangles of ‘foam board’ to a piece of wood using PVA glue. ''(<span style="color: green">'''Note:''' paint, cover or print the A4 Card before any cutting out or other modelling.</span>)'' | ||
* Roof panels can be made ot of thick card and finished in the same way as infill panels. Alternatively separate card tiles can be cut out and layered on - or the roof could be thatched! | * Roof panels can be made ot of thick card and finished in the same way as infill panels. Alternatively separate card tiles can be cut out and layered on - or the roof could be thatched! | ||
* Windows can be printed out from the internet or made from cellophane on to which a criss-cross lattice is drawn with a thin CD pen. | * Windows can be printed out from the internet or made from cellophane on to which a criss-cross lattice is drawn with a thin CD pen. | ||
| Line 27: | Line 27: | ||
---- | ---- | ||
<span style="color: green">'''Note:''' | <span style="color: green">'''Note:''' | ||
Images from the internet can be saved by hovering over them and choosing '''''Save Image As''''' or similar from the right hand mouse button menu options. The saved image will then need to be loaded into software such as [https://en.wikipedia.org/wiki/Microsoft_Paint '''MS Paint'''], '''[[GIMP]]''', [https://en.wikipedia.org/wiki/Microsoft_Paint '''Libre Office Draw'''] and resized to suit the model.</span> | Images from the internet can be saved by hovering over them and choosing '''''Save Image As''''' or similar from the right hand mouse button menu options. The saved image will then need to be loaded into software such as [https://en.wikipedia.org/wiki/Microsoft_Paint '''MS Paint'''], '''[[GIMP]]''', [https://en.wikipedia.org/wiki/Microsoft_Paint '''Libre Office Draw'''], [https://www.microsoft.com/en-gb/store/b/office?invsrc=search&OCID=AID620866_SEM_WVQFFgAAAF0Nz2_U:20170920164211:s&ef_id=WVQFFgAAAF0Nz2_U:20170920164211:s&s_kwcid=AL!4249!3!214110105964!e!!!!ms%20office&ef_id=WVQFFgAAAF0Nz2_U:20170920164211:s '''MS Office'''] and resized to suit the model.</span> | ||
---- | ---- | ||
| Line 34: | Line 34: | ||
View photographs or visit actual '''Tudor Houses''' and draw a simplification of their designs across '''A4 Card''' - either '''Landscape''' or '''Portrait''' as determined by the house style. Start by drawing two lines across the card: one to represent the '''First Floor''' level and one for the '''Attic'''. For '''Gable-ended''' houses, the '''Attic''' level will be determined by first drawing the 45<sup>0</sup> roof angle from the top centre of the '''Portrait''' oriented card. For side-on houses, the '''Gutter''' line will be about 4 times the 8mm square '''Stripwood''' thickness plus the card thickness for the example shown ''(i.e. about 33mm in total)''. | View photographs or visit actual '''Tudor Houses''' and draw a simplification of their designs across '''A4 Card''' - either '''Landscape''' or '''Portrait''' as determined by the house style. Start by drawing two lines across the card: one to represent the '''First Floor''' level and one for the '''Attic'''. For '''Gable-ended''' houses, the '''Attic''' level will be determined by first drawing the 45<sup>0</sup> roof angle from the top centre of the '''Portrait''' oriented card. For side-on houses, the '''Gutter''' line will be about 4 times the 8mm square '''Stripwood''' thickness plus the card thickness for the example shown ''(i.e. about 33mm in total)''. | ||
=====Construction===== | =====Construction===== | ||
| Line 44: | Line 45: | ||
The alternative, 'side-on' '''Tudor House''' designs | The alternative, 'side-on' '''Tudor House''' designs are made similarly with the exception that only a separate '''First Floor''' card is needed. <span style="color: green">'''Note:''' the tops of each of the side spacers and the sides of the frames are cut at 45<sup>0</sup> to match the roof angle and it is this that determines distance down to the gutter</span> | ||
[[File:TudorHouseVersion2.png|600px|center]] | [[File:TudorHouseVersion2.png|600px|center]] | ||
| Line 50: | Line 51: | ||
The two basic designs can be varied in terms of door and window positions for example, and a complete street scene created by assembling several together. | The two basic designs can be varied in terms of door and window positions for example, and a complete street scene created by assembling several together. | ||
[[File:TudorStreetSceneLabelled.png|500px|center]] | [[File:TudorStreetSceneLabelled.png|500px|center]] | ||
---- | |||
<span style="color: blue">'''Activity:''' | |||
See also: '''[[Tudor House Box Model]]''' and '''[[Tudor House Card Cut-Out Model]]''' | |||
</span> | |||
---- | |||
{{Box Modelling Buyers Guide}} | |||
[[Category:The Tudors]] | [[Category:The Tudors]] | ||
[[Category:Primary Technology]] | [[Category:Primary Technology]] | ||
Latest revision as of 10:18, 16 May 2018

Introduction
A complete Tudor Street Scene can be modelled as a series of Tudor House Box Models or using Stripwood Technology type constructions. But full 3D models would take up much time and space and so a semi-3D wall frieze can be a good way of displaying a local scene - (e.g. The Shambles, York).
Preparation
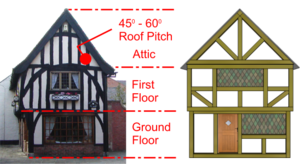
Visit or view photographs of Tudor Houses and note that many have a Ground Floor, First Floor and steeply angled roof which creates space for a room in the Attic. Some may also have a Second Floor. Even earlier than The Tudors there was some standardisation of lengths of timbers and the height of the Ground Floor (e.g. ‘In 1276 [in London] it was ordered that jetties, along with pentices and gutters, should be at least 9ft above the ground so as not to impede horsemen.’ ref. The Construction of Medieval and Tudor Houses in London, by Dr John Schofield).
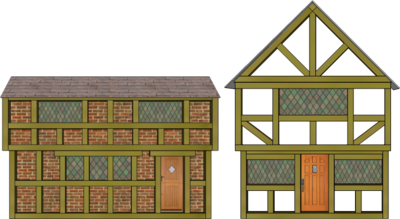
Notice also that many present the steeply angled roof Gable to the street, but several others are 'side on'. This observation suggests that at least two types of relief model will be needed to create a credible street scene.
Materials Available
- A sheet of A4 Card (medium or thick) provides a good starting point: use Portrait for Gable-ended houses and Landscape for others.
- The timber frames can be modelled at this scale by 8mm square Stripwood and glued in place using PVA Glue
- Infill panels can be painted, covered with brick patterned paper (either downloaded from the internet or purchased), or a pattern printed on using simple sponge printing or potato printing type techniques. A brick pattern printing block can also be made by gluing small rectangles of ‘foam board’ to a piece of wood using PVA glue. (Note: paint, cover or print the A4 Card before any cutting out or other modelling.)
- Roof panels can be made ot of thick card and finished in the same way as infill panels. Alternatively separate card tiles can be cut out and layered on - or the roof could be thatched!
- Windows can be printed out from the internet or made from cellophane on to which a criss-cross lattice is drawn with a thin CD pen.
- Doors are made from thick card and most easily finished using a print-out from the internet and Adhesive Tape used to hinge them in position.
Note: Images from the internet can be saved by hovering over them and choosing Save Image As or similar from the right hand mouse button menu options. The saved image will then need to be loaded into software such as MS Paint, GIMP, Libre Office Draw, MS Office and resized to suit the model.
House Designs
View photographs or visit actual Tudor Houses and draw a simplification of their designs across A4 Card - either Landscape or Portrait as determined by the house style. Start by drawing two lines across the card: one to represent the First Floor level and one for the Attic. For Gable-ended houses, the Attic level will be determined by first drawing the 450 roof angle from the top centre of the Portrait oriented card. For side-on houses, the Gutter line will be about 4 times the 8mm square Stripwood thickness plus the card thickness for the example shown (i.e. about 33mm in total).
Construction
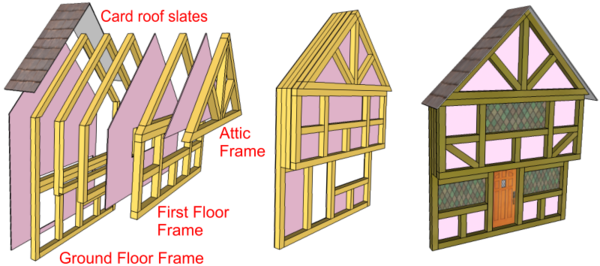
The card for Gable-ended designs should be cut along the roof lines and the design for the First Floor and Attic reproduced on separate pieces of card. These will be spaced out and 'sandwiched' by layers of Stripwood to create the Attic projection and the overhanging Jetty as shown.
Windows and doorways should be cut out and the Card surfaces finished before assembling together with Stripwood spacers and frames. The lengths of Stripwood are most easily painted before being glued on to the card pieces.
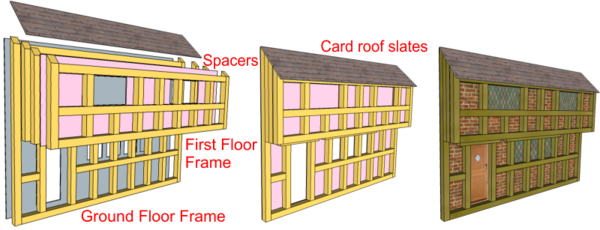
The alternative, 'side-on' Tudor House designs are made similarly with the exception that only a separate First Floor card is needed. Note: the tops of each of the side spacers and the sides of the frames are cut at 450 to match the roof angle and it is this that determines distance down to the gutter
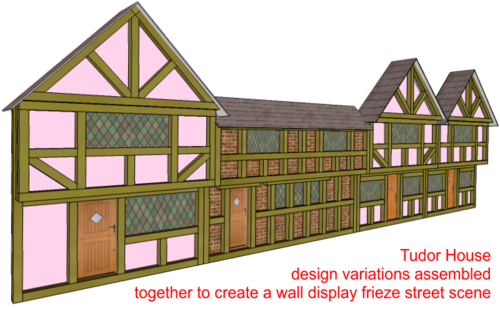
The two basic designs can be varied in terms of door and window positions for example, and a complete street scene created by assembling several together.
Activity: See also: Tudor House Box Model and Tudor House Card Cut-Out Model
Safety Point! Take great care with hot glue guns and all hot-melt glues. The melted glue can stick to the skin and cause severe burns.


