String Tidy: Difference between revisions
From DT Online
m Changed images |
mNo edit summary |
||
| (21 intermediate revisions by the same user not shown) | |||
| Line 1: | Line 1: | ||
[[File:StringTidy.png| | [[File:StringTidy.png|200px|right]] | ||
__TOC__ | |||
=====What to Make:===== | |||
''(Designers might call this the Design Brief and/or the Specification)'' | |||
| Line 6: | Line 11: | ||
__TOC__ | |||
=====What to Use:===== | |||
* Good quality card tube can be cut to length for the body ''(e.g. postal tubes)'' | |||
* Ready cut wooden discs can be used for the ends ''(or use plastic end caps for postal tubes)'' | |||
* Plastics tube can also be used ''(e.g. rainwater pipes)'' | |||
* Decoration can be applied by wrapping around a '''[[Colour Printing|computer print-out]]''', applying shapes cut out of self-adhesive plastics, '''[[decoupage]]''', or paint. | |||
=====Things to find out and think about:===== | |||
* Collect small boxes and containers to look at how they are made and how their lids fit. | * Collect small boxes and containers to look at how they are made and how their lids fit. | ||
* How big should the container be? You will need to measure some balls of string | * How big should the container be? You will need to measure some balls of string | ||
* What size of string will be stored? | * What size of string will be stored? This will determine the size of hole or slot the string is drawn through. | ||
* How will the container be filled and emptied? | * How will the container be filled and emptied? You will probably need to have at least one end that releases in some way. | ||
* Will the container be used outside ''(e.g. in the garden)'' and if so, will it need to be weatherproof? | * Will the container be used outside ''(e.g. in the garden)'' and if so, will it need to be weatherproof? | ||
* How will the string be drawn out of the container? | * How will the string be drawn out of the container? | ||
* How will the string be cut to length? | * How will the string be cut to length? A cutter could be built-in or provision made for a separate cutting tool to be stored within the design. | ||
=====Some ideas:===== | |||
[[File:StringTidyGroup.png|500px|right]] | |||
<div style="clear: both;"></div> | |||
=====Ways of Making:===== | |||
{| | {| | ||
|- | |- | ||
| Line 43: | Line 44: | ||
---- | ---- | ||
<span style="color: green">'''Note:''' | <span style="color: green">'''Note:''' | ||
'''‘Squareness’''' is a word used by engineers to describe something which is a right angles or 90 degrees. They might perform a similar test using a '''[[Surface Plate]]''' and Try Square | '''‘Squareness’''' is a word used by engineers to describe something which is a right angles or 90 degrees. They might perform a similar test using a '''[[Precision Marking and Measuring|Surface Plate]]''' and Try Square | ||
</span> | </span> | ||
---- | ---- | ||
| [[File:TestingTubeEndSquareness.png| | | [[File:TestingTubeEndSquareness.png|200px|right]] | ||
|- | |- | ||
| Decide how long to cut the tube ''(don't forget to allow for the top and | | Decide how long to cut the tube ''(don't forget to allow for the top and bottom fitting into the tube)''. Stand the tube upright on a flat surface together with a block or wood or similar with a height equal to the length of tube to be cut ''(less half the diameter of a pencil if you wish to be exact)''. Hold the pencil on top of the wood block and rotate the tube to draw a cutting line around it. | ||
---- | ---- | ||
<span style="color: green">'''Note:''' | <span style="color: green">'''Note:''' | ||
'''Engineers''' would use a '''[[Surface | '''Engineers''' would use a '''[[Precision Marking and Measuring|Surface Gauge]]''' for very accurate work, or a '''[[Precision Marking and Measuring|Scribing Block]]''' to mark lengths along bars and tubes. | ||
</span> | </span> | ||
---- | ---- | ||
| [[File:PencilBlock.png| | | [[File:PencilBlock.png|200px|right]] | ||
|- | |- | ||
| It may be possible to hold smaller diameter tubes ''(e.g. less than 50mm dia.)'' against a '''[[Bench Hook]]''' whilst it is being cut using a '''[[Hacksaw|Junior Hacksaw]]'''. Slowly rotate the tube as it is cut along the marked out line. | | It may be possible to hold smaller diameter tubes ''(e.g. less than 50mm dia.)'' against a '''[[Bench Hook]]''' whilst it is being cut using a '''[[Hacksaw|Junior Hacksaw]]'''. Slowly rotate the tube as it is cut along the marked out line. | ||
| Line 62: | Line 63: | ||
</span> | </span> | ||
---- | ---- | ||
| [[File:SawingSmallTube.jpg| | | [[File:SawingSmallTube.jpg|200px|right]] | ||
|- | |- | ||
| Larger diameter tube may be better held in an '''[[Engineers Vice]]''' whilst it is being sawn. | | Larger diameter tube may be better held in an '''[[Engineers Vice]]''' whilst it is being sawn. | ||
| [[File:SawingLargeTube.jpg| | | [[File:SawingLargeTube.jpg|200px|right]] | ||
|- | |- | ||
| The tops and bottoms of the tube container can be made out of discs of '''[[MDF]]''' or '''[[Ply]]''' or similar. Choose a thickness of about 6mm for most purposes and mark out the required diameter using a '''[[Pencil Compass]]'''. | | The tops and bottoms of the tube container can be made out of discs of '''[[Manufactured Board|MDF]]''' or '''[[Manufactured Board|Ply]]''' or similar. Choose a thickness of about 6mm for most purposes and mark out the required diameter using a '''[[Drawing Instruments|Pencil Compass]]'''. | ||
---- | ---- | ||
<span style="color: green">'''Note:''' | <span style="color: green">'''Note:''' | ||
'''Engineers''' would use '''[[Dividers]]''' and a Carpenter might use a '''[[Wing Compass]]''' to do this.</span> | '''Engineers''' would use '''[[Dividers and Compasses|Dividers]]''' and a Carpenter might use a '''[[Dividers and Compasses|Wing Compass]]''' to do this.</span> | ||
| [[File:MarkingOutDisc.jpg| | | [[File:MarkingOutDisc.jpg|200px|right]] | ||
|- | |- | ||
| <span style="color: green">They may also use '''[[ | | <span style="color: green">They may also use '''[[Oddleg Calipers]]''' to find the centre of a disc with an unknown centre ''(e.g. if using discs which have been '''Stamped''' or '''Punched''' out of a sheet)'' | ||
</span> | </span> | ||
---- | ---- | ||
| [[File:OddLegsCentreFinding.jpg|100px|right]] | | [[File:OddLegsCentreFinding.jpg|100px|right]] | ||
|- | |- | ||
| Discs | | Discs marked out on '''[[Manufactured Board|MDF]]''' or '''[[Manufactured Board|Ply]]''' can be cut out using a '''[[Scroll Saw]]''' or the work may be held in a '''[[Engineers Vice|Vice]]''' and cut out by hand using a '''[[Coping Saw]]''' | ||
| [[File:UsingCopingSaw.jpg| | | [[File:UsingCopingSaw.jpg|200px|right]] | ||
|- | |- | ||
| A number of discs will be needed to make the String Tidy: two for the top and one or two for the bottom. The top discs are glued together to make a lid so one needs to be the outside diameter of the tube and another made to be a snug fit on the inside of the tube. The discs can be finished to size by hand using '''[[Files and Rasps|Files]]''' or more accurately using a '''[[Disc Sander]]'''. The bottom of the tube can be filled the same way or by gluing a single disc to the inside. | | A number of discs will be needed to make the String Tidy: at least two for the top and one or two for the bottom. The top discs are glued together to make a lid so one needs to be the outside diameter of the tube and another made to be a snug fit on the inside of the tube. The discs can be finished to size by hand using '''[[Files and Rasps|Files]]''' or more accurately using a '''[[Disc Sander]]'''. The bottom of the tube can be filled the same way or by gluing a single disc to the inside. Alternatively the plastics end cap of a Postal Tube can be used. | ||
---- | ---- | ||
<span style="color: green">'''Note:''' | <span style="color: green">'''Note:''' | ||
| Line 95: | Line 96: | ||
</span> | </span> | ||
---- | ---- | ||
| [[File:TubeBoxAssy.jpg| | Alternatively, the surface of the tube could be decorated by '''[[Decoupage]]''' using images cut out of magazines - or the tubes could be painted. | ||
---- | |||
<span style="color: green">'''Note:''' | |||
If water-based paints are used they can be made more durable and given a '''‘Glaze’''' by painting over with '''[[Glues and Pastes|PVA]]''' adhesive. | |||
</span> | |||
---- | |||
| [[File:TubeBoxAssy.jpg|200px|right]] | |||
|} | |} | ||
=====Testing:===== | |||
* Is the top easy to remove? | * Is the top easy to remove? | ||
| Line 108: | Line 116: | ||
* Does your decoration make it clear what is inside? | * Does your decoration make it clear what is inside? | ||
=====Further Work:===== | |||
* '''[[Appliqué]]''' decoration to top | |||
Add a means of cutting the string or twine | |||
See also | * Add a means of cutting the string or twine | ||
* See also '''[[Making Containers from Tube]]''' and '''[[Silversmithing Cylinders]]''' | |||
{{Graphics Products Buyers Guide}} | |||
[[Category:Primary]] | |||
[[Category:Topics, Projects and Tasks]] | |||
[[Category:Manufacturing Projects]] | |||
[[Category:Boxes and Containers]] | |||
Latest revision as of 17:35, 11 June 2017
What to Make:
(Designers might call this the Design Brief and/or the Specification)
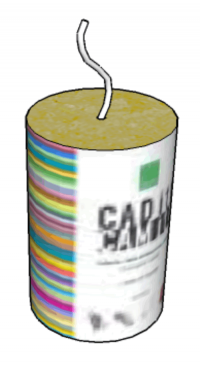
Design, make and decorate a small round container to hold a ball of string ready for use.
What to Use:
- Good quality card tube can be cut to length for the body (e.g. postal tubes)
- Ready cut wooden discs can be used for the ends (or use plastic end caps for postal tubes)
- Plastics tube can also be used (e.g. rainwater pipes)
- Decoration can be applied by wrapping around a computer print-out, applying shapes cut out of self-adhesive plastics, decoupage, or paint.
Things to find out and think about:
- Collect small boxes and containers to look at how they are made and how their lids fit.
- How big should the container be? You will need to measure some balls of string
- What size of string will be stored? This will determine the size of hole or slot the string is drawn through.
- How will the container be filled and emptied? You will probably need to have at least one end that releases in some way.
- Will the container be used outside (e.g. in the garden) and if so, will it need to be weatherproof?
- How will the string be drawn out of the container?
- How will the string be cut to length? A cutter could be built-in or provision made for a separate cutting tool to be stored within the design.
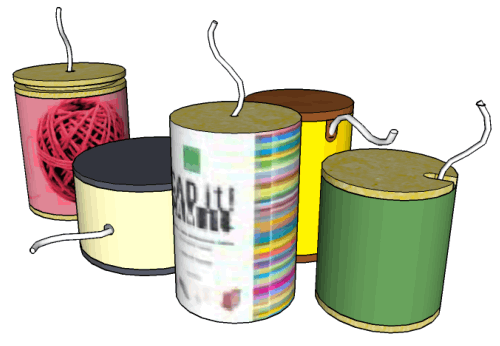
Some ideas:
Ways of Making:
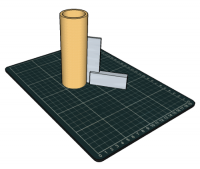
| Find a length of tube which is big enough to hold a ball or bobbin of string. Check that the end is ‘square’ by standing it upright on a flat surface and holding a Try Square against it.
Note: ‘Squareness’ is a word used by engineers to describe something which is a right angles or 90 degrees. They might perform a similar test using a Surface Plate and Try Square |
 |
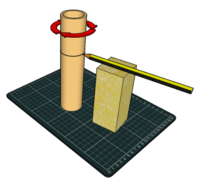
| Decide how long to cut the tube (don't forget to allow for the top and bottom fitting into the tube). Stand the tube upright on a flat surface together with a block or wood or similar with a height equal to the length of tube to be cut (less half the diameter of a pencil if you wish to be exact). Hold the pencil on top of the wood block and rotate the tube to draw a cutting line around it.
Note: Engineers would use a Surface Gauge for very accurate work, or a Scribing Block to mark lengths along bars and tubes. |
 |
| It may be possible to hold smaller diameter tubes (e.g. less than 50mm dia.) against a Bench Hook whilst it is being cut using a Junior Hacksaw. Slowly rotate the tube as it is cut along the marked out line.
Note: The Bench Hook could be held in a Carpenters Vice to make it more secure. |
 |
| Larger diameter tube may be better held in an Engineers Vice whilst it is being sawn. | 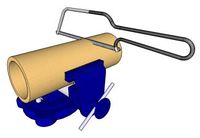 |
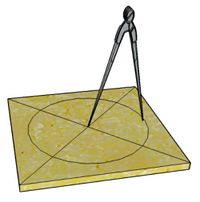
| The tops and bottoms of the tube container can be made out of discs of MDF or Ply or similar. Choose a thickness of about 6mm for most purposes and mark out the required diameter using a Pencil Compass.
Note: Engineers would use Dividers and a Carpenter might use a Wing Compass to do this. |
 |
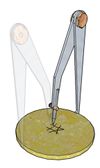
| They may also use Oddleg Calipers to find the centre of a disc with an unknown centre (e.g. if using discs which have been Stamped or Punched out of a sheet)
|
 |
| Discs marked out on MDF or Ply can be cut out using a Scroll Saw or the work may be held in a Vice and cut out by hand using a Coping Saw |  |
| A number of discs will be needed to make the String Tidy: at least two for the top and one or two for the bottom. The top discs are glued together to make a lid so one needs to be the outside diameter of the tube and another made to be a snug fit on the inside of the tube. The discs can be finished to size by hand using Files or more accurately using a Disc Sander. The bottom of the tube can be filled the same way or by gluing a single disc to the inside. Alternatively the plastics end cap of a Postal Tube can be used.
Note: If available, a small Lathe would be the most accurate way of fitting discs to suit the tube. Either mount the disc on a Mandrel or grip the disc against a pad held in the Chuck using a Rotating Centre . |
 |
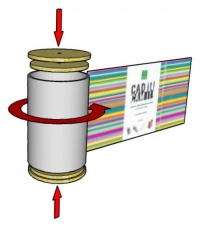
| A decorative wrapper can be made by Colour Printing a rectangle with a length equal to the Circumference of the tube used and width equal to the tube length.
Note: For some practical purposes, the Circumference can be estimated by simply multiplying the diameter by three. This is a little less than it should be but if the wrapper is glued with water based glue it is likely to stretch slightly and fit. Alternatively, the surface of the tube could be decorated by Decoupage using images cut out of magazines - or the tubes could be painted. Note: If water-based paints are used they can be made more durable and given a ‘Glaze’ by painting over with PVA adhesive. |
 |
Testing:
- Is the top easy to remove?
- How can it be made easier?
- Is the top secure?
- How could it be fixed more firmly?
- Does the box hold a good range if string products?
- Can the string be dispensed without the ball or bobbin getting tangled?
- Does your decoration make it clear what is inside?
Further Work:
- Appliqué decoration to top
- Add a means of cutting the string or twine
- See also Making Containers from Tube and Silversmithing Cylinders


