Tudor House Card Cut-Out Model: Difference between revisions
From DT Online
Created Article |
m Added links |
||
| (10 intermediate revisions by the same user not shown) | |||
| Line 1: | Line 1: | ||
[[File:TimberedCardCutOut.png| | [[File:TimberedCardCutOut.png|400px|right]] | ||
__TOC__ | __TOC__ | ||
| Line 11: | Line 11: | ||
The | The parts needed to assemble models at approximately 1/50th full-size can be organised to fit on to A4 size thin card. It is possible therefore to research a real building of interest, draw it to scale on computer, include all colours and textures, add glue tabs, then print out directly on to thin card to create the model as described through the example given below. To add reality, the colours and textures could be obtained from actual photographs of the building in question and, if required, an entire street scene or townscape could be created in this way. | ||
[[File:TimberedCardCutOutSide-Tabbed.png| | [[File:TimberedCardCutOutSide-Tabbed.png|350px|right]] | ||
| Line 18: | Line 18: | ||
Sides and front views of the '''Tudor House''' can be researched, estimated or scaled from a photograph and drawn out as accurately as possible. Colours and textures can be added. | Sides and front views of the '''Tudor House''' can be researched, estimated or scaled from a photograph and drawn out as accurately as possible. It is important to check that the heights in each view are the same. Colours and textures can be added. | ||
| Line 33: | Line 33: | ||
The floor and roof sections are simple rectangles, the sizes of which can be can be measured off the other two views. | The floor and roof sections are simple rectangles, the sizes of which can be can be measured off the other two views. | ||
<div style="clear: both;"></div> | |||
[[File:TudorHouse1.pdf|150px|left|Download a PDF containing full-size drawings for the example as described above]] | |||
[[:File:TudorHouse1.pdf|Download a PDF containing full-size drawings for the example as described above. | [[:File:TudorHouse1.pdf|Download a PDF containing full-size drawings for the example as described above. | ||
Print out directly on to thin card, cut, fold and glue together a Tudor House model as shown]] | Print out directly on to thin card, cut, fold and glue together a Tudor House model as shown. | ||
Click to Download then click again to open a Print Version. | |||
''(Ensure the Printer Layout is set to Landscape)''.]] | |||
----- | |||
<div style="clear: both;"></div> | <div style="clear: both;"></div> | ||
=====Adding Timber Detail===== | =====Adding Timber Detail===== | ||
| Line 51: | Line 54: | ||
[[File:TudorHouseJettyAssy.png| | [[File:TudorHouseJettyAssy.png|175px|left]] | ||
If the '''Tudor House''' is to have a [https://en.wikipedia.org/wiki/Jettying '''Jetty'''] the front of the Tudor House should be considered in three sections: Ground Floor, First Floor, and Attic. These can be 'timbered' separately on their front sides and extra timbers added to their reverse sides as they are assembled to overhangs for the Attic and the Jetty. | If the '''Tudor House''' is to have a [https://en.wikipedia.org/wiki/Jettying '''Jetty'''] the front of the Tudor House should be considered in three sections: Ground Floor, First Floor, and Attic. These can be 'timbered' separately on their front sides and extra timbers added to their reverse sides as they are assembled to create overhangs for the Attic and the Jetty. ''(<span style="color: green">Note: the strips to create the Jetty stop short of the edge to allow for the thickness of the sides</span>)''. | ||
[[File:TimberedCardCutOutAssy.png|500px|right]] | |||
The floor and roof sections could be simple rectangles of thicker card, the sizes of which are measured off the other two views. For extra detail, '''[[:Category:Stripwood Technology|Stripwood]]''' can be added to the underside of the roof sheets to simulate [https://en.wikipedia.org/wiki/Rafter '''Rafters''']. | |||
The floor and roof sections are simple rectangles, the sizes of which can be can be measured off the other two views. | |||
<div style="clear: both;"></div> | |||
[[File:TudorHouse2.pdf|150px|left|Download a PDF containing full-size drawings for the example as described above]] | |||
[[:File:TudorHouse2.pdf|Download a PDF containing full-size drawings for the example as described above. | |||
Print out directly on to thin card, cut, fold and glue together a Tudor House model as shown. | |||
Click to Download then click again to open a Print Version. | |||
''(Ensure the Printer Layout is set to Landscape)''.]] | |||
---- | |||
<span style="color: blue">'''Activity:''' | |||
Card cut-out models have at times been a promotional feature on packaging such as Cereal Boxes. A set of Tudor Houses to create an historic street scene coud be a suitable theme for such models. Design a card cut-out Tudor House at a scale suitable for this purpose. In addition to identifying house designs and types, selection of an appropriate scale should be researched to leave open the option of integrating the house with other scale models which are commercially available ''(e.g. [https://en.wikipedia.org/wiki/List_of_rail_transport_modelling_scale_standards model railway scales], [https://en.wikipedia.org/wiki/Wooden_toy_train Brio], [https://en.wikipedia.org/wiki/Hornby_Railways Hornby], [https://en.wikipedia.org/wiki/Airfix Airfix], [https://en.wikipedia.org/wiki/Dinky_Toys Dinky], [https://en.wikipedia.org/wiki/Corgi_Classics Corgi], [https://en.wikipedia.org/wiki/Lego_Duplo Duplo], [http://lego.wikia.com/wiki/Minifigure Lego], [https://en.wikipedia.org/wiki/Playmobil Playmobile])'' | |||
</span> | |||
---- | |||
<span style="color: blue"> | |||
See also: '''[[Tudor House Box Model]]''' and '''[[Tudor Street Scene]]''' | |||
</span> | |||
---- | |||
{{Box Modelling Buyers Guide}} | |||
[[Category:The Tudors]] | [[Category:The Tudors]] | ||
[[Category:Graphics and Modelling Tasks]] | |||
[[Category:Tasks]] | |||
[[Category:Topics, Projects and Tasks]] | |||
Latest revision as of 10:12, 16 May 2018
Introduction
Tudor Houses can be modelled by creating scaled drawings on card which is cut, folded and glued together to assemble a 3D model. The scaled drawing can be produced using a variety of techniques including:
- by hand using Drawing Instruments and Technical Drawing methods;
- by cutting out a template first drawn on Squared Paper
- using a computer with graphics or CAD software.
The parts needed to assemble models at approximately 1/50th full-size can be organised to fit on to A4 size thin card. It is possible therefore to research a real building of interest, draw it to scale on computer, include all colours and textures, add glue tabs, then print out directly on to thin card to create the model as described through the example given below. To add reality, the colours and textures could be obtained from actual photographs of the building in question and, if required, an entire street scene or townscape could be created in this way.
Creating the Design
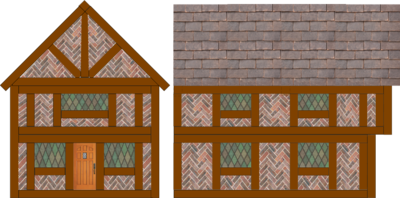
Sides and front views of the Tudor House can be researched, estimated or scaled from a photograph and drawn out as accurately as possible. It is important to check that the heights in each view are the same. Colours and textures can be added.
Windows may be added as an illustration or left blank and, after assembly, filled with cellophane or similar, on to which typical criss-cross lattice window panes have been drawn using a CD Marker Pen.
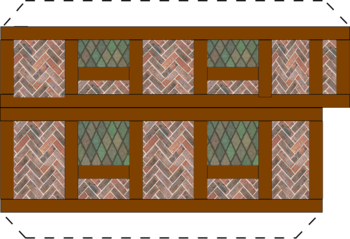
To complete the design, consideration needs to be given to how the various pieces will be assembled together and glue tabs added as required.
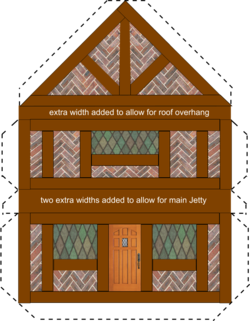
If the Tudor House is to have a Jetty then extra material has to be added between floors to allow for the overhangs.
The floor and roof sections are simple rectangles, the sizes of which can be can be measured off the other two views.

Adding Timber Detail
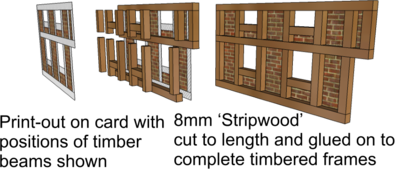
With some minor modification, the design can be modified to enable lengths of Stripwood to be added to the exterior of the cut-out model to add realism.
Glue tabs can be omitted from the design since the edges of the timber strips will provide the necessary gluing surface.
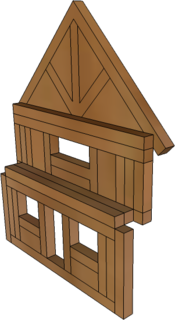
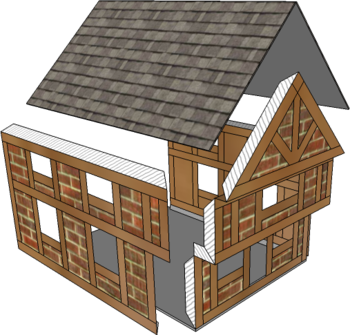
If the Tudor House is to have a Jetty the front of the Tudor House should be considered in three sections: Ground Floor, First Floor, and Attic. These can be 'timbered' separately on their front sides and extra timbers added to their reverse sides as they are assembled to create overhangs for the Attic and the Jetty. (Note: the strips to create the Jetty stop short of the edge to allow for the thickness of the sides).
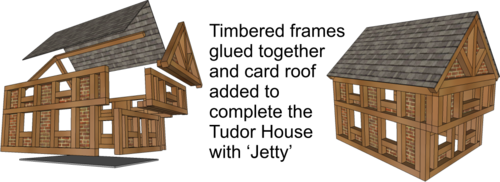
The floor and roof sections could be simple rectangles of thicker card, the sizes of which are measured off the other two views. For extra detail, Stripwood can be added to the underside of the roof sheets to simulate Rafters.
The floor and roof sections are simple rectangles, the sizes of which can be can be measured off the other two views.

Activity: Card cut-out models have at times been a promotional feature on packaging such as Cereal Boxes. A set of Tudor Houses to create an historic street scene coud be a suitable theme for such models. Design a card cut-out Tudor House at a scale suitable for this purpose. In addition to identifying house designs and types, selection of an appropriate scale should be researched to leave open the option of integrating the house with other scale models which are commercially available (e.g. model railway scales, Brio, Hornby, Airfix, Dinky, Corgi, Duplo, Lego, Playmobile)
See also: Tudor House Box Model and Tudor Street Scene
Safety Point! Take great care with hot glue guns and all hot-melt glues. The melted glue can stick to the skin and cause severe burns.


