Tudor House Box Model: Difference between revisions
From DT Online
m Added Category |
m Added Buyers Guide |
||
| Line 44: | Line 44: | ||
Many '''Tudor Houses''' in townships were also shops aligned along crowded streets. Shop frontage was limited and so, to create additional living space, upper floors were extended to overhang the lower ground floor shop fronts. These overhangs were known as [https://en.wikipedia.org/wiki/Jettying '''Jetties'''] and they can be modelled by choosing two suitably sized boxes as a starting point. | Many '''Tudor Houses''' in townships were also shops aligned along crowded streets. Shop frontage was limited and so, to create additional living space, upper floors were extended to overhang the lower ground floor shop fronts. These overhangs were known as [https://en.wikipedia.org/wiki/Jettying '''Jetties'''] and they can be modelled by choosing two suitably sized boxes as a starting point. | ||
{{Box Modelling Buyers Guide}} | |||
[[Category:The Tudors]] | [[Category:The Tudors]] | ||
[[Category:Primary Technology]] | [[Category:Primary Technology]] | ||
Revision as of 12:57, 20 September 2017

Introduction
Box Modelling can provide a convenient starting point for modelling Tudor Houses. If new and unused boxes or cartons are not available, it is usually best to take the box apart and turn it inside out to present a clean unpainted surface to the outside. This is easier to paint on and glue things to. Whether using a new or a used box, most of the work can be done on it when it is folded out flat.

Modifying the Box Net
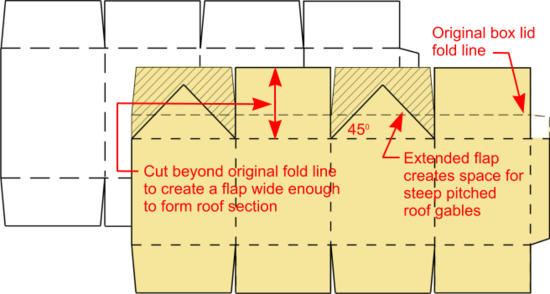
Much depends upon the particular box or carton design used but some lend themselves to being modified such that the roof sections can be included and others don't.
The issue arises because the roofs of Tudor houses are set at a steep angle, or pitch. This should be at least 450, up to as much as 600, and the end flaps of most boxes are not large enough to accommodate this. One solution is to cut beyond the original fold line to extend the flap as shown.

Accommodating a Roof
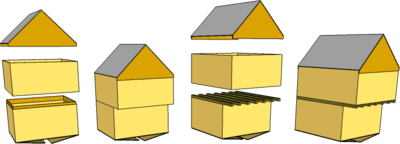
To avoid extending the box net end flaps beyond simply accommodating the steeply angled gable ends, the roof slates can be added separately.
Alternatively, the original box net can be left entirely unchanged and a completely separate roof section, including its gable ends, made from card and added.
Adding Detail to the Box Net
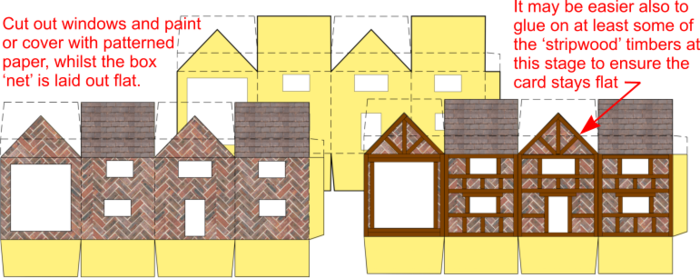
It is much easier to do most work on the model whilst the box net is folded out flat. Using a Craft Knife and a Safety Ruler the card can be laid on a Cutting Mat to cut out windows, doorways and modify the end flaps if needed.
The flattened net can be painted or covered with patterned paper at this stage (Suitable patterns can be searched for on the internet and printed off or brick patterned paper for example, can be purchased). Water-based paints and pastes will inevitably buckle and distort the card and so it will need to be pressed or weighted flat again when dry.
Some of the longer lengths of Stripwood to model the timber frame could also be added whilst the net is folded flat - or, indeed, the whole timber frame could be added at this stage. The lengths of Stripwood will help keep the box sides flat after they are folded back together making it easier to fix any final details.


Selecting the Boxes to create a Jetty
Many Tudor Houses in townships were also shops aligned along crowded streets. Shop frontage was limited and so, to create additional living space, upper floors were extended to overhang the lower ground floor shop fronts. These overhangs were known as Jetties and they can be modelled by choosing two suitably sized boxes as a starting point.
Safety Point! Take great care with hot glue guns and all hot-melt glues. The melted glue can stick to the skin and cause severe burns.


