Actions

Scales: Difference between revisions

From DT Online

(Added Template)
(Added Main Image)
Line 1: Line 1:
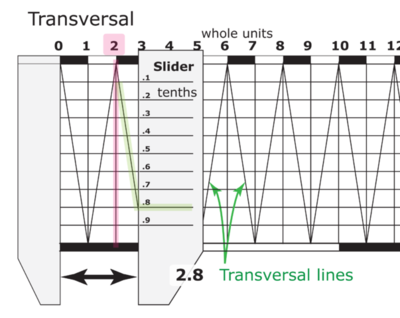
[[File:Transversal_Use.png|400px|right|Diagonal Scale|link=https://en.wikipedia.org/wiki/File:Transversal_Use.png]]
[[File:603px-Transversal Use.png|400px|right|Diagonal Scale|link=https://en.wikipedia.org/wiki/File:Transversal_Use.png]]
__TOC__
__TOC__


Revision as of 19:12, 5 July 2016

Diagonal Scale


Description

A Scale can be used if a full-size (or true-size) drawing would be too big to fit on the paper being used or where drawing at larger than full-size is useful to show greater detail (e.g. when designing a circuit board). They can also be used to convert units of measurement (e.g. objects measured in inches drawn full-size, but in millimetres on the drawing).


Drawing at full-size is said to be drawn at a ratio of 1 : 1 (i.e. 1 unit in reality is drawn as 1 unit on paper). For a drawing to be half-size 1 unit in reality would be equal to ½ size units on paper, so would have a ratio of 1 : 2, quarter-size would be 1 : 4 and so on. The ratios are derived from a Representative Fraction which is given as:


RepresentativeFraction.png


Plain Scale
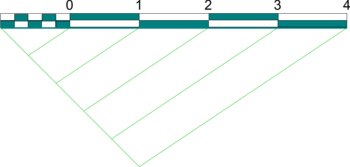
  • Start by deciding how many units long the scale needs to be (e.g. the longest dimension on the drawing).
  • Draw a line to represent this length to scale (e.g. half actual size)
  • From one end, a second line at an angle to it.
  • Step off along this second line equal divisions of any convenient size up to the number of units required.
  • Join the end of the last division to the end of the first line and draw lines parallel to it through all other divisions as shown.
  • Sub-divide the first scale division as required using a similar procedure and start numbering the scale from the end of this.

PlaneScale.png
Diagonal Scale
  • It is not practical to create very small sub-divisions on Plain Scale, hence the need for a Diagonal Scale.
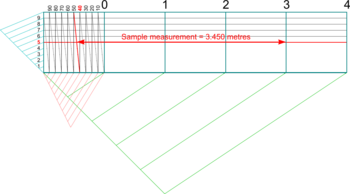
  • Begin by creating a Plain Scale as above but draw a rectangle equal to the length of scale and any convenient height.
  • Create the major sub-divisions as before (e.g. ¼, ½, ¾, or cm, etc.) and extend the divisions vertically.
  • Divide the height of the rectangle into as many minor sub-divisions as are needed (e.g. ⅛,⅜,⅝,⅞ or mm, etc.) and draw horizontal lines through the points.
  • Draw diagonals to each of the vertical rectangles created by extending the sub-divisions.
  • Half way up, a diagonal would cross the rectangle at half its width and so on, thus providing the minor sub-divisions (see the example measurement shown of 3.450 metres).

DiagonalScale.png

Note: There are occasions when drawing accurately to scale can provide more than a good representation, or model, of the finished product. Scale drawings can be measured from and used to transfer sizes of a complex shape on to a large sheet of material for example, but in general and with the advent of CAD, measuring off an Engineering Drawing is not as common as it once was - and has never been satisfactory for really accurate work.
DT Online Buyers' Guide
Helix Oxford Maths Set Linex Student Saver Bundle Helix Precision Plus Drawing Set Primary Shape Template Set Linex Circle Template Helix National Curriculum Drawing Set Helix 3 Piece Stencil Set Linex Universal Architects Template French Curve Transparent Template <img src=
Helix Oxford Maths Set Linex Student Saver Bundle Helix Precision Plus Drawing Set Primary Shape Template Set Linex Circle Template Helix National Curriculum Drawing Set Helix 3 Piece Stencil Set Linex Universal Architects Template French Curve Transparent Template T-Square