Wired Edge: Difference between revisions
From DT Online
Created article |
mNo edit summary |
||
| Line 16: | Line 16: | ||
* Complete any other folds for joints and seams. | * Complete any other folds for joints and seams. | ||
* Form a length of wire to suit the perimeter of the finished edge and tucked it into the previously formed channel. | * Form a length of wire to suit the perimeter of the finished edge and tucked it into the previously formed channel. | ||
* Lie the workpiece with its top edge face down on a '''[[Bench Block]]''' or similar surface and tuck the edge of metal down on to the wire with a '''[[Peening Hammer]]''' to complete the edge. | * Lie the workpiece with its top edge face down on a '''[[Creasing Iron]]''', '''[[Bench Block]]''' or similar surface and tuck the edge of metal down on to the wire with a '''[[Peening Hammer]]''' to complete the edge. | ||
---- | ---- | ||
<span style="color: green">'''Note:''' | <span style="color: green">'''Note:''' | ||
Latest revision as of 18:01, 30 May 2017

Description
The edges of thin sheet metals can be made safe and given additional rigidity by folding the top rim around a thick wire to create a Wired Edge type of Hem.
Making the Joint

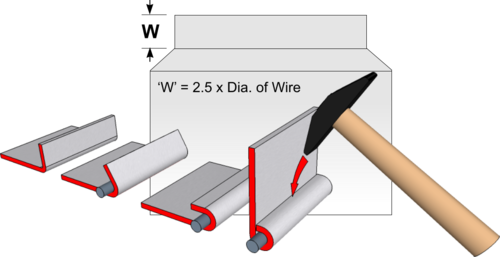
- Mark out the Development, or pattern, of the object to be made allowing an extra 2.5 times the diameter of wire to be used along its top edge (plus any other allowances for joints and seams).
- Where possible, the initial folds to create the Wired Edge are made whilst the sheet is still flat using Folding Bars and Hatchet Stake or Bench Folder.
- Bend the folded angle down on to a strip of scrap metal of thickness equal to the wire diameter using a Boxwood or Rawhide Mallet on to a Bench Block or similar surface.
- Complete any other folds for joints and seams.
- Form a length of wire to suit the perimeter of the finished edge and tucked it into the previously formed channel.
- Lie the workpiece with its top edge face down on a Creasing Iron, Bench Block or similar surface and tuck the edge of metal down on to the wire with a Peening Hammer to complete the edge.
Note: Use a Mallet and not a Hammer initially to avoid stretching the metal as it is struck (this would cause the edge to curl and distort).


