Actions

Nets and Developments

From DT Online
Revision as of 22:08, 1 June 2015 by DT Online (talk | contribs)
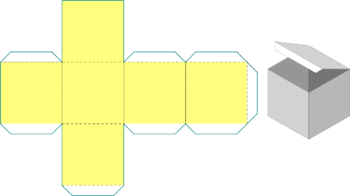
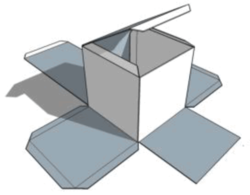
CubePackageNet.png

Nets and Developments are alternative names for the pattern you would need to cut out of a flat sheet to create a shape that can be folded up to form a 3 dimensional object.


Mathematicians tend to use the term ‘Net’ whereas engineers and technologists more commonly use the term ‘Development’ - perhaps because they wish to add details such as glue tabs to make sure the nets can be made in reality - but the two words are really synonymous.


Cube
  • Cubes have 6 faces so 6 squares are linked together to create the ‘Net’
  • There are 11 different ways of doing this - can you think of them all?
  • Try drawing round a square shape or ‘template’ to discover as many as you can (see ‘Geometric relations’ )
  • The completed ‘Development’ would need to have glue tabs added or some form of interlocking design, if the cube is to be made up into a real box.
  • Dotted lines can also be used to show where to fold.
CubeNet3.png
Prism
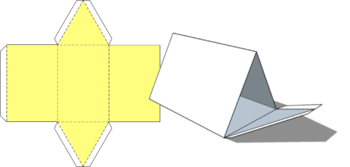
  • The development of a prism may start with rectangle of length equal to the sum of all sides and height equal to the prism length.
  • Polygons of the same size and shape as the prism cross-section (triangles in this case) are then added to complete the net as shown.

Note: Polygons be constructed using the prism sides as a base - see Polygons


  • An alternative is to start with the polygon and to each side add a rectangle of the same dimensions as the prism sides.
  • Using squared paper can be helpful when drawing nets and developments.

PrismNet2.png
Pyramid
  • Pyramids may be developed by linking together from a common point, the requisite number of triangles of the same dimensions (i.e. congruent) as pyramid sides.
  • A polygon of the same size and shape as the pyramid base can then be added to complete the net.
  • An alternative is to start with the base polygon and to each side add a triangle of the same dimensions as the prism sides.
PyramidNet.png
Cylinder
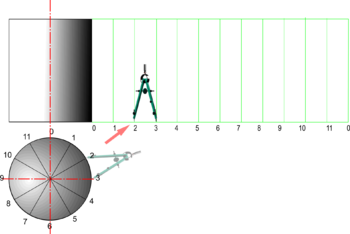
  • The development of a cylinder is essentially a rectangle of length equal to the cylinder circumference and height equal to its height.
  • A convenient way of marking out a length equal to the circumference, is to divide the base circle into a number of equal parts (say, 12) and step these off along a line as shown.
  • If the cylinder is ‘closed’, the sub-divided base circle may have glue tabs attached to each sector and be used to make end caps.

CylinderNet.png
Cone
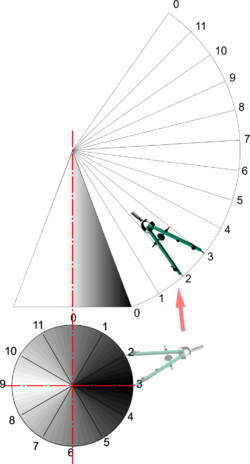
  • Drawing the net of a cone is most easily done by starting from a point and striking an arc of radius equal to the length of side of the cone as shown.
  • Divide the base circle into a number of equal parts (say, 12) and step these off along the arc.
  • The sub-divided base circle may have glue tabs attached to each sector and be used to make a base cap for the cone.

Note: Pyramids may also be drawn more easily in this way.


ConeNet.png

Note: Find some empty packaging and take it apart to see the real examples of ‘nets’ or ‘developments’ used to make them. Notice how and where they are joined so they hold together.