Veneering
From DT Online
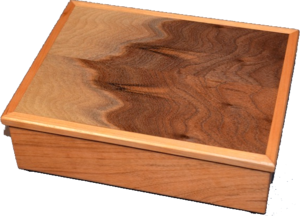
Description
Veneers are thin slices of timber are Laminated on to a core material, usually a Manufactured Board, in order to provide an enhanced or decorative appearance. Veneering enables the sustainable use of rare and exotic timbers and the use of some timbers which may be too brittle or difficult to work otherwise.
The process of Veneering has been practised since the time of the Pharaohs in Ancient Egypt but was little used during the Middle Ages. The craft was revived in Renaissance Europe during the 15th century and became most evident in the 18th and early 19th centuries through the work of furniture designers such as Chippendale, Hepplewhite, and Sheraton.
Veneering Processes
Industrial processes are used to produce Manufactured Boards with a range of real wood finishes by hot or cold pressing using hydraulic, screw-operated or vacuum presses but there are several methods which are suitable for use in Design and Technology projects.
- Self-Adhesive Veneer
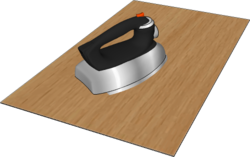
Pre-glued, iron-on veneer is available and for general work, such as shelving and speaker casings, can be quite satisfactory. It is simply applied by using a domestic iron, on medium or hot setting, and ironing it flat on to the surface to be covered. It is available also as Edging Tape, both as real wood veneer and plastic laminate, and this is most useful to finish the edges of cut pieces of Manufactured Board.
- Contact Adhesive
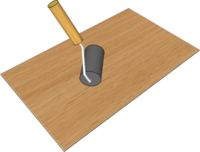
Real wood veneer can be fixed to the surface of a core material, or ‘substrate’, using Contact Adhesive. Both the wood veneer and possibly the substrate are likely to be porous so it advised to proceed as follows:
- Inspect the veneer for tell-tale knife marks which will indicate which side was inside the Flitch when it was sliced. This side will have been subjected to some Compression during slicing and is best used as the glued surface.
- Apply adhesive with a spreader evenly to each surface, paying particular attention to the edges. Allow to go ‘tacky’.
- Apply a second coat similarly and allow that to go ‘tacky’.
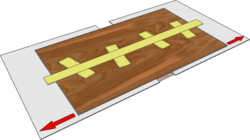
- The two surfaces will adhere on contact so cover the substrate with two sheets of thin card laid end to end before positioning the veneer.
- Separate the two pieces of card a little at a time to expose a central strip which can be pressed together then proceed to withdraw the cards as the veneer is brought into contact with the substrate, working out from the centre.
- Finally use a roller, working out from the centre, to ensure all the veneer is pressed into contact with the substrate, paying particular attention to the outside edges.
- Hot Iron
A domestic iron set to hot can also be used to glue veneer to a substrate using P.V.A. glue. Identify the compressed, inside of the veneer then spread P.V.A. evenly on to both surfaces. An advantage of this method is that the veneer can now be positioned on to the substrate without the danger of instant contact. Once in position, the hot iron is used to set the glue, working from the centre to the outside (Note: protect the surfaces of the veneer and the iron by covering with newspaper or similar before ironing).
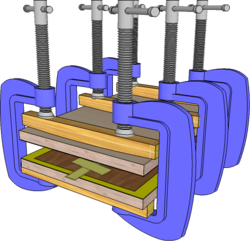
- Clamps and Cauls
A small workpiece (such as a box lid) can be veneered using P.V.A. glue and simply gripped in a Carpenters Vice until the glue sets.
Larger pieces of work can be held between two stout boards using G Cramps and Cauls - a length of Batten shaped to be slightly convex on its underside to ensure that pressure is applied to the centre outwards as the cramps are tightened.
- Vacuum Bag
Vacuum Presses are used in industry but a smaller, strong rubber-coated fabric or polyurethane 'bag', or sealed tube, suitable for use in Design and Technology is commercially available and supplied complete with vacuum pump (e.g. Bagpress). This uses atmospheric pressure to force thin veneers on to the substrate.
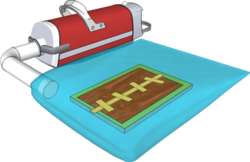
The veneer is glued and placed over the substrate and may be supported on a base, or platen, with slots or holes to ensure air can be drawn out. Once so prepared, the loaded mould is placed inside a sealed bag and air is sucked out to create a vacuum, causing the veneer to be evenly pressed on to the substrate core material. The vacuum also sucks air out of the pores of the veneer and this is replaced by glue which helps form a stronger bond. The process is useful also when using veneers to Cold Mould curved forms.
Note: In most cases, prevent excess glue sticking the veneer to any clamping devices by covering the veneer with newspaper or similar before clamping
Joining Veneers
Sliced veneers, in particular, may not always be wide enough for the job in hand and will need to be joined together. Joining separate Leaves of veneer, either side by side or end to end, is common requirement also when they are used decoratively.
Making edges straight enough to be joined can done by laying the two leaves over each other, with joining edges together, and trimming them using a sharp Craft Knife together with Safety Ruler and Cutting Mat. Alternatively, the two edges can be clamped together between two straight edge battens and made straight with a sharp Block Plane or similar.
Once straightened, the separate Leaves of veneer are brought together and held in place with Kraft Tape. Good practice is to pull the join together with short lengths of tape then finish by running tape down the length of the joint. The joined pieces can then be handled as a single sheet of veneer.

Matching Veneers
As veneers are sliced off the log or Flitch they are numbered and stacked in order. This is because consecutive Leaves of veneer are almost identical and can be used in various pattern matching arrangements.

Veneering Sequence
When veneering a flat sheet the veneer is cut to overlap all round by a few millimetres and then trimmed back to the edge of the sheet. When veneering a box for example, the sequence of veneering has to be considered to ensure each piece in turn can be properly trimmed and overlaps are organised to minimise any glue lines showing.
For example, when veneering a box with lid:
- Veneer the bottom of the box first (if needed) then trim overlaps to be flush to the box sides.
- Veneer the ends and trim to the top and sides.
- Veneer the sides and trim to the top and ends
- Veneer the top and trim to the sides
This will result in overlaps such that any glue lines will be restricted to the bottom, ends and around the vertical edges of the top rather than the top itself. Other solutions are possible of course depending on which surfaces are considered most important and therefore where it is least acceptable to have a glue line.


