Cast Aluminium Plaquette
From DT Online

What to Make:
Design and Make a small plaque based on a number, logo or initials.
- The number, logo or initials should be limited to 3 characters and the area of the final plaquette should not exceed 15,000mm2.
- The plaque should be cast as an aluminium relief and backgrounds either painted or filled with coloured resin.
What to Use:
- Make the Pattern by cutting out a design from 3mm thick MDF or Hardboard and glue to a 6mm thick backing (or machine from solid 9mm stock).
- Paint to a good finish using the paint to create a small Fillet.
- LM4 aluminium casting Ingot or equivalent.
- Exterior metal primer, undercoat and paint; alternatively coloured Polyester or Epoxy resin.
Things to find out and think about:
- Find out about the process of Sand Casting (but note differences in Runner design described below).
- Ensure a bold, simple design with good spaces between design elements - remember the mould will be made of sand and the Pattern will need to be withdrawn without crumbling or damaging the mould cavity.
- Think about the chosen Font style and size - if a door number, will it be seen from the edge of the property?
- Are there any traditional logos which could be used - e.g. Zodiac or Astrological Signs or Heiroglyphs?
- How can you calculate the weight of cast aluminium required to ensure there is enough melted before pouring into the mould?
- How will the finished plaquette be fixed or mounted in place?
Some ideas:
- Uses - door numbers, club signs or logos, paper weight, box lid insert, medallion, garden markers (e.g. for vegetable rows), a 'branding iron' to scorch logos or patterns on to wooden structures and products.
- Shapes - square, rectangular, circular, . . . etc.
- Fixing - on wall, post, floor, . . . by screws, nuts & bolts or glued . . . loose (i.e. no fixing)?
Ways of Making:
Make the Pattern using Computer Graphics to generate a full size design and print-out to use as a template. Glue to 3mm MDF or Hardboard and cut out with a Coping Saw or Scroll Saw. Alternatively cut out directly using a CNC Laser or machine from solid 9mm material using a CNC Router.
Make a Green Sand Mould from the Pattern as follows:
| Place the Pattern on a Moulding Board and cover with the Drag joint side down as shown.
|
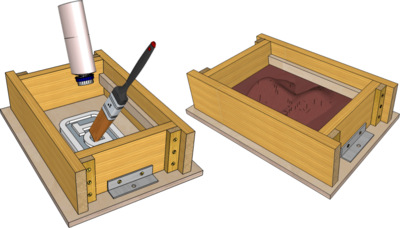 |
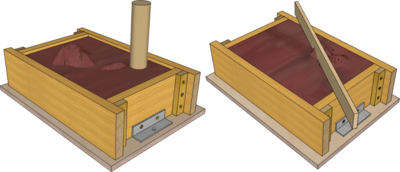
| Fill the Drag with Moulding Sand and compact it by using a Rammer in decreasing circles starting from the outside of the frame.
Note: A short length of 25mm dowel makes a suitable Rammer and a Strickle can simply be a straight length of rectangular bar or wood strip. |
 |
| Turn over the Drag and add the Cope.
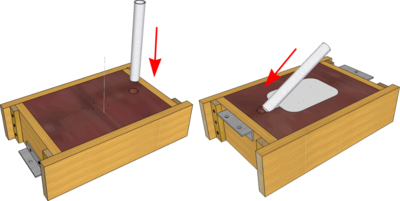
Note: When casting in aluminium, DT Online has found it easier to omit Sprue Pins at this stage and cut them later with a length of 25mm diameter thin-walled metal tube. |
 |
| Lift off the Cope, put to one side and turn over the Drag on to the Moulding Board.
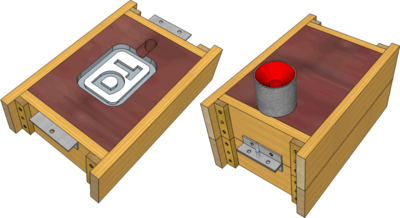
Note: This is different from a traditional Sand Casting technique. DT Online advises that aluminium casts well if the mould cavity is located in the top box and a single parallel Runner Sprue feeds down to it and no Riser Sprue. To achieve this, the Moulding Box will be used later such that the Drag is on top. |
 |
| Screw a large woodscrew or screw eye into the back of the Pattern - this will be known as a Rapping Pin.
|
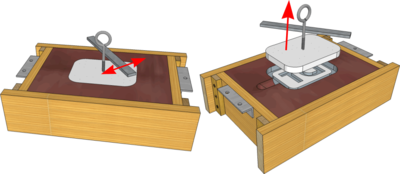 |
| Replace the Cope and turn the re-assembled Moulding Flask over such that the Drag is now on top.
Safety Point! Pouring molten metal is extremely dangerous!
|
 |
Testing:
- Did the Pattern withdraw from the sand mould satisfactorily and, if not, how could the design be improved?
- Did the casting show any signs of sinking as a result of contraction on cooling? If so, can Chills be introduced across the top of the pattern when it is placed on the Moulding Board at the start and rammed up to be part of the mould such that they force the metal to start cooling from the top of the mould?
Further Work:
- How would you design a series of interlocking plaquettes to enable different numbers or longer names to be used?