Heat Treatment
From DT Online
 |
Description
Heat Treatment in Design and Technology involves the use of heat to raise the temperature of a material (usually metal) to a point where changes in its crystaline structure occur and alter its working characteristics.
In a workshop situation, the source of heat is usually a Blow Torch but industrially, more consistency and accuracy is achieved by the use of temperature controlled ovens and kilns.
Flame Control
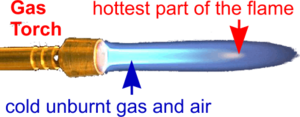
The type of flame produced by either Blow Torches or Welding Torches can be altered to suit the job in hand by varying the mix of gas and air.
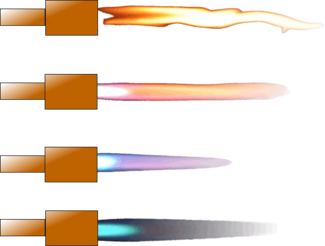
- Fuel rich flames with little or no forced air such as a candle flame, flicker and burn bright yellow as a result of the glowing soot with them. They are good for giving out light but are relatively cool and not suitable for most Heat Treatment processes.
- As air is introduced, the flame strengthens and turns orange as the soot is burned to produce a large ‘soft’ flame. A Blow Torch with this flame type is chosen for Annealing since it is large enough to enable even heating of the workpiece.
- When the point is reached such that there is exactly the right amount of air introduced to ensure all the gas is burned, a Neutral Flame results which is ideal for Welding.
- An excess of air will lead to a roaring blue Oxidising Flame which is unsuitable for Welding but its extra heat makes it useful for Brazing with a Blow Torch providing it is not held too close to the work.
Annealing
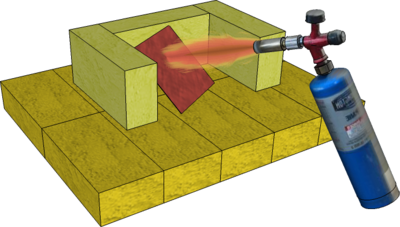
The purpose of Annealing is to increase Malleability. It is perhaps the most accessible Heat Treatment process in general workshops, using only a Blow Torch, but it differs slightly for different metals:
- Copper
- Heat to Red Heat (approx. 7000C - 8000C) then quench in water to cool it.
- Brass
- Heat as for Copper but allow to cool naturally.
- Aluminium
- Either mark the surface with soap and heat until the soap turns black, or rub with a small sliver of wood and heat until it chars, then leave to cool naturally.
- Steel
- Surround the steel with charcoal or coke and heat everything up to a Bright Red or Orange Heat (approx. 10000C) and allow everything to cool as slowly as possible to allow time for large grains to be formed. At this temperature, the steel will become non-magnetic and so can be tested with magnet - although the heat may well destroy the magnet!
Note:
- In all cases, ensure the workpiece is clean before starting - to avoid the surface becoming pitted during the process. Once cool, the metal will need to be cleaned of all the oxides on the surface. This can be done mechanically but in industry, immersing in 10% dilute nitric acid is used for copper or brass and 10% diluted sulphuric (battery acid) used for steel. The process is known as Pickling and greatly speeds up the operation.
- Safer (and ‘greener’) alternatives for home or hobby use include: Sodium Bisulphate (pool and hot-tub conditioner), Citric Acid (descaler/sanitiser), or salt and vinegar - may take longer but much safer!
Safety Point!
- Wear gloves and eye protection and NEVER add water to acid : always acid to water to avoid a violent reaction.
- Even when ‘safer’ alternatives are chosen, the Pickle Baths produce a hazardous waste after use because of the metals suspended in them. Neutralise with Bi-carb of Soda (a little at a time) and dispose in accordance with local regulations.
Hardening and Tempering
Steel is an Alloy of Iron and Carbon. Mild Steel has only a very small amount of carbon (less than 0.5%) and cannot be Hardened and Tempered but Tool Steel with a carbon content of around 5% or more can (i.e. 0.5% - 1.5%).
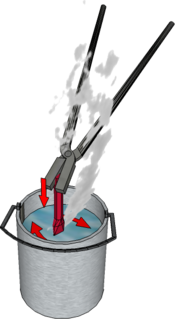
If Tool Steel is heated to Red Heat and then plunged into water to cool it quickly, it will become ‘pot hard’ and very Brittle making it unusable for most purposes.
Tempering is a process whereby the hardened steel is heated again and cooled from a lower temperature. This increases the Toughness at the expense of losing some Hardness. In industry, the correct temperature would be set by the oven or kiln but, with experience, the changing oxide colours can be used to judge when it is reached sufficiently accurately for craft work.
Note: The water should be stirred before quenching to speed up cooling by taking the heat away and the heated steel plunged in vertically to avoid deformation and cracking.
Hardening and Tempering is therefore a two-stage process as follows:
- Ensure the workpiece is bright and highly polished (e.g. using Emery Cloth) - it will not be possible to do this when it is hardened.
- Heat to Red Heat and quench in water (or vegetable oil for example).
- Polish again to a bright finish so the tempering colours can be seen next.
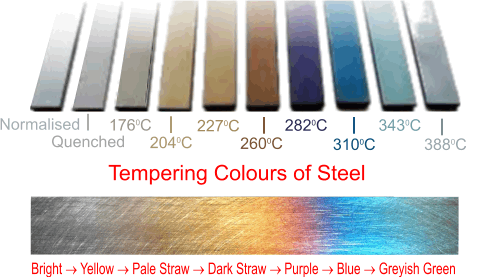
- Carefully reheat and watch for the chosen colour to appear then let it cool as soon as it does (i.e. cool from a rising temperature : not when it is falling).
- As a general guide, the following temperatures and colours are used:
- 2210C - Pale Yellow - knives and hammers
- 2320C - Pale Straw - lathe tools
- 2430C - Middle Straw - punches
- 2600C - Dark Straw - axes and wood chisels
- 2770C - Purple - cold chisels
- 2990C - Blue - screwdrives, springs and gears
Note: A skilled traditional Blacksmith could achieve Hardening and Tempering of a tool tip with a single heating operation. After initial quenching and hardening of the tip, the workpiece, still with residual heat, would be held against the edge of the anvil. The cold edge serves as a heat-sink to stop residual heat conducting down the tool tip as it is quickly polished. The workpiece is then raised to allow residual heat to conduct through and bring the tip up to the required temperature for Tempering.
Case Hardening
Mild Steel can be given a hardened surface for greater wear resistance by Case Hardening.
The outer layer of Mild Steel must first have its carbon content enriched by covering it with a carbon-rich compound and ‘cooking’ it at Red Heat until sufficient carbon is absorbed into the surface. This process is known as Carburising.
The workpiece can then be quenched to harden the carbon-enriched outer layer to complete the Case Hardening process. Tempering is not necessary because the inner core remains Mild Steel and this is able to absorb any shocks.
Normalising
This process is used to even out stresses and refine grain structure, especially in products which have been subjected to uneven heating and cooling, as in a welded structure for example.
The whole workpiece is raised to the temperature of the Critical Point and then cooled in still air. The cooling is therefore a little faster than for Annealing, which has to cool slowly within the furnace or kiln. This results in a finer grain structure and greater Toughness.
Because it is a faster process and requires less time in the costly furnace or kiln, Normalising is more economic than Annealing and the widely used method of increasing strength and toughness. Forgings and castings are Normalised after cooling to improve their condition prior to machining.
Properties of Heat Treated Steel
The effects of Heat Treatment on Steel are greatly dependent on its Carbon content. Low carbon steels can be almost unaffected but the properties of steels with only small amounts of carbon added are changed dramatically. In general, Hardness and Strength is traded for increased Toughness, Ductility and Malleability or vice versa.
The temperatures to which the Steel is heated, the time it is held at the temperature and the rate of cooling all affect changes in its Crystalline Structures in addition to controlling the type, size and distribution of Alloying elements.
 |
 |
 |
 |
 |
 |
 |
 |
| LPG Gas Torch |
Acid Pickle Bath |
Electric Slow Cooker 6.5L Litres |
Soduim Bisulphate |
Citric Acid |
Bicarbonate of Soda |
Rubber Safety Gloves |
Brass Crucible Tong |