Model Anderson Shelter
From DT Online
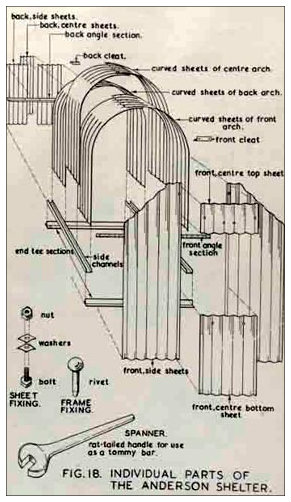
Description
Anderson Shelters were 1800mm high, 1400mm wide, 2000mm long and intended to sleep up to six people. They came as a 'kit of parts' made from corrugated steel sheets of various lengths and each about 700mm wide. People were required to put them together within two weeks of receiving them.
The ' kit' included six curved sheets bolted together at the top plus several straight pieces to enable each end to be built leaving an entrance at one end and an escape hatch at the other. The shelters were half buried in the ground with earth heaped on top for extra protection.
Making a Model Anderson Shelter
Making models of historic buildings and objects is a good way to understand them and remember what has been learned - it is also good fun! A display model, approximately 1/10th scale, of an Anderson Shelter can be made using mainly Card and Stripwood Materials.
An alternative could be to use 'Correx', corrugated plastics, but gluing would have to be done using a hot Glue Gun and some heating would be needed to mould the curved sections.
Preparing the 'Kit'
A simplified 'Kit of Parts' for a 1/10th scale model can be made by cutting 70mm wide strips from a cardboard carton for example. The strips are cut to length as follows:
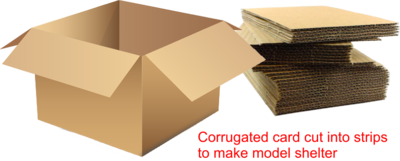
- 2 flat corrugated card strips 180mm long and 70mm wide
- 2 flat corrugated card strips 210mm long and 70mm wide each having one corner cut off (one left-hand and one right-hand sheet)
- 2 flat corrugated card strips 90mm long and 70mm wide
- 1 flat corrugated card strips 100mm long and 70mm wide
- 1 flat corrugated card strips 38mm long and 70mm wide
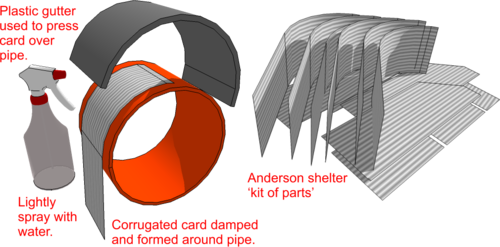
- 6 curved corrugated card strips are made by first dampening 70mm wide card strip an draping them over a piece of 125mm diameter plastics drain pipe, or similar, and left to dry (if needed a length of plastics gutter can be used to press the card around the pipe but will need to be removed occasionaly to allow drying to take place). Once dried, the curved strips are cut such that they are 180mm high overall.
Assembling the Main Structure
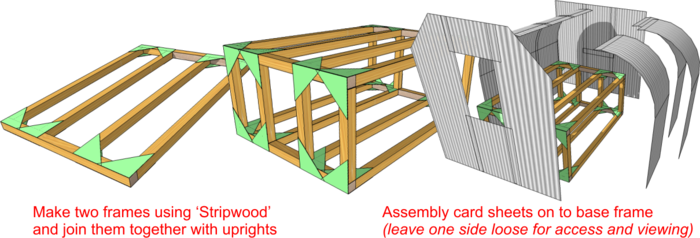
- Make two rectangular frames 200mm long and 140mm wide using Stripwood.
- Add two lengths of Stripwood 50mm in from each of the two long sides - these will form the sides of the main adult size bunks.
- Cut 8 pieces of Stripwood each 60mm long and use these to join together the two frames as shown.
- Glue togetther, overlapping a little, 3 of the curved strips to create a curved side 200mm long by 180mm high and glue this to one side of the assembled frames.
- Similarly, glue together a second curved side and keep this to one side to use as a removable section later.
- Again, overlapping a little, glue together the left and right-handed 210mm long strips with a 90mm long strip at the bottom and a 38mm strip at the top to leave the entrance opening in the centre. Glue this sub-assembly on to the front of the base frame.
- Simiilarly, glue together the two 180mm long strips with a 90mm long strip at the bottom and the 100mm long strip at the top - glued only towards the top such that it can bend inwards to simulate the escape hatch. Glue this sub-assembly on to the rear of the base frame.
Making Junior Bunk Beds
- Make two rectangular frames 140mm long and 50mm wide using Stripwood.
- Cut 8 pieces of Stripwood each 25mm long and use these to add 4 legs to each of the two frames as shown.
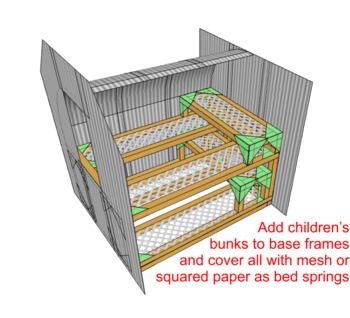
- Cut 2 rectangles of 1cm squared paper (or card or open mesh of some kind) and glue to the top of the two bunks to simulate bed springs.

Adding Bunk Beds
- Similarly, cut 2 rectangles of 1cm squared paper (or card or open mesh of some kind) and glue to the top of the two adult bunks to simulate bed springs.
- Add the two junior bunks across the end of the model shelter as shown.
Modelling the Earth Works
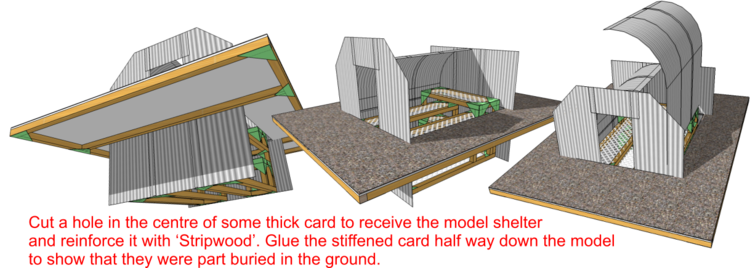
- Cut a rectangle of Thick Card approximately A3 size.
- Reinforce the card by adding a Stripwood frame around its outer edge.
- Cut a rectangular slot such that the shelter model will fit into it - cut the slot a little wider than needed to ensure the loose curved side frame can slide in and out of it with ease.
- Add two cross rails to the Stripwood frame which fit snugly up against the front and rear of the model shelter and use these to glue the entire support frame half way up the model shelter.
Completed Model
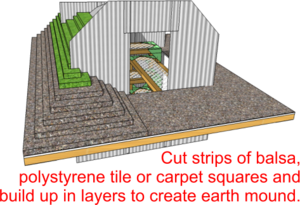
- Complete the model by cutting strips of carpet tile, balsa or polystyrene tile for example, and buld up layers to simulate earth works.
- The advice given to households during the war was that the Anderson Shelter should be set into the ground to a depth of 4 feet (i.e. 120mm in this 1/10th scale model).
- The Home Office advice continued that there should be a minumum of 15 inches depth of soil (38mm for this model) covered over the arches of the shelter.
- These two stipulations can be modelled and shown by covering half the model as shown and changing the colour of the layers to indicate where ground level ends and the mounding over of turf and soil continues.
Notes:
- MDF Discs which are pre-drilled are most useful if available, otherwise this might be done as preparation before using with younger children - alternatively a Hand Drill Stand could be used (if neccessary, adults or older children can cut them out of strips of MDF or Ply using a Holesaw).
- Dowels 4mm, 5mm, and 6mm are useful sizes for axles.
- Florist Wire is easily bent into shape whereas stiff wire, such as Brass Brazing Rod, is more suitable for connecting rods.


