Packaging Designer User Guide
From DT Online
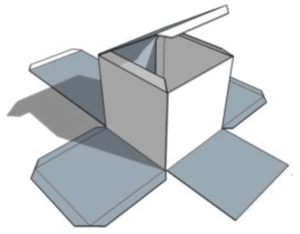
Description
The Packaging Designer application allows a wide range of nets to be modified including not only cartons and packaging but also other card based products - e.g. Pocket File, Desk Tidy, Optical Toys.
Any or all dimensions can be modified in the secure knowledge that the net will still fit together. The volume of the completed package, and the surface area of material required are calculated.
The modified designs can be simply printed or saved and loaded into many popular drawing applications.
Selecting a Net
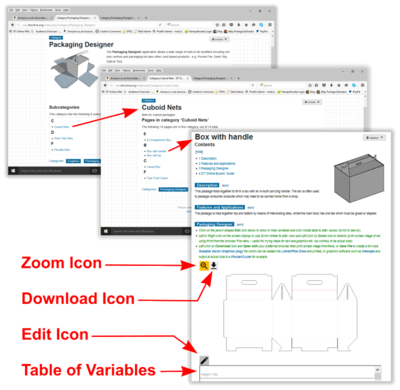
- Choose the type of Net required from the Subcategories from within Packaging Designer.
- Left Click on the Net required from the those listed to open the relevant Packaging Designer page.
- Scroll down the page to view the Net using the browser Scroll Bar.
Note:
If the Mouse Scroll Wheel is used, the image of the Net will be zoomed in or out when that part of the page is reached. To reset the image, Left Click on the Zoom Icon.
- Left Click on the Edit Icon to Show or Hide the Table of Variables.
- If required, Left Click any of the variables in the table, delete its default value and type in a new one.
- Enter the new value to redraw the Net at its new size.
- Left or Right Click on the screen display or use Scroll Wheel to alter view and Left Click on Zoom Icon to reset it.
Note:
The Net is a Parametric drawing and so all dimensions which relate to any single dimension altered will also change to maintain the validy of the Net. Left click on the Zoom Icon to centre the edited Net and Zoom it to fit the screen.
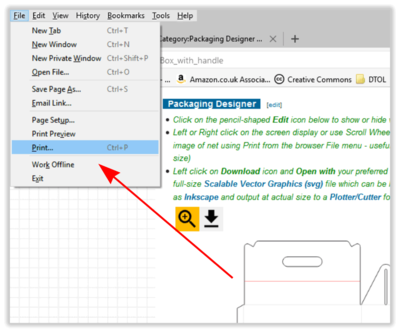
- The screen image of Net can be printed using Print from the browser File menu.
Note:
This output is quick and simple and may be useful for hand-rendering to try ideas for text and graphics etc., but it is unlikely to be actual size unless by chance.
Saving the Net CAD File
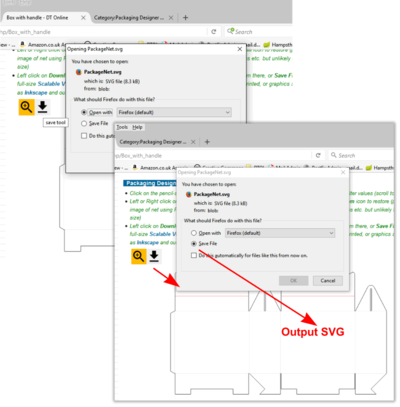
Once any required changes have been made to the dimensions of the chosen Net, it can be saved at actual size as a Scaleable Vector Graphics (SVG) file for use in other applications.
- Left Click on the Download Icon and choose the option to Save File and click OK.
- For future use, note where the SVG File is saved on your computer - it may be in your Downloads Folder.
Note:
The Open with option provides an alternative method of opening in your preferred internet browser and printing from there. This option can be used also to load the Net into any other software which is able to receive SVG Files (e.g. LibreOffice, Inkscape, GIMP) but in all cases some experimentation will be needed to determine if the resulting output is actual size or scaled to fit in some way .
Using LibreOffice Draw
LibreOffice Draw is a free of charge Vector Graphics drawing program with which you can quickly create a wide variety of graphical images. Vector Graphics store and display an image as an assembly of simple geometric elements such as lines, circles, and polygons, rather than a collection of pixels (points on the screen) and this allows for easier storage and scaling of the image. Draw is fully integrated into the LibreOffice suite and this simplifies exchanging graphics with all components of the suite (e.g. simply by copying and pasting the image).
The functionality of LibreOffice Draw is extensive and, even though it was not designed to rival high-end graphics applications, it possesses more functionality than the drawing tools that are generally integrated with most office productivity suites.
- Download LibreOffice from http://www.libreoffice.org/ and run the Draw application
- The SVG file of the Packing Net can be loaded using Open from the drop-down File menu or simply by dragging it in.
If the Net is larger than the the chosen paper size, it will be automatically scaled to fit. This may be adequate for hand-rendering to try ideas as above but if actual size is needed, a work-around is needed follows:
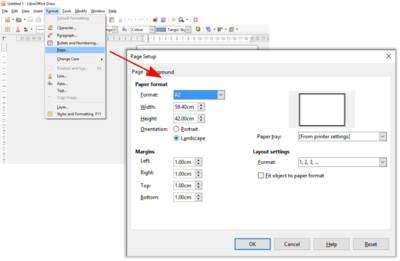
- Choose Page... from the Format menu to open the Page Setup dialogue box.
- Set the Paper format to a size and orientation that is larger than your final design of Net (e.g. Landscape A3 will accommodate many of the Nets if their default values are retained).
- Do not use Open from the File menu but rather drag theSVG file on to the page as before.
- Position the Net to the top left hand corner of the page (it should be Grouped, if not, Select All and Group first).
- Go back to the Page Setup dialogue box and try reducing the paper to a size which just contains the net.
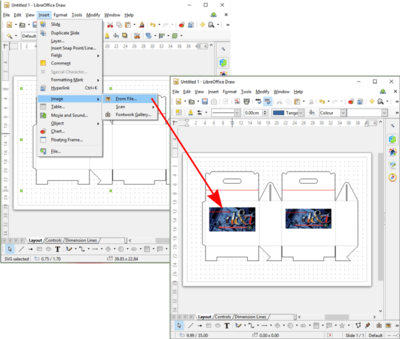
- Images can be added from the Insert menu and Text is simply added using the Text Tool.
- If the paper size is within the capability of your printer then simply go ahead and print - the output will be actual size.
- If the paper size is beyond the capability of your printer, go to Print and note that the dialogue box includes an option to Distribute on multiple sheets of paper - a full-size Net can then be assembled after printing.
Using Inkscape
Inkscape is professional quality Vector Graphics software which uses the W3C open standard SVG (Scalable Vector Graphics) as its native format but will accept and output most common image and drawing formats (e.g. JPG, GIF, PNG, PDF, WMF, DXF, HPGL). It is used by design professionals and hobbyists worldwide.
Inkscape can be downloaded from www.inkscape.org and is well supported with Tutorials, and social media user groups such as the Community . There are also many 3rd party Video Tutorials on YouTube.
- Download Inkscape and run the application - it will open with its default page setting.
- From the File menu choose Open... and selct the previously saved SVG file of the Packaging Net.
- Inkscape wll automatically adjust the page to a Custom Size to accommodate the Net full size.
- To adjust to a standard paper size, use the Document Properties dialogue box and choose the required size and orientation.
Note: If the SVG file is simply dragged on to the default page it will not adjust in size automatically but page size and orientation can be changed at any time using the Document Properties dialogue box.
- However it is loaded, the Net will be Grouped and can be moved around the page but easily Ungrouped if individual edits are needed.
- Additional files, including images, can simply be opened or dragged on to the drawing - to add images for example.
- Text is simply added using the Text Tool.
The finished design can be printed (if the printer can manage the size of paper) or Saved as... one of the many standard formats available ready to be used in another CAD application or fed directly into a CNC Cutter/Plotter for example.


