Dowel Joint: Difference between revisions
From DT Online
m Corrected Link |
m Added Amazon Link |
||
| (6 intermediate revisions by the same user not shown) | |||
| Line 1: | Line 1: | ||
=====Description===== | |||
[https://en.wikipedia.org/wiki/Dowel#Application '''Dowel Joints'''] can be used to reinforce '''[[Butt Joint|Butt Joints]]''' in any jointing configuration ''(e.g. Edge Joints, Angle and Tee Joints)''. Very accurate marking out and positioning of the '''[[Dowel|Dowels]]''' is required if the joint is to work and several methods, templates and special tools have been devised to achieve this. | [https://en.wikipedia.org/wiki/Dowel#Application '''Dowel Joints'''] can be used to reinforce '''[[Butt Joint|Butt Joints]]''' in any jointing configuration ''(e.g. Edge Joints, Angle and Tee Joints)''. Very accurate marking out and positioning of the '''[[Dowel|Dowels]]''' is required if the joint is to work and several methods, templates and special tools have been devised to achieve this. | ||
| Line 8: | Line 10: | ||
[[File:Dowels.png|300px|right|thumb|Using a '''[[Dowel Plate]]''' to make dowels as an alternative to purchasing them ready-made.]] | |||
__TOC__ | |||
=====Features and Uses===== | |||
[ | Initially, a [https://en.wikipedia.org/wiki/Dowel#Application '''Dowel Joint'''] provided a simpler and quicker alternative to a '''[[Mortise and Tenon Joint]]''' but the more recently developed '''[[Biscuit Joint]]''' is now often preferred because they require less marking out and the joint is more forgiving in that, on initial assembly, the '''[[Biscuit Jointer|Biscuit]]''' is quite a loose fit before it swells to size with the wet glue. | ||
=====Marking Out===== | =====Marking Out===== | ||
[[File:DowelJointMarkingOut.png |300px|left]] | [[File:DowelJointMarkingOut.png |300px|left]] | ||
* Prepare the timber joining faces to ensure they are straight and '''[[Squareness|Square]]''' and mark their '''[[Face Side and Face Edge|Face Sides and Face Edges]]''' ''(if several joints are to be used to make a frame for example, all joints should also be numbered)'' | * Prepare the timber joining faces to ensure they are straight and '''[[Squareness|Square]]''' and mark their '''[[Face Side and Face Edge|Face Sides and Face Edges]]''' ''(if several joints are to be used to make a frame for example, all joints should also be numbered)'' | ||
| Line 29: | Line 34: | ||
=====Marking Dowel Centres===== | =====Marking Dowel Centres===== | ||
There are several alternative methods to ensure the dowel centres are accurately marked. These include the use of '''[[Nails and Pins|Panel Pins]]''', '''[[Template|Templates]]''' or '''[[Dowel Centres]]''': | There are several alternative methods to ensure the dowel centres are accurately marked. These include the use of '''[[Nails and Pins|Panel Pins]]''', '''[[Template|Templates]]''' or '''[[Dowel Centres]]''': | ||
* After marking out, drive small | |||
* After marking out, drive small '''[[Nails and Pins|Panel Pins]]''' half way into the marked centres on one half of the joint. | |||
** Snip off the heads of the pins | ** Snip off the heads of the pins | ||
** Press the joint together so that the panel pins transfer the centre positions to the second piece. | ** Press the joint together so that the panel pins transfer the centre positions to the second piece. | ||
** Remove the | ** Remove the '''[[Nails and Pins|Panel Pins]]''' and drill as before. | ||
[[File:DowelJointCentreMarking.png |150px|right]] | [[File:DowelJointCentreMarking.png |150px|right]] | ||
| Line 44: | Line 51: | ||
or | or | ||
[[File:DowelCentreMarkers.png|300px|right]] | [[File:DowelCentreMarkers.png|300px|right]] | ||
* Mark out one half of the joint only and drill holes for the dowels. | * Mark out one half of the joint only and drill holes for the dowels. | ||
| Line 53: | Line 61: | ||
=====Dowelling Jigs===== | =====Dowelling Jigs===== | ||
<div class="floatright"><dtamazon type="search" search="Dowelling Jig"><img alt="DowellingJigs.png" src="/images/thumb/5/5e/DowellingJigs.png/200px-DowellingJigs.png" width="200" height="142" srcset="/images/5/5e/DowellingJigs.png 1.5x, /images/5/5e/DowellingJigs.png 2x" /></a></dtamazon></div> | |||
Various devices have been developed to simplifying the making of '''Dowel Joints'''. A '''[[Jig|Dowelling Jig]]''' clamps to the edge of the timber to be joined and adjustable drill guides are set into position. The dowel holes can then be drilled with little or no marking out required and the guides help to ensure the drill is kept perpendicular to the joining faces. | Various devices have been developed to simplifying the making of '''Dowel Joints'''. A '''[[Jig|Dowelling Jig]]''' clamps to the edge of the timber to be joined and adjustable drill guides are set into position. The dowel holes can then be drilled with little or no marking out required and the guides help to ensure the drill is kept perpendicular to the joining faces. | ||
<div style="clear: both;"></div> | <div style="clear: both;"></div> | ||
=====Typical Dowel Joints===== | =====Typical Dowel Joints===== | ||
[[File:DowelJoints.png|800px|right]] | [[File:DowelJoints.png|800px|right]] | ||
<div style="clear: both;"></div> | |||
{{Dowel Joint Buyers Guide}} | |||
[[Category:Wood Joints]] | [[Category:Wood Joints]] | ||
Latest revision as of 11:51, 13 December 2017
Description
Dowel Joints can be used to reinforce Butt Joints in any jointing configuration (e.g. Edge Joints, Angle and Tee Joints). Very accurate marking out and positioning of the Dowels is required if the joint is to work and several methods, templates and special tools have been devised to achieve this.
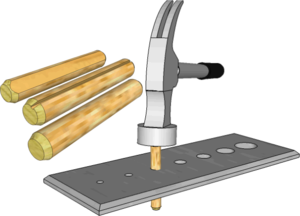
Choose a size of dowel approximately one third the width of timber to be joined and about six times their diameter in length - half inserted into each part of the joint. The ends should be tapered (use a Pencil Sharpener for small dowels) and there should be a flat or grooves along the length to allow air and surplus glue to escape when the joined is 'cramped up' under pressure.
Once 'cramped up' (e.g. using Sash Cramps), the Dowels are a very tight fit inside the holes and difficult to remove so any 'dry' joint testing would need to be done with Dowels which have been sanded down to make them an easier fit.
Features and Uses
Initially, a Dowel Joint provided a simpler and quicker alternative to a Mortise and Tenon Joint but the more recently developed Biscuit Joint is now often preferred because they require less marking out and the joint is more forgiving in that, on initial assembly, the Biscuit is quite a loose fit before it swells to size with the wet glue.
Marking Out
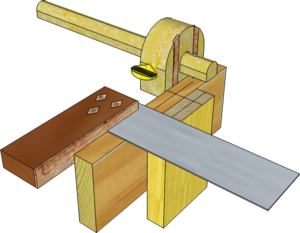
- Prepare the timber joining faces to ensure they are straight and Square and mark their Face Sides and Face Edges (if several joints are to be used to make a frame for example, all joints should also be numbered)
- Grip the two halves of the joint together in a Vice with their Face Sides and Face Edges to the outside.
- Use a Marking Gauge to scribe centre lines on each piece and a Try Square to Square the dowel centres across.
- Use a Centre Punch to mark the dowel centres to help locate the drill accurately.
To make the joint, drill holes for the dowels taking care to ensure all drilling is at right angles to the joining faces and the depth of hole is a little more than half the length of the dowel to be used (this is to ensure the dowel does not come to the bottom of the hole before the joint is fully closed and to provide some space for any excess glue).
Marking Dowel Centres
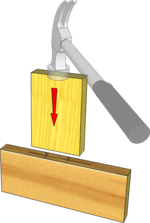
There are several alternative methods to ensure the dowel centres are accurately marked. These include the use of Panel Pins, Templates or Dowel Centres:
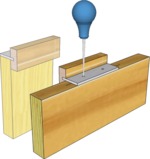
- After marking out, drive small Panel Pins half way into the marked centres on one half of the joint.
- Snip off the heads of the pins
- Press the joint together so that the panel pins transfer the centre positions to the second piece.
- Remove the Panel Pins and drill as before.
or
- Make a small Template from scrap timber and accurately mark the dowel positions on it.
or
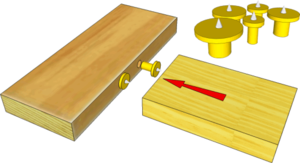
- Mark out one half of the joint only and drill holes for the dowels.
- Insert Dowel Centres into the drilled holes.
- Press the two halves of the joint together so that the Dowel Centres mark the second piece.
- Drill holes for dowels in the second piece as before.
Dowelling Jigs
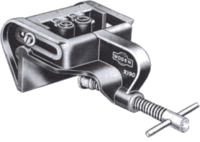
Various devices have been developed to simplifying the making of Dowel Joints. A Dowelling Jig clamps to the edge of the timber to be joined and adjustable drill guides are set into position. The dowel holes can then be drilled with little or no marking out required and the guides help to ensure the drill is kept perpendicular to the joining faces.
Typical Dowel Joints

 |
 |
 |
 |
 |
 |
 |
| Engineers' Stainless Steel Rule |
Carpenters 6" Try Square |
Draper Marking Gauge |
Dowel Centre Point Set |
Faithfull Dowel Kit Drill and Points |
Wolfcraft Universal Dowel Kit |
Wolfcraft Dowel Master |
