Drawing Boards: Difference between revisions
From DT Online
m Corrected Category |
mNo edit summary |
||
| (6 intermediate revisions by the same user not shown) | |||
| Line 1: | Line 1: | ||
[[File:Drawingboard2.gif| | [[File:Drawingboard2.gif|350px|right]] | ||
A freehand sketching exercise to help give a ''''feel'''' for how '''Oblique Perspective''' can be used to view objects. | __TOC__ | ||
=====Description===== | |||
A freehand sketching exercise to help give a ''''feel'''' for how '''[[:Category:Perspective|Oblique Perspective]]''' can be used to view objects. | |||
| Line 12: | Line 17: | ||
---- | ---- | ||
<span style="color: green">'''Note:''' | <span style="color: green">'''Note:''' | ||
Even though you have drawn all rectangles the same size directly above each other, you may notice they appear wider as they cross the '''Eye Line'''. This is a common '''Optical Illusion''' and artists compensate for it in their paintings. Also, in Greek architecture, tall pillars were made thinner in the middle so they might look parallel when viewed. | Even though you have drawn all rectangles the same size directly above each other, you may notice they appear wider as they cross the '''Eye Line'''. This is a common '''[[Optical Illusions|Optical Illusion]]''' and artists compensate for it in their paintings. Also, in Greek architecture, tall pillars were made thinner in the middle so they might look parallel when viewed. | ||
</span> | </span> | ||
---- | ---- | ||
{{Graphics Buyers Guide}} | |||
[[Category:Graphics Starters]] | [[Category:Graphics Starters]] | ||
[[Category:Perspective]] | |||
Latest revision as of 12:37, 9 September 2016

Description
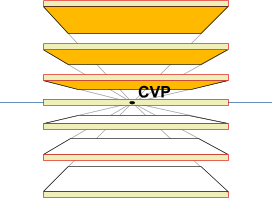
A freehand sketching exercise to help give a 'feel' for how Oblique Perspective can be used to view objects.
- Take a sheet of paper and a drawing pencil.
- Draw an horizontal line and mark a near its centre - these will be the Central Vanishing Point (CVP) and it sits on the Eye Line or Horizon Line.
- Imagine you are looking at a the edge of a drawing board and draw a thin rectangle astride the horizon line.
- Project copies of this rectangle directly above and below it.
- Join the corners of each rectangle to the CVP.
- Make a judgement about where to draw the horizontal lines to represent the rear edges of the drawing boards.
- Use lining in and shading to give the impression you are looking above and below a drawing board.
Note: Even though you have drawn all rectangles the same size directly above each other, you may notice they appear wider as they cross the Eye Line. This is a common Optical Illusion and artists compensate for it in their paintings. Also, in Greek architecture, tall pillars were made thinner in the middle so they might look parallel when viewed.
 |
 |
 |
 |
 |
 |
 |
 |
 |
 |
| A3 Cartridge Paper |
A3 Layout Pad |
A3 Marker Pad |
A3 Coloured Pad |
A3 Tracing Paper |
A3 Graph Pad |
A3 Drawing Board |
Drawing and Sketching Pencil Art Set |
Coloured Pencil Set |
A3 Light Box |