Hand Drill Stand: Difference between revisions
From DT Online
mNo edit summary |
mNo edit summary |
||
| Line 29: | Line 29: | ||
---- | ---- | ||
<span style="color: blue">'''Activity:''' | <span style="color: blue">'''Activity:''' | ||
Consider how to design and make a simple '''[[Jig]]''' to hold the work whilst drilling discs to make wheels - ideally one which 'self-centres' the discs. Primary schools linked to a neighbouring secondary school, may find that students there would be interested in designing a suitable '''[[Jig]]''', or even a '''Hand Drill Stand''' completely, and would be able to manufacture them using the extensive D&T workshop facilities that most have. | Consider how to design and make a simple '''[[Jig]]''' to hold the work whilst drilling discs to make wheels - ideally one which 'self-centres' the discs. Primary schools linked to a neighbouring secondary school, may find that students there would be interested in designing a suitable '''[[Jig]]''', or even a '''[[Hand Drill Stand Project|Hand Drill Stand]]''' completely, and would be able to manufacture them using the extensive D&T workshop facilities that most have. | ||
</span> | </span> | ||
---- | ---- | ||
Latest revision as of 09:33, 10 February 2017

Introduction
Young children may have difficulty drilling holes which are truly Square to the surface (e.g. of a disc to make a wheel). A simple Jig can be made which supports a Hand Drill within a sliding frame to assist. In use, one child operates the drill and another holds the work-piece to be drilled.
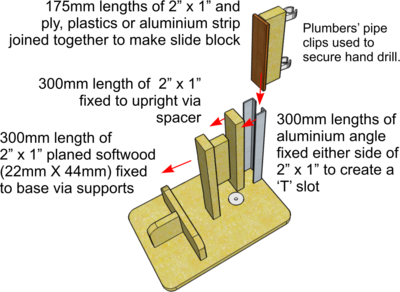
The illustration gives some main dimensions for guidance but these are not critical and can be varied to suit the drill used and the materials available.
The better quality drills always have two Pinions and the Gears are fully enclosed. These tend to be easier to operate and turn more smoothly - and they avoid the danger of trapped fingers!

Hand Drill Stand Construction
Typical assembly details of a stand are shown together with some notional dimensions for guidance. The main elements are: a base large enough to ensure stability; a vertical support structure firmly fixed to the base (see Wood Joints for suitable constructions) and a sliding block to which the Hand Drill is attached.
The vertical support is arranged, by means of a spacing block, such that the drill overhangs to provide clearance when drilling holes in the centre of wider pieces of material.
The most critical element is the sliding block assembly. A variety of materials and constructions can be explored but the aim is to ensure the drill can slide up and down easily without undue 'waggle'.
Activity: Consider how to design and make a simple Jig to hold the work whilst drilling discs to make wheels - ideally one which 'self-centres' the discs. Primary schools linked to a neighbouring secondary school, may find that students there would be interested in designing a suitable Jig, or even a Hand Drill Stand completely, and would be able to manufacture them using the extensive D&T workshop facilities that most have.
- The tools and equipment listed assumes the existence also of commonly available classroom resources such as: basic geometry equipment (e.g. pencils, rulers, compasses); pencil sharpeners, artists' brushes or glue spatulas, paper punches and trimmers, paper clips, bulldog clips, PVA glue.
See also the Buyers Guides for:
 |
 |
 |
 |
 |
 |
 |
 |
 |
| Combination Pliers |
Pistol Grip Junior Hacksaw |
8oz Claw Hammer |
Cross Pein Pin Hammer 4oz |
Clamp on Bench Vice |
Coping Saw Frame |
Glue Gun |
Soldering Station |
Flip-Top Workbench |