Soft Soldering: Difference between revisions
From DT Online
mNo edit summary |
mNo edit summary |
||
| Line 35: | Line 35: | ||
* apply '''[[Soldering Flux|Flux]]''' and assemble the joint - secure with wire or a '''[[Jig]]''' etc. if necessary, | * apply '''[[Soldering Flux|Flux]]''' and assemble the joint - secure with wire or a '''[[Jig]]''' etc. if necessary, | ||
* pre-heat the workpiece with a gas torch using a large soft '''[[Heat Treatment|Annealing]]''' flame, | * pre-heat the workpiece with a gas torch using a large soft '''[[Heat Treatment|Annealing]]''' flame, | ||
* heat up the copper bit hand irons, on a '''[[ | * heat up the copper bit hand irons, on a '''[[Branecessaryzing Hearth]]''' for example, until a green flame is created, | ||
* dip the '''[[Soldering Irons|Soldering Iron]]''' tip into '''[[Soldering Flux|Flux]]''' to clean it and ensure it is well [https://en.wikipedia.org/wiki/Tinning '''Tinned'''] ''(i.e. coated with a layer of solder)'', | * dip the '''[[Soldering Irons|Soldering Iron]]''' tip into '''[[Soldering Flux|Flux]]''' to clean it and ensure it is well [https://en.wikipedia.org/wiki/Tinning '''Tinned'''] ''(i.e. coated with a layer of solder)'', | ||
* bring the heated '''[[Soldering Irons|Soldering Iron]]''' and '''Solder''' to the workpiece together and transfer '''Solder''' to the joint, | * bring the heated '''[[Soldering Irons|Soldering Iron]]''' and '''Solder''' to the workpiece together and transfer '''Solder''' to the joint, | ||
* continue to dip the the heated iron in '''[[Soldering Flux|Flux]]''' and pick up extra '''Solder''' as needed, | * continue to dip the the heated iron in '''[[Soldering Flux|Flux]]''' and pick up extra '''Solder''' as needed, | ||
* if necessary, continue heating the workpiece with a gas torch and brush on more '''[[Soldering Flux|Flux]]''' to help the '''Solder''' flow along and through the joint ''(given a clean surface and the presence of '''[[Soldering Flux|Flux]]''', '''Solder''' will ‘chase the heat’ and can be coaxed along in this way)'', | * if necessary, continue heating the workpiece with a gas torch and brush on more '''[[Soldering Flux|Flux]]''' to help the '''Solder''' flow along and through the joint ''(given a clean surface and the presence of '''[[Soldering Flux|Flux]]''', '''Solder''' will ‘chase the heat’ and can be coaxed along in this way)'', | ||
* allow to cool, remove any wire or '''[[Jig|Jigs]]''' etc., wash thoroughly and place in a '''[[Pickling|Pickle Bath]]''' to clean. | * allow to cool, remove any wire or '''[[Jig|Jigs]]''' etc., wash thoroughly and place in a '''[[Pickling|Pickle Bath]]''' to clean if required. | ||
* if necessary, any remaining '''[[Soldering Flux|Active Flux]]''' can be neutralised by brushing over with [https://en.wikipedia.org/wiki/Sodium_bicarbonate '''Bi-Carbonate of Soda'''] to halt further corrosion. | |||
| Line 56: | Line 57: | ||
* introduce '''Solder''' to the workpiece, | * introduce '''Solder''' to the workpiece, | ||
* if necessary, continue heating the workpiece with a gas torch and brush on more '''[[Soldering Flux|Flux]]''' to help the '''Solder''' flow along and through the joint ''(given a clean surface and the presence of '''[[Soldering Flux|Flux]]''', '''Solder''' will ‘chase the heat’ and can be coaxed along in this way)'', | * if necessary, continue heating the workpiece with a gas torch and brush on more '''[[Soldering Flux|Flux]]''' to help the '''Solder''' flow along and through the joint ''(given a clean surface and the presence of '''[[Soldering Flux|Flux]]''', '''Solder''' will ‘chase the heat’ and can be coaxed along in this way)'', | ||
* allow to cool, remove any wire or '''[[Jig|Jigs]]''' etc., wash thoroughly and place in a '''[[Pickling|Pickle Bath]]''' to clean. | * allow to cool, remove any wire or '''[[Jig|Jigs]]''' etc., wash thoroughly and place in a '''[[Pickling|Pickle Bath]]''' to clean if required. | ||
* if necessary, any remaining '''[[Soldering Flux|Active Flux]]''' can be neutralised by brushing over with [https://en.wikipedia.org/wiki/Sodium_bicarbonate '''Bi-Carbonate of Soda'''] to halt further corrosion. | |||
Revision as of 08:06, 3 July 2017
Description
Soft Soldering is a method of joining metals with a Eutectic Tin/Lead Alloy. The heat source is often an Electric Soldering Iron but copper ‘irons’ heated with a gas torch may be needed for larger work.
Metals including copper, brass, lead, tin (inc. Tinplate) and steel are readily soldered but some metals, such as aluminium and cast iron, either require special solders or are not at all suitable to be joined in this way.
Using an Electric Soldering Iron
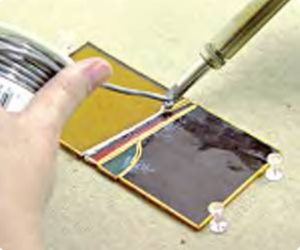
Soft Soldering with an Electric Soldering Iron is commonly the method used to fuse Electronics components on to circuit boards - multi-core solder wire which incorporates a ‘passive’ Flux is used (to avoid corrosion of the copper tracks afterwards). This method can be used also for other circumstances where only small sections of materials are to be joined (e.g. when joining the ends of the copper tape used to make a Terrarium or to join together the ‘H’ and ‘U’ shaped lead Cames when creating a piece of decorative Glasswork - although heavier section Cames may be heated more easily with a copper bit Soldering Iron heated by a gas torch).
A typical Soft Soldering technique using an Electric Soldering Iron is as follows :
- ensure all pieces to be joined are clean, either by using Emery Cloth, Pickling, or Steel Wool,
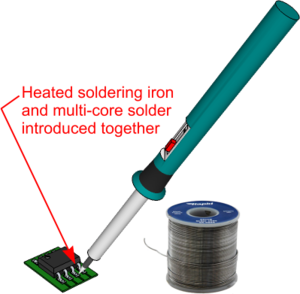
- The pieces are laid together then both Soldering Iron and multi-core Solder are brought to the joint together,
- on heating, the resin (aka Rosin), passive Flux melts out of the cored solder to cover the area and this is quickly followed by solder melting and flowing along the joint,
- separate pieces may be coated with a thin layer of solder before joining together - a process known as Tinning,
- if Tinned first, the separate pieces can often be brought together and simply touched with the heated Soldering Iron to fuse the two layers of solder together.
Soldering with a gas heated iron
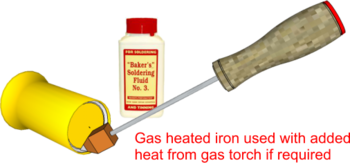
There are tasks involving larger sections of conductive metals for which an Electric Soldering Iron might struggle to provide sufficient heat. There are circumstances also when better control can be exercised if additional heat can be applied with a gas torch and wet, ‘active’ Flux (e.g. Bakers Fluid) is brushed along the joint to encourage the solder to run in particular directions. In each case, the presence of mains electricity is potentially dangerous and gas heated Soldering Irons are preferred. Such circumstances are commonplace when assembling components in Beaten Metalwork.
A typical Soft Soldering technique using gas heated Soldering Irons is as follows :
- ensure the pieces to be joined are clean and close fitting,
- apply Flux and assemble the joint - secure with wire or a Jig etc. if necessary,
- pre-heat the workpiece with a gas torch using a large soft Annealing flame,
- heat up the copper bit hand irons, on a Branecessaryzing Hearth for example, until a green flame is created,
- dip the Soldering Iron tip into Flux to clean it and ensure it is well Tinned (i.e. coated with a layer of solder),
- bring the heated Soldering Iron and Solder to the workpiece together and transfer Solder to the joint,
- continue to dip the the heated iron in Flux and pick up extra Solder as needed,
- if necessary, continue heating the workpiece with a gas torch and brush on more Flux to help the Solder flow along and through the joint (given a clean surface and the presence of Flux, Solder will ‘chase the heat’ and can be coaxed along in this way),
- allow to cool, remove any wire or Jigs etc., wash thoroughly and place in a Pickle Bath to clean if required.
- if necessary, any remaining Active Flux can be neutralised by brushing over with Bi-Carbonate of Soda to halt further corrosion.
Heating with a Gas Torch
It is possible, and often convenient when working with large pieces of conductive metals such as in Beaten Metalwork, to Solder without use of a Soldering Iron at all but simply bring the workpiece up to soldering heat and introduce Flux and Solder directly to the joint (in essence, the heated workpiece becomes the Soldering Iron).
The soldering process is broadly as follows:
- ensure the pieces to be joined are clean and close fitting,
- apply Flux (e.g. an ‘active’ liquid Flux such as Bakers Fluid will withstand the heat of the torch and can continue to be brushed on the joint as it is heated),
- assemble the joint - secure with wire or a Jig etc. if necessary,
- set the gas torch to produce a large, soft Annealing flame and heat the workpiece generally,
- intensify the flame and focus in on the area to joined,
- introduce Solder to the workpiece,
- if necessary, continue heating the workpiece with a gas torch and brush on more Flux to help the Solder flow along and through the joint (given a clean surface and the presence of Flux, Solder will ‘chase the heat’ and can be coaxed along in this way),
- allow to cool, remove any wire or Jigs etc., wash thoroughly and place in a Pickle Bath to clean if required.
- if necessary, any remaining Active Flux can be neutralised by brushing over with Bi-Carbonate of Soda to halt further corrosion.
Sweated Joints
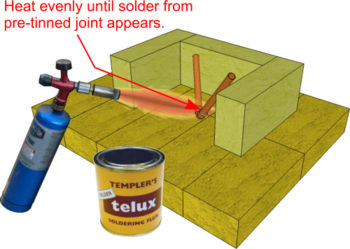
It is sometimes convenient to pre-coat the pieces to be joined with a thin layer of solder first (a process known as Tinning), let them cool, clean them, re-assemble the joint with Flux (e.g. Telux) and re-heat to fuse the layers together. This is known as a Sweated Joint.
Gas torches are used to produce Sweated Joints as follows:
- ensure the pieces to be joined are clean and close fitting,
- apply Flux (when joining water pipes a water based Flux is advised which will wash out afterwards) and Tin the jointing surfaces by applying a thin layer of solder (Yorkshire Fittings, as used by plumbers, have a solder ring built-in for this purpose),
- allow to cool, clean and re-apply Flux to the joint pieces,
- assemble the joint - secure with wire or a Jig etc. if necessary,
- set the gas torch to produce a large, soft Annealing flame and heat the workpiece generally,
- intensify the flame and focus in on the area to joined,
- if necessary, continue heating the workpiece with a gas torch and brush on more Flux to help the Solder flow along and through the joint (given a clean surface and the presence of Flux, Solder will ‘chase the heat’ and can be coaxed along in this way - e.g. Solder will appear around the end of a Yorkshire Fittings having been drawn there by heat and Capillary Action ),
- allow to cool, remove any wire or Jigs etc., wash thoroughly and clean.
Wiped Joint
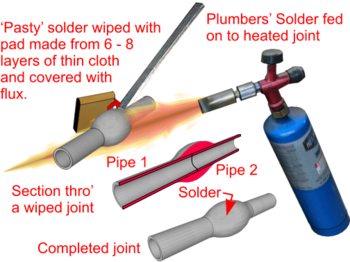
During the first half of the 20th Century it was common for domestic Plumbing to comprise mainly Lead piping and underground electricity or telecoms cables to be sheathed in Lead (the use of Lead for domestic water pipes was ended in 1970) . In each case joints were made with Soft Solder using a Wiped Joint technique whereby semi-molten solder is ‘wiped’ around the joint area using a wooden stick or a cloth coated in Flux (e.g. traditionally animal fat or Tallow before the general use of Rosin (aka Resin)).
The Wiped Joint technique has been used since the time of Ancient Rome. It relies on solder staying workable or ‘pasty’ in a semi-molten state to give time for it to be ‘wiped’ around the joint. Such solders must be Non-Eutectic (e.g. 50/50 Lead and Tin) such that the change from solid to liquid occurs over a temperature range (i.e. as opposed to the Eutectic Alloy, used as Tinmans Solder and for electronics work, which has a melting point the same as the freezing point).
Most Plumbers would use a Flux covered cloth pad instead of a wooden stick. Traditionally, the pad would be made up from several layers of Moleskin but layers of any similar thickness cloths would suffice.
Gas torches (or Blow Lamps) are used to produce Wiped Joints as follows:
- the pieces to be joined are closely fitted together and the jointing area surfaces scraped clean with a metal scraper (e.g. a paint scraper),
- coat the jointing area with Flux to protect it as the joint is heated with a gas torch or Blow Lamp,
- Plumbers' Solder is melted on to the jointing area forming lumps of semi-molten solder,
- when the solder on the joint is at such a heat as to make it difficult to keep it on the pipe, it is then patted round with the Flux covered cloth pad, and the surplus solder on the edges wiped off,
- ‘wiping’ should start from the back of the joint and continue in an upward direction using pressure from the fingers to clean the edges first,
- once the edges are formed, the main body of the joint is built up and shaped by wiping round using even pressure across the full width of the pad changing hands and direction as required,
- avoid wiping the joint more than is necessary and stop once it is neatly formed.
 |
 |
 |
 |
 |
 |
 |
 |
 |
| Soldering Iron Station |
Multicore Solder |
LED Magnifier with Clamps and Soldering Stand |
Soldering Mat |
Soldering Flux |
Soft Solder |
Bakers Soldering Fluid |
Solder Flux Brushes |
Gas Soldering & Brazing Torch |
