PCB Drill: Difference between revisions
From DT Online
Added Template |
mNo edit summary |
||
| (2 intermediate revisions by the same user not shown) | |||
| Line 1: | Line 1: | ||
[[File:PCBdrills.png |300px|right | [[File:PCBdrills.png |300px|right|link=http://www.amazon.co.uk/gp/product/B00KBYXPCU/ref=as_li_tl?ie=UTF8&camp=1634&creative=6738&creativeASIN=B00KBYXPCU&linkCode=as2&tag=dton06-21]] | ||
__TOC__ | |||
=====Description===== | |||
Individual electronic control circuits ''(e.g. resulting from use of the '''[[PCB Designer|DT Online PCB Designer]]''')'' can be made using '''[[Photo-Etching]]''' or by cutting away material from a '''Copper-Clad''' board using a '''[[Milling Machine|CNC Milling Machine]]''' or '''[[CNC Engraving|CNC Engraver]]''' for example. Components are added by drilling small holes through the board and soldering them into place. This is known as [https://en.wikipedia.org/wiki/Printed_circuit_board#Through-hole_technology '''Through Hole Technology'''] ''(as opposed to [https://en.wikipedia.org/wiki/Printed_circuit_board#Surface-mount_technology '''Surface-Mount'''])''. | |||
=====Features and Applications===== | |||
The component mounting holes can be drilled using a low-volt hand-held drill running at high speed and with a 1.5mm or 2mm diameter drill bit in the [https://en.wikipedia.org/wiki/Collet '''Collet Chuck''']. Such small drills can easily break and more precision is obtained if the drill is held in a stand ''(or a standard '''[[Drill Press]]''')'' is used. Care must be taken to let the drill do the work and not to force the drill into the PCB. It will help if the circuit board is first taped by its edges to a flat backing board of [https://en.wikipedia.org/wiki/Medium-density_fibreboard '''MDF'''] for example. | The component mounting holes can be drilled using a low-volt hand-held drill running at high speed and with a 1.5mm or 2mm diameter drill bit in the [https://en.wikipedia.org/wiki/Collet '''Collet Chuck''']. Such small drills can easily break and more precision is obtained if the drill is held in a stand ''(or a standard '''[[Drill Press]]''')'' is used. Care must be taken to let the drill do the work and not to force the drill into the PCB. It will help if the circuit board is first taped by its edges to a flat backing board of [https://en.wikipedia.org/wiki/Medium-density_fibreboard '''MDF'''] for example. | ||
| Line 7: | Line 14: | ||
[https://en.wikipedia.org/wiki/Printed_circuit_board '''Printed Circuit Boards (PCBs)'''] are usually made of [https://en.wikipedia.org/wiki/Fiberglass '''Fiberglass'''], which is highly abrasive, and so will quickly wear out [https://en.wikipedia.org/wiki/High-speed_steel '''HSS'''] drills if many holes are to be drilled. [https://en.wikipedia.org/wiki/Drill_bit#PCB_through-hole_drill_bits '''Specialist drill bits'''] with [https://en.wikipedia.org/wiki/Tungsten_carbide '''Tungsten Carbide'''] tips are available and these are used, together with '''[[CNC]]''' drills, in industry. | [https://en.wikipedia.org/wiki/Printed_circuit_board '''Printed Circuit Boards (PCBs)'''] are usually made of [https://en.wikipedia.org/wiki/Fiberglass '''Fiberglass'''], which is highly abrasive, and so will quickly wear out [https://en.wikipedia.org/wiki/High-speed_steel '''HSS'''] drills if many holes are to be drilled. [https://en.wikipedia.org/wiki/Drill_bit#PCB_through-hole_drill_bits '''Specialist drill bits'''] with [https://en.wikipedia.org/wiki/Tungsten_carbide '''Tungsten Carbide'''] tips are available and these are used, together with '''[[CNC]]''' drills, in industry. | ||
{{PCB Drill Buyers Guide}} | {{PCB Drill Buyers Guide}} | ||
Latest revision as of 17:37, 3 November 2016

Description
Individual electronic control circuits (e.g. resulting from use of the DT Online PCB Designer) can be made using Photo-Etching or by cutting away material from a Copper-Clad board using a CNC Milling Machine or CNC Engraver for example. Components are added by drilling small holes through the board and soldering them into place. This is known as Through Hole Technology (as opposed to Surface-Mount).
Features and Applications
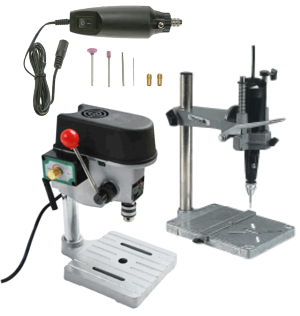
The component mounting holes can be drilled using a low-volt hand-held drill running at high speed and with a 1.5mm or 2mm diameter drill bit in the Collet Chuck. Such small drills can easily break and more precision is obtained if the drill is held in a stand (or a standard Drill Press) is used. Care must be taken to let the drill do the work and not to force the drill into the PCB. It will help if the circuit board is first taped by its edges to a flat backing board of MDF for example.
Printed Circuit Boards (PCBs) are usually made of Fiberglass, which is highly abrasive, and so will quickly wear out HSS drills if many holes are to be drilled. Specialist drill bits with Tungsten Carbide tips are available and these are used, together with CNC drills, in industry.
 |
 |
 |
 |
 |
 |
 |
| Cordless Rechargeable Mini Rotary Drill |
Multipurpose Rotary Tool |
Dremel Workstation |
Mini Bench Drill Press |
Dremel Multitool |
Dremel Accessory Set |
Cemented Carbide 0.8mm PCB Drill |