Box Kite Construction: Difference between revisions
From DT Online
mNo edit summary |
m Changed Main Image |
||
| Line 1: | Line 1: | ||
[[File:BoxKite.png| | [[File:BoxKite.png|800px|right]] | ||
__TOC__ | __TOC__ | ||
| Line 8: | Line 8: | ||
Note that changing the variables related to '''Wings''' in the '''Designer''' table below, may result in their shape being trapezoid, triangular or no '''Wings''' at all. | Note that changing the <<span style="color: red">variables</span>> related to '''Wings''' in the '''Designer''' table below, may result in their shape being trapezoid, triangular or no '''Wings''' at all. | ||
In addition, removing one of the sides of the box will result in '''Triangular Box Kites''', joining two together will produce a '''Rectangular Box Kite''' ''(e.g. similar to the '''Hargraves' Box Kite''' shown beow)'' and if wings are added models of the famous '''Cody Kites''' can be created. | |||
---- | ---- | ||
[[File:AngleofAttack.png|125px|right]] | |||
<span style="color: green">'''Note:''' | <span style="color: green">'''Note:''' | ||
Once you have finalised your '''Kite''' proportions, the '''[[Kite Design Basics|Angle of Attack]]''' can be set by adjustment of the '''Bridle'''. The normal method is to loop the '''Bridle''' over one finger and suspend the '''Kite''' upside down. The position of the finger is adjusted until the tail of the '''Kite''' hangs at an angle of 20<small><sup>0</sup></small> to 30<small><sup>0</sup></small> to the floor. | Once you have finalised your '''Kite''' proportions, the '''[[Kite Design Basics|Angle of Attack]]''' can be set by adjustment of the '''Bridle'''. The normal method is to loop the '''Bridle''' over one finger and suspend the '''Kite''' upside down. The position of the finger is adjusted until the tail of the '''Kite''' hangs at an angle of 20<small><sup>0</sup></small> to 30<small><sup>0</sup></small> to the floor. | ||
| Line 22: | Line 26: | ||
More sophisticated '''Kites''', and most commercially available '''KItes''', use '''[[Basic Kite Construction|Ripstop Nylon]]''' or similar, together with '''[[Basic Kite Construction|Fibreglass Rods and Tubes]]'''. Instead of fixing with tape, extra allowances are added to the '''Kite''' pattern where needed, to enable the '''Spars''' to be slotted into sewn hems. | More sophisticated '''Kites''', and most commercially available '''KItes''', use '''[[Basic Kite Construction|Ripstop Nylon]]''' or similar, together with '''[[Basic Kite Construction|Fibreglass Rods and Tubes]]'''. Instead of fixing with tape, extra allowances are added to the '''Kite''' pattern where needed, to enable the '''Spars''' to be slotted into sewn hems. | ||
See the '''DT Online''' article on '''[[Basic Kite Construction]]''' for more detail. | |||
| Line 27: | Line 34: | ||
---- | ---- | ||
<span style="color: green">'''Note:'''</span> | <span style="color: green">'''Note:'''</span> | ||
* <span style="color: green">The main variable in the table below is the total length of the '''Kite | * <span style="color: green">The main variable in the table below is the total length of the '''Kite Spar''' ''(i.e. <<span style="color: red">Spar:Length</span>> set initally to 1200mm)</span> | ||
* <span style="color: green">Almost all other dimensions are derived as a '''Percentage of | * <span style="color: green">Almost all other dimensions are derived as a '''Percentage of <<span style="color: red">SparLength</span>>''' ''(e.g the length of the side of square forming the 'box', i.e <<span style="color: red">BoxPercent</span>>, is set initally as equal to 30% of the <<span style="color: red">SparLength</span>>)''. </span> | ||
* <span style="color: green">All '''Percentages''' initially are based on the proportions given at the start of this article but all can be changed by clicking in the table and typing in a new '''Percentage''' ''(e.g. if only a single pair of centrally placed Cross Spars are needed then set TopCrossPercent and BottomCrossPercent each to be 50%)''</span> | * <span style="color: green">All '''Percentages''' initially are based on the proportions given at the start of this article but all can be changed by clicking in the table and typing in a new '''Percentage''' ''(e.g. if only a single pair of centrally placed Cross Spars are needed then set <<span style="color: red">TopCrossPercent</span>> and <<span style="color: red">BottomCrossPercent</span>> each to be 50%)''</span> | ||
* <span style="color: green">Refreshing or reloading the page will reset all variables to their default values.</span> | |||
---- | ---- | ||
Revision as of 09:48, 28 November 2016

Description
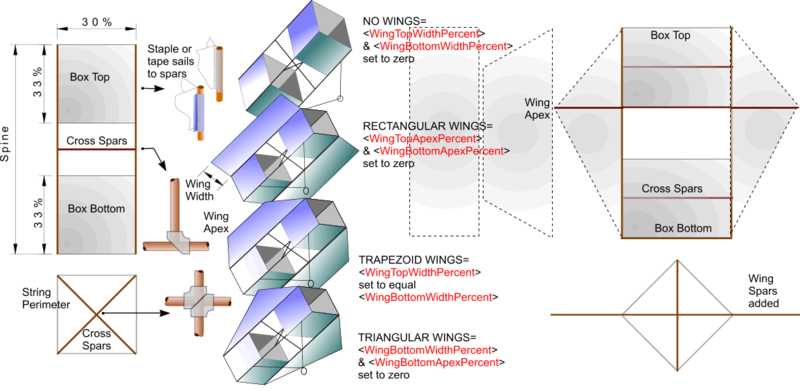
Some general proportions and a basic method of construction is shown opposite.
Note that changing the <variables> related to Wings in the Designer table below, may result in their shape being trapezoid, triangular or no Wings at all.
In addition, removing one of the sides of the box will result in Triangular Box Kites, joining two together will produce a Rectangular Box Kite (e.g. similar to the Hargraves' Box Kite shown beow) and if wings are added models of the famous Cody Kites can be created.

Note: Once you have finalised your Kite proportions, the Angle of Attack can be set by adjustment of the Bridle. The normal method is to loop the Bridle over one finger and suspend the Kite upside down. The position of the finger is adjusted until the tail of the Kite hangs at an angle of 200 to 300 to the floor.
Materials and Construction
Kites can be made quite successfully using thin Polyethylene sheeting (e.g. as used to make bin liners) and Adhesive Tapes, split Bamboo flower sticks. Kraft Paper can also be used and even Tissue Paper, especially for smaller Kites and using BBQ Skewers for Spars.
More sophisticated Kites, and most commercially available KItes, use Ripstop Nylon or similar, together with Fibreglass Rods and Tubes. Instead of fixing with tape, extra allowances are added to the Kite pattern where needed, to enable the Spars to be slotted into sewn hems.
See the DT Online article on Basic Kite Construction for more detail.
Designer
- Click on the pencil-shaped Edit icon below to show or hide variables and click inside table to alter values (scroll to see all).
- Left or Right click on the screen display or use Scroll Wheel to alter view and Left click on Zoom icon to restore (note: Zoom will be focussed around the cursor position)
- Left click on Download icon and Open with your preferred browser then print screen image from there (useful for trying ideas for text and graphics etc. but unlikely to be actual size), or Save File to create a full-size Scalable Vector Graphics (svg) file which can be loaded into LibreOffice Draw and printed, or graphics software such as Inkscape for eventual output at actual size to a Plotter/Cutter for example. See Packaging Designer User Guide for more detail.
Note:
- The main variable in the table below is the total length of the Kite Spar (i.e. <Spar:Length> set initally to 1200mm)
- Almost all other dimensions are derived as a Percentage of <SparLength> (e.g the length of the side of square forming the 'box', i.e <BoxPercent>, is set initally as equal to 30% of the <SparLength>).
- All Percentages initially are based on the proportions given at the start of this article but all can be changed by clicking in the table and typing in a new Percentage (e.g. if only a single pair of centrally placed Cross Spars are needed then set <TopCrossPercent> and <BottomCrossPercent> each to be 50%)
- Refreshing or reloading the page will reset all variables to their default values.
Box Kite Examples
- On February 15th 1893 Australian inventor, Lawrence Hargrave, flew his box kite design at a beach near Wollongong, south of Sydney in New South Wales.
- The Wright Brothers develop their control system with kites from 1899 before Orville's first flight on December 17th, 1903 in an aircraft very similar to a box kite.
- In 1900, Texan Samuel F.Cody developed a large winged box kite that was used for man-lifting experiments and adopted for aerial observation by the British War Office in1906.
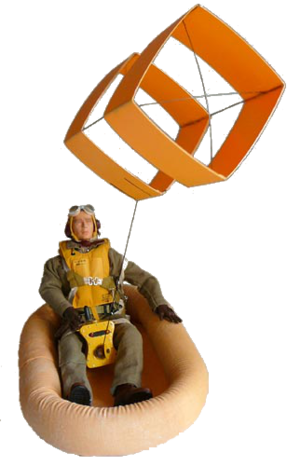
- During World War 2, aircrews were issued with box kites to use to attract attention the event of being 'downed'.
 |
 |
 |
 |


