Widening Joint: Difference between revisions
From DT Online
mNo edit summary |
mNo edit summary |
||
| (16 intermediate revisions by the same user not shown) | |||
| Line 1: | Line 1: | ||
=====Description===== | |||
[[File:HeartSide.png|400px|right]] | [[File:HeartSide.png|400px|right]] | ||
'''Widening Joints''' are used to make wider boards by joining narrower ones edge to edge. Whichever jointing method is chosen, care should be taken to ensure the curve of the [https://en.wikipedia.org/wiki/Dendrochronology#Growth_rings '''Annular Rings'''] is reversed on adjacent boards as shown. | '''Widening Joints''' are used to make wider boards by joining narrower ones edge to edge. Whichever jointing method is chosen, care should be taken to ensure the curve of the [https://en.wikipedia.org/wiki/Dendrochronology#Growth_rings '''Annular Rings'''] is reversed on adjacent boards as shown. | ||
| Line 4: | Line 6: | ||
As timber dries out, its [https://en.wikipedia.org/wiki/Dendrochronology#Growth_rings '''Annular Rings'''] will tend to try and straighten. Reversing their direction in this way minimises the degree to which the widened board will '''''cup''''' or '''''warp'''''. | As timber dries out, its [https://en.wikipedia.org/wiki/Dendrochronology#Growth_rings '''Annular Rings'''] will tend to try and straighten. Reversing their direction in this way minimises the degree to which the widened board will '''''cup''''' or '''''warp'''''. | ||
---- | |||
<span style="color: green">'''Note:''' | |||
Although now almost universally replaced by '''[[Manufactured Board|MDF]]''', solid timber [https://en.wikipedia.org/wiki/Window_sill window sills] would be positioned 'heart side up'. This ensures that if there is any movement as the [https://en.wikipedia.org/wiki/Dendrochronology#Growth_rings '''Annular Rings'''] tend to straighten, the sill would 'bow' upwards in the centre rather than 'cup' and hold moisture. | |||
</span> | |||
---- | |||
To avoid this problem almost completely, choose boards which have been sliced '''''radially''''' from across the centre of the tree, and whose [https://en.wikipedia.org/wiki/Dendrochronology#Growth_rings '''Annular Rings'''] are therefore close to being at right angles to each face ''(these boards are known as '''[[Timber Conversion|Quarter Sawn]]''' and '''[[Timber Conversion|Rift Sawn]]''' - they are much sought-after and will be hard to find!)'' | |||
To avoid this problem almost completely, choose boards which have been sliced from across the centre of the tree, and whose [https://en.wikipedia.org/wiki/Dendrochronology#Growth_rings '''Annular Rings'''] are therefore close to being at right angles to each face ''(these boards are known as | |||
| Line 15: | Line 21: | ||
Some '''[[Planes|planing]]''' will be needed after jointing to ensure the finished boards surfaces are flat, so choose boards somewhat thicker than the required finished size to start with. | Some '''[[Planes|planing]]''' will be needed after jointing to ensure the finished boards surfaces are flat, so choose boards somewhat thicker than the required finished size to start with. | ||
{| class="wikitable" style="border=0; background-color:#ffffff; width=100%" | |||
|- | |||
| width=55%|__TOC__ | |||
| style="text-align:right;" | [[File:Plain quarter sawn.png|250px]] | |||
|- | |||
| colspan="2" style="text-align:right;" | '''A''' : Radial Cut = Quarter Sawn ''(and Rift Sawn)''<br />'''B''' : Tangential Cut = Through & Through, Plain or Crown Sawn | |||
|} | |||
=====Rubbed Joint===== | |||
[[File:RubbedGluing.png|150px|right]] | [[File:RubbedGluing.png|150px|right]] | ||
[[File:RubbedJointResting.png|150px|right]] | [[File:RubbedJointResting.png|150px|right]] | ||
| Line 48: | Line 59: | ||
* Drill pilot holes for the screws in one piece and holes to clear the screw-heads in the second piece 10mm - 12mm deep. | * Drill pilot holes for the screws in one piece and holes to clear the screw-heads in the second piece 10mm - 12mm deep. | ||
* Drill holes to clear the screw shank, also 10mm to 12mm deep, at the ends of the slots. | * Drill holes to clear the screw shank, also 10mm to 12mm deep, at the ends of the slots. | ||
* Using a thin '''[[Chisels|Mortise Chisel]]''' cut the slots through to the screw-head clearance holes to a width equal to the screw shank. | * Using a thin '''[[Chisels|Mortise Chisel]]''' cut the slots through to the screw-head clearance holes to a width equal to the screw shank. ''(click on images to enlarge for clarity)'' | ||
* Screw a screw into a scrap piece of wood to a depth of 8 or 9mm and use this to cut the screw head grooves by placing it down into the screw-head clearance hole and tapping along the slot with a '''[[Hammers|Hammer]]'''. | * Screw a screw into a scrap piece of wood to a depth of 8 or 9mm and use this to cut the screw head grooves by placing it down into the screw-head clearance hole and tapping along the slot with a '''[[:Category:Hammers|Hammer]]'''. | ||
* Use the same scrap of wood, with screw, to set the height of the screw-heads in the second piece of timber. | * Use the same scrap of wood, with screw, to set the height of the screw-heads in the second piece of timber. | ||
* Bring the two pieces together and lightly '''[[Sash Cramp|cramp]]''', then using a '''[[:Category:Mallets|Mallet]]''', drive the screws along the slots to bring the timber ends together. | * Bring the two pieces together and lightly '''[[Sash Cramp|cramp]]''', then using a '''[[:Category:Mallets|Mallet]]''', drive the screws along the slots to bring the timber ends together. | ||
| Line 70: | Line 81: | ||
=====Biscuit Joint===== | =====Biscuit Joint===== | ||
[[File:BiscuitWideningJoint.png|200px|right]] | [[File:BiscuitWideningJoint.png|200px|right]] | ||
'''[[Butt Joint|Butt Joints]]''' can be reinforced by inserting dried and compressed wooden '''[[Jointing Biscuit|Biscuits]]''' into pre-cut slots or '''Grooves'''. The use of '''[[Jointing Biscuit|Biscuits]]''' is gaining popularity in preference to using '''[[Dowel Joint|Dowels]]''' because they are more forgiving and less marking out is needed ''(i.e. the '''[[Biscuit Jointer]]''' or '''[[Router]]''' used | '''[[Butt Joint|Butt Joints]]''' can be reinforced by inserting dried and compressed wooden '''[[Jointing Biscuit|Biscuits]]''' into pre-cut slots or '''Grooves'''. The use of '''[[Jointing Biscuit|Biscuits]]''' is gaining popularity in preference to using '''[[Dowel Joint|Dowels]]''' because they are more forgiving and less marking out is needed ''(i.e. the '''[[Biscuit Jointer]]''' or '''[[Router]]''' used has stops and fences to ensure correct positioning and often only a centre line is needed to mark the positions for the '''[[Jointing Biscuit|Biscuits]]''')''. | ||
<div style="clear: both;"></div> | <div style="clear: both;"></div> | ||
| Line 80: | Line 91: | ||
A traditional floor-boarding joint ''(now largely superseded by '''[[Manufactured Board|Chipboard]]''' panels but still a useful and strong method of joining together boards)''. The [https://en.wikipedia.org/wiki/Groove_%28joinery%29 '''Groove'''] should be approximately one third the thickness of the joining edges and cut with a '''[[Planes|Plough Plane]]''' using the nearest width blade. The '''Tongue''' can be cut to match in the form of two [https://en.wikipedia.org/wiki/Rabbet '''Rebates'''] but shaped and matching blades are available for '''[[Planes|Combination Planes]]''' to ensure a close fitting joint. They can also be machined using a '''[[Router]]'''. | A traditional floor-boarding joint ''(now largely superseded by '''[[Manufactured Board|Chipboard]]''' panels but still a useful and strong method of joining together boards)''. The [https://en.wikipedia.org/wiki/Groove_%28joinery%29 '''Groove'''] should be approximately one third the thickness of the joining edges and cut with a '''[[Planes|Plough Plane]]''' using the nearest width blade. The '''Tongue''' can be cut to match in the form of two [https://en.wikipedia.org/wiki/Rabbet '''Rebates'''] but shaped and matching blades are available for '''[[Planes|Combination Planes]]''' to ensure a close fitting joint. They can also be machined using a '''[[Router]]'''. | ||
<div style="clear: both;"></div> | <div style="clear: both;"></div> | ||
---- | |||
<span style="color: green">'''Note:''' | |||
Traditionally, '''[[Timber Conversion|Quarter Sawn]]''', '''[[Timber Conversion|Rift Sawn]]''', timber would be chosen for floorboards because the [https://en.wikipedia.org/wiki/Dendrochronology#Growth_rings '''Annular Rings'''] at right angles to the surface would offer much greater wear resistance. | |||
</span> | |||
---- | |||
* '''Loose Tongue ''(or 'Key')''''' | * '''Loose Tongue ''(or 'Key')''''' | ||
| Line 97: | Line 112: | ||
[[File:ShipLap.png|200px|left]] | [[File:ShipLap.png|200px|left]] | ||
This also is a variant of a '''Tongued and Grooved''' joint and is used commonly for exterior cladding of sheds for example. | This also is a variant of a '''Tongued and Grooved''' joint and is used commonly for exterior cladding of sheds for example. | ||
<div style="clear: both;"></div> | |||
---- | |||
<span style="color: green">'''Note:''' | |||
[https://en.wikipedia.org/wiki/Groove_(joinery) '''Grooves'''] and [https://en.wikipedia.org/wiki/Rabbet '''Rebates'''] may also be cut by make several passes with a '''[[Table Saw]]''' but only with adequate guarding in place - see [http://www.hse.gov.uk/pubns/wis16.pdf '''Circular saw benches - Safe working practices WIS16 - HSE''']. Industrially ''(but NOT in schools - ref: '''[[BS 4163:2014 Health and safety for design and technology in educational and similar establishments - Code of practice|BS 4163]]''')'' a [https://en.wikipedia.org/wiki/Wood_shaper '''Spindle Moulder'''] may also be used. Either a '''[[Router]]''' or a [https://en.wikipedia.org/wiki/Wood_shaper '''Spindle Moulder'''] may be used for stopped [https://en.wikipedia.org/wiki/Rabbet '''Rebates'''] and [https://en.wikipedia.org/wiki/Groove_(joinery) '''Grooves'''], but NOT a '''[[Table Saw]]''' ''(ref: [http://www.hse.gov.uk/pubns/wis16.pdf '''WIS16 - HSE'''] as above)''. | |||
</span> | |||
---- | |||
{{Wood Joints Buyers Guide}} | |||
[[Category:Wood Joints]] | [[Category:Wood Joints]] | ||
Latest revision as of 17:54, 1 January 2018
Description
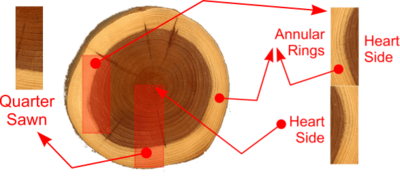
Widening Joints are used to make wider boards by joining narrower ones edge to edge. Whichever jointing method is chosen, care should be taken to ensure the curve of the Annular Rings is reversed on adjacent boards as shown.
As timber dries out, its Annular Rings will tend to try and straighten. Reversing their direction in this way minimises the degree to which the widened board will cup or warp.
Note: Although now almost universally replaced by MDF, solid timber window sills would be positioned 'heart side up'. This ensures that if there is any movement as the Annular Rings tend to straighten, the sill would 'bow' upwards in the centre rather than 'cup' and hold moisture.
To avoid this problem almost completely, choose boards which have been sliced radially from across the centre of the tree, and whose Annular Rings are therefore close to being at right angles to each face (these boards are known as Quarter Sawn and Rift Sawn - they are much sought-after and will be hard to find!)
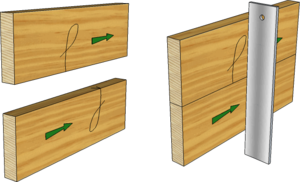
It is important to ensure joining surfaces are straight and square and to arrange boards such that their Grain goes in the same direction - this is so any subsequent planing and finishing is made easier. Check for Squareness by balancing one board on top of another and testing with a straight edge.
Some planing will be needed after jointing to ensure the finished boards surfaces are flat, so choose boards somewhat thicker than the required finished size to start with.

| |
| A : Radial Cut = Quarter Sawn (and Rift Sawn) B : Tangential Cut = Through & Through, Plain or Crown Sawn | |
Rubbed Joint
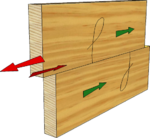
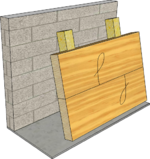
This plain Butt Joint is the simplest Widening Joint but with careful preparation and modern Adhesives can be very strong.
- Prepare the joining edges carefully by planing them to ensure they are straight and test for Squareness with a Try Square.
- Mark Face Side and Face Edge - and if several boards are to be joined, mark the joining faces and number them to ensure they are assembled correctly.
- Coat the joining edges with a suitable Adhesive (e.g. P.V.A.) then rub the joining edges together to remove any air bubbles and surplus glue (hence the name: Rubbed Joint).
- The assembled joint can then be stacked against a wall until the glue sets as shown.
- Alternatively, the boards can be held in Sash Cramps but ensure the Cramps are placed on alternative sides to prevent the boards buckling under pressure.
Slot Screwed Widening Joint
Screws can be used in this way to reinforce an ordinary Rubbed Joint with the advantage that the finished board can be worked on straight away after jointing.
It is also useful for joining together greasy, old, painted or rough timber in coarse construction work (e.g. for outside use).
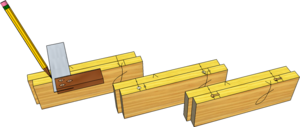
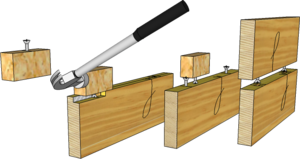
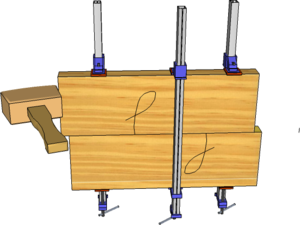
- Prepare the joining edges, Gauge their centres, then hold them together with ends overlapping about 12mm as shown.
- Use a Try Square to square lines across where the screws are to be positioned.
- On one piece only, square lines across about 14mm - 16mm to one side of each of the screw centres to mark the ends of the slots.
- Drill pilot holes for the screws in one piece and holes to clear the screw-heads in the second piece 10mm - 12mm deep.
- Drill holes to clear the screw shank, also 10mm to 12mm deep, at the ends of the slots.
- Using a thin Mortise Chisel cut the slots through to the screw-head clearance holes to a width equal to the screw shank. (click on images to enlarge for clarity)
- Screw a screw into a scrap piece of wood to a depth of 8 or 9mm and use this to cut the screw head grooves by placing it down into the screw-head clearance hole and tapping along the slot with a Hammer.
- Use the same scrap of wood, with screw, to set the height of the screw-heads in the second piece of timber.
- Bring the two pieces together and lightly cramp, then using a Mallet, drive the screws along the slots to bring the timber ends together.
- if required after this dry run, take apart the joint, add glue and re-assemble.
Dowel Joint
Dowels provide a convenient means by which to strengthen a Butt Joint (or Rubbed Joint) but great care has to be taken to ensure accurate location of the Dowels in each piece to be joined. Choose a Dowel diameter approximately one third the thickness of the joining edges.
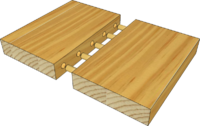
- Prepare the joining edges, Gauge their centres, then hold them together in a Vice for example.
- Use a Try Square to square lines across where the Dowels are to be positioned.
- Drill holes for the Dowels 20mm - 25mm deep in one piece only,
- Insert Dowel Centres into the drilled holes and press the two halves of the joint together such that the Dowel Centres mark the hole positions on the second piece.
- (an alternative is partially to drive panel pins into one half, snip off their heads and use these to mark centres on the second piece).
Biscuit Joint
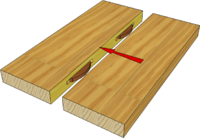
Butt Joints can be reinforced by inserting dried and compressed wooden Biscuits into pre-cut slots or Grooves. The use of Biscuits is gaining popularity in preference to using Dowels because they are more forgiving and less marking out is needed (i.e. the Biscuit Jointer or Router used has stops and fences to ensure correct positioning and often only a centre line is needed to mark the positions for the Biscuits).
Tongued and Grooved Joints
- Tongue and Groove Joint
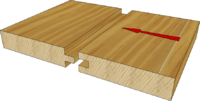
A traditional floor-boarding joint (now largely superseded by Chipboard panels but still a useful and strong method of joining together boards). The Groove should be approximately one third the thickness of the joining edges and cut with a Plough Plane using the nearest width blade. The Tongue can be cut to match in the form of two Rebates but shaped and matching blades are available for Combination Planes to ensure a close fitting joint. They can also be machined using a Router.
Note: Traditionally, Quarter Sawn, Rift Sawn, timber would be chosen for floorboards because the Annular Rings at right angles to the surface would offer much greater wear resistance.
- Loose Tongue (or 'Key')
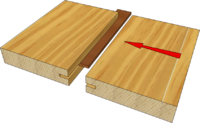
Very similar to a Tongued and Grooved Joint but requiring only Grooves to be cut into each of the joining edges thus simplifying construction. The Tongue is made from solid timber or Ply and fitted into the Grooves which are cut to a suitable width (e.g. the nearest standard Ply thickness to approximately one third the timber thickness). If Tongues are made from solid timber, the Grain should be either diagonal or go across the width for strength.
- Matched Boarding

This is a Tongued and Grooved joint whereby the joint is emphasised by the addition of a Chamfer along the joining edges. It is used to make up panelling including the rear of bookcases for example.
- Ship Lap Boarding

This also is a variant of a Tongued and Grooved joint and is used commonly for exterior cladding of sheds for example.
Note: Grooves and Rebates may also be cut by make several passes with a Table Saw but only with adequate guarding in place - see Circular saw benches - Safe working practices WIS16 - HSE. Industrially (but NOT in schools - ref: BS 4163) a Spindle Moulder may also be used. Either a Router or a Spindle Moulder may be used for stopped Rebates and Grooves, but NOT a Table Saw (ref: WIS16 - HSE as above).
- Good tools will last a lifetime - buy the best you can afford!


