Mitre Joint: Difference between revisions
From DT Online
m (Added links) |
m (Corrected Link) |
||
| Line 10: | Line 10: | ||
---- | ---- | ||
<span style="color: green">'''Note:''' | <span style="color: green">'''Note:''' | ||
Several wood joints may include a mitre on one of the faces, especially if there is a need to return mouldings of some kind ''(e.g. '''[[Bridle]]''' and '''[[Dovetail]]'''. | Several wood joints may include a mitre on one of the faces, especially if there is a need to return mouldings of some kind ''(e.g. '''[[Bridle Joint|Bridle]]''' and '''[[Dovetail Joint|Dovetail]]'''. | ||
</span> | </span> | ||
---- | ---- | ||
Revision as of 09:22, 8 February 2016
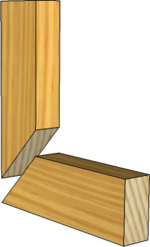
A Mitre Joint is created by cutting the joining pieces at 45 deg. They are essentially a Butt Joint and therefore quite weak but can be strengthened by reinforcement with Keys (i.e. thin pieces of veneer or similar set into sawn grooves). Keys may be made from the same timber or a contrasting timber (or another material) can create a decorative effect.
Mitre Joints are most commonly seen in picture frames but are useful in any situation where a Rebate, Groove or Moulding has to be returned around a corner.
Note: Several wood joints may include a mitre on one of the faces, especially if there is a need to return mouldings of some kind (e.g. Bridle and Dovetail.
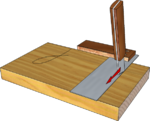
It is important to ensure that the ends of timber forming the joint are cut accurately and Square. This can be achieved off the saw if care is taken using a Tenon Saw and a Mitre Box for example. Alternatively a Precision Mitre Saw or Radial Arm Saw will produce more predictable results. In all cases, scribing the joint lines with a Marking Knife will help to ensure clean edges at the joint face.
Grooves for Loose Tongues can be cut using a Plough Plane and Slots for Keys cut by hand using a Tenon Saw and Coping Saw then pared to the line using Chisels. Alternatively a Router with suitable cutters can be used for both tasks.
Note: The work-piece is turned around in the Vice to ensure the Tenon Saw cuts vertically and the waste is on the blind side of the saw. Note also the scrap wood behind the work-piece to avoid splitting out when paring to the line with the chisel.
Safety Point! Students may only use a Router or Radial Arm Saw when they have been trained and assessed and the assessment shows that they are competent, and are under appropriate supervision of specifically trained staff.


