Seaming: Difference between revisions
From DT Online
mNo edit summary |
mNo edit summary |
||
| Line 14: | Line 14: | ||
Once soldered together, the 'seamed' form can be further worked by '''[[Raising]]'''or similar techniques and then '''[[Planishing|Planished]]'''. Bases can be added, as can embellishments such as spouts, feet or surface decoration, by working through the grades ''(i.e. melting points)'' of '''[[Silver Solder]]''' and finally down to '''[[Soft Solder]]'''.[[File:FilingConeCylinder.png|right|300px]] | Once soldered together, the 'seamed' form can be further worked by '''[[Raising]]''' or similar techniques and then '''[[Planishing|Planished]]'''. Bases can be added, as can embellishments such as spouts, feet or surface decoration, by working through the grades ''(i.e. melting points)'' of '''[[Silver Solder]]''' and finally down to '''[[Soft Solder]]'''.[[File:FilingConeCylinder.png|right|300px]] | ||
Revision as of 22:47, 14 May 2017
Description
Seaming is a process whereby flat sheets of metal are rolled and joined at their 'seam' to form cylinders or cones as a starting point for further work when creating Beaten Metalwork articles.
Features and Applications
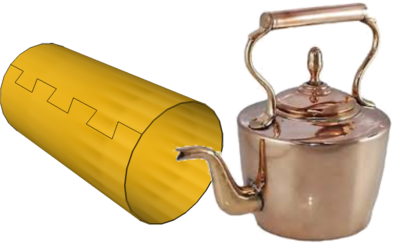
The 'seams' are commonly joined by Hard Soldering using Silver Solder. Straight 'seams' are common, and are suitable for most purposes, but traditional Copper Kettles, for example, have 'seam' joints Dovetailed for extra strength before soldering.
Once soldered together, the 'seamed' form can be further worked by Raising or similar techniques and then Planished. Bases can be added, as can embellishments such as spouts, feet or surface decoration, by working through the grades (i.e. melting points) of Silver Solder and finally down to Soft Solder.
The Seaming Process
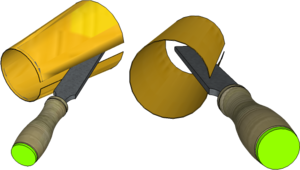
The flat sheet is first rolled into the required cylinder or cone and the 'seam' filed to the closest fit possible (all solders flow by a process of Capillary Action so the joint needs to be clean and close fitting).
Filing at this stage also helps to ensure that the metal edge is filed to a slight bevel such that close metal to metal contact is maintained throughout the sheet thickness.
Some Silversmiths prefer to hold the 'tang' of a file in a vice and simply rub the 'seamed' joint backwards and forwards along it to achieve a good close fit.
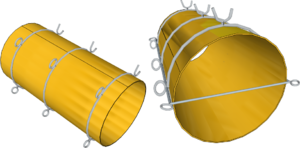
Once a close fitting 'seam' has been achieved, the metal is thoroughly cleaned (e.g. with Emery Cloth) and held together with hoops of soft iron binding wire prior to soldering. Twisted loops are included which can be further twisted to pull the joint together. Conical forms also require wire hoops around the ends to which the circular hoops are attached so that they don't slip towards the narrower end of the cone.
After soldering, the 'seamed' object is Pickled to clean it of oxides after which is is ready for further work (e.g. one end can simply be flared out by holding it at an angle to a cylindrical Stake and striking it with a Raising Hammer or Collet Hammer).
 |
 |
 |
 |
 |
 |
 |
| Jewellers Leather Sandbag |
Bossing Mallet |
Rawhide Mallet |
Jewellers Hammers |
Repoussé and Chasing Punches |
Panel Beating Tools Set |
Doming Block and Punches |


