Corner Lap Joint: Difference between revisions
From DT Online
mNo edit summary |
mNo edit summary |
||
| (10 intermediate revisions by the same user not shown) | |||
| Line 1: | Line 1: | ||
=====Description===== | |||
[https://en.wikipedia.org/wiki/Lap_joint '''Corner Lap Joints'''] ''(aka Rebated Butt, Shouldered Corner, or Angle Lap Joint)'' is useful for joining the corners of boxes, cabinet carcasses and simple drawer fronts for example. It is an improvement on a '''[[Butt Joint]]''' in that it provides two potential nailing or screwing surfaces | [https://en.wikipedia.org/wiki/Lap_joint '''Corner Lap Joints'''] ''(aka Rebated Butt, Shouldered Corner, or Angle Lap Joint)'' is useful for joining the corners of boxes, cabinet carcasses and simple drawer fronts for example. It is an improvement on a '''[[Butt Joint]]''' in that it provides two potential nailing or screwing surfaces, more gluing area and reduces the amount of [https://en.wikipedia.org/wiki/Wood_grain '''End Grain'''] exposed. | ||
The thickness of the '''Lap''' can depend on whether two nailing surfaces are required for strength, or if it is used | [[File:CornerLapMainImage.png|400px|right]] | ||
The thickness of the '''Lap''' can depend on whether two nailing surfaces are required for strength, or if it is used to conceal [https://en.wikipedia.org/wiki/Wood_grain '''End Grain'''] or cover the end of a [https://en.wikipedia.org/wiki/Groove_%28joinery%29 '''Groove'''] or [https://en.wikipedia.org/wiki/Rabbet '''Rebate'''] for example. | |||
| Line 9: | Line 10: | ||
[[File:CornerLapScribing.png|200px|right]] | |||
=====Marking Out===== | =====Marking Out===== | ||
| Line 17: | Line 18: | ||
A '''[[Gauges|Marking Gauge]]''' can be used to mark the thickness of the '''Lap'''. | A '''[[Gauges|Marking Gauge]]''' can be used to mark the thickness of the '''Lap'''. | ||
| Line 22: | Line 24: | ||
[[File:CornerLapCuttingSawGuide.png |200px|left]] | [[File:CornerLapCuttingSawGuide.png |200px|left]] | ||
The scribed lines are ''' | The scribed lines are '''[[Paring|pared]]''' into a shallow 'V' groove to provide a guide for the '''[[Tenon Saw]]''' which is used to cut the shoulders. | ||
| Line 28: | Line 30: | ||
[[File:CornerLapCuttingShoulder.png |300px|right]] | |||
=====Sawing the Shoulder===== | =====Sawing the Shoulder===== | ||
The work-piece is firmly clamped to the bench top and a '''[[Tenon Saw]]''' is guided by the ''' | The work-piece is firmly clamped to the bench top and a '''[[Tenon Saw]]''' is guided by the '''[[Paring|pared]]''' 'V' groove to saw down to the lines marking the '''Lap'''. | ||
| Line 43: | Line 45: | ||
It may be necessary when jointing larger pieces of timber to make more than a single saw cut to enable the waste to be removed more easily and accurately. | It may be necessary when jointing larger pieces of timber to make more than a single saw cut to enable the waste to be removed more easily and accurately. | ||
[[File:CornerLapChiselling2.png|250px|right]] | |||
=====Paring away the waste===== | =====Paring away the waste===== | ||
Grip the work firmly by clamping to the bench top and use a '''[[Chisels|Wood Chisel]]''' with a '''[[Mallets|Mallet]]''' to remove the bulk of the waste | Grip the work firmly by clamping to the bench top and use a '''[[Chisels|Wood Chisel]]''' with a '''[[:Category:Mallets|Mallet]]''' to remove the bulk of the waste | ||
[[File:CornerLapParing.png|200px|left]] | [[File:CornerLapParing.png|200px|left]] | ||
Use '''[[Chisels]]''' to '''pare''' away the remaining waste to create the '''Lap''''. | Use '''[[Chisels]]''' to '''[[Paring|pare]]''' away the remaining waste to create the '''Lap''''. | ||
Grip the blade of the '''[[Chisels|Chisel]]''' with one hand ''(thumb on top)'' and grip the handle with the other, to push with a slicing action to '''pare''' down to the marked lines.Vary directions to cope with any difficult | Grip the blade of the '''[[Chisels|Chisel]]''' with one hand ''(thumb on top)'' and grip the handle with the other, to push with a slicing action to '''[[Paring|pare]]''' down to the marked lines. Vary directions to cope with any difficult [https://en.wikipedia.org/wiki/Wood_grain '''Grain''']. | ||
| Line 70: | Line 71: | ||
[[File:CornerLapRouter.png|200px|left]] | |||
To remove waste and level the '''Lap''' on wider boards in particular, a '''[[Planes|Rebate Plane]]''' or '''[[Planes|Shoulder Plane]]''' can be used as shown. | To remove waste and level the '''Lap''' on wider boards in particular, a '''[[Planes|Rebate Plane]]''' or '''[[Planes|Shoulder Plane]]''' can be used as shown. | ||
As an alternative to cutting by hand, a '''[[Router|Portable Router]]''' can be supported on scrap timber equal to the thickness of the work-piece and, with suitable guides in place, the '''Lap''' can be machined out. | As an alternative to cutting by hand, a '''[[Router|Portable Router]]''' can be supported on scrap timber equal to the thickness of the work-piece and, with suitable guides in place, the '''Lap''' can be machined out. | ||
---- | |||
<span style="color: red">'''Safety Point!''' | |||
Students may only use a '''[[Router]]''' when they have been trained and assessed and the assessment shows that they are competent, and are under appropriate supervision by specifically trained staff. | |||
</span> | |||
---- | |||
[[File:CornerLapBoxes.png|right|500px]] | |||
=====Uses for a Corner Lap Joint===== | |||
The '''Lap''' can be used not only to hide [https://en.wikipedia.org/wiki/Wood_grain '''End Grain'''] but also to close off features such as a [https://en.wikipedia.org/wiki/Groove_%28joinery%29 '''Groove'''] cut for a sliding lid or a [https://en.wikipedia.org/wiki/Rabbet '''Rebate'''] cut to receive a box top or backing panel for example. | |||
The thickness of the '''Lap''' is varied to suit the depth of '''Groove''' or '''Rebate'''. | |||
{{Wood Joints Buyers Guide}} | |||
[[Category:Wood Joints]] | [[Category:Wood Joints]] | ||
Latest revision as of 07:54, 30 August 2017
Description
Corner Lap Joints (aka Rebated Butt, Shouldered Corner, or Angle Lap Joint) is useful for joining the corners of boxes, cabinet carcasses and simple drawer fronts for example. It is an improvement on a Butt Joint in that it provides two potential nailing or screwing surfaces, more gluing area and reduces the amount of End Grain exposed.
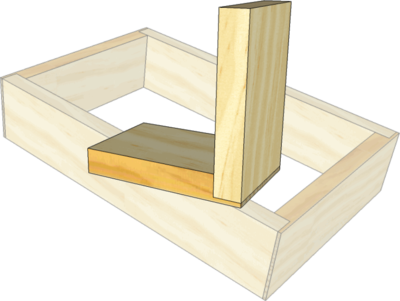
The thickness of the Lap can depend on whether two nailing surfaces are required for strength, or if it is used to conceal End Grain or cover the end of a Groove or Rebate for example.
Marking Out
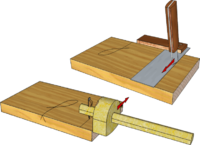
The shoulder is marked along from the end of the work-piece either by striking with a Marking Knife and Try Square or by setting a Cutting Gauge to the timber thickness.
A Marking Gauge can be used to mark the thickness of the Lap.
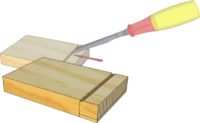
The scribed lines are pared into a shallow 'V' groove to provide a guide for the Tenon Saw which is used to cut the shoulders.
Scribing the lines serves to ensure the shoulders have an accurate sharp edge where they butt up to the surface of the second piece of timber.
Sawing the Shoulder
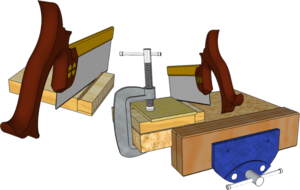
The work-piece is firmly clamped to the bench top and a Tenon Saw is guided by the pared 'V' groove to saw down to the lines marking the Lap.
If additional guidance is required, the scrap piece of timber used to clamp the work-piece can be aligned along the 'V' groove and the saw rubbed alongside it.

It may be necessary when jointing larger pieces of timber to make more than a single saw cut to enable the waste to be removed more easily and accurately.
Paring away the waste
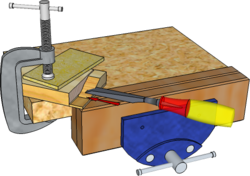
Grip the work firmly by clamping to the bench top and use a Wood Chisel with a Mallet to remove the bulk of the waste
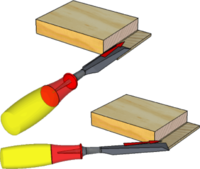
Use Chisels to pare away the remaining waste to create the Lap'.
Grip the blade of the Chisel with one hand (thumb on top) and grip the handle with the other, to push with a slicing action to pare down to the marked lines. Vary directions to cope with any difficult Grain.
Note: When paring with a Chisel press the back of the hand or knuckles gripping the blade, against the work-piece to improve control and act as a brake.
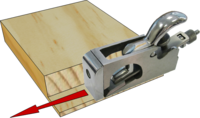
To remove waste and level the Lap on wider boards in particular, a Rebate Plane or Shoulder Plane can be used as shown.
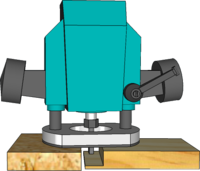
As an alternative to cutting by hand, a Portable Router can be supported on scrap timber equal to the thickness of the work-piece and, with suitable guides in place, the Lap can be machined out.
Safety Point! Students may only use a Router when they have been trained and assessed and the assessment shows that they are competent, and are under appropriate supervision by specifically trained staff.
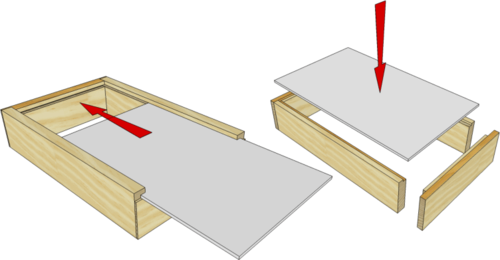
Uses for a Corner Lap Joint
The Lap can be used not only to hide End Grain but also to close off features such as a Groove cut for a sliding lid or a Rebate cut to receive a box top or backing panel for example.
The thickness of the Lap is varied to suit the depth of Groove or Rebate.
- Good tools will last a lifetime - buy the best you can afford!


