Dovetail Joint: Difference between revisions
From DT Online
Created article |
mNo edit summary |
||
| (8 intermediate revisions by the same user not shown) | |||
| Line 1: | Line 1: | ||
[[File:DovetailJoints.png|500px|right]] | |||
__TOC__ | |||
<div style="clear: both;"></div> | |||
=====Description===== | |||
[https://en.wikipedia.org/wiki/Dovetail_joint '''Dovetail Joints'''] are one of the strongest joints for box or carcass construction and can only be separated in one direction. There are '''Dovetail''' type variations for several framing joints ''(e.g.see '''[[Halving Joint|Halving]]''', '''[[Housing Joint|Housing]]''' and '''[[Bridle Joint|Bridle]]''' '''Joints''')''. In addition, '''Dovetail''' shaped '''Keys''' can be used to reinforce joints ''(e.g. '''[[Mitre Joint|Mitre Joints]]''')''. | [https://en.wikipedia.org/wiki/Dovetail_joint '''Dovetail Joints'''] are one of the strongest joints for box or carcass construction and can only be separated in one direction. There are '''Dovetail''' type variations for several framing joints ''(e.g.see '''[[Halving Joint|Halving]]''', '''[[Housing Joint|Housing]]''' and '''[[Bridle Joint|Bridle]]''' '''Joints''')''. In addition, '''Dovetail''' shaped '''Keys''' can be used to reinforce joints ''(e.g. '''[[Mitre Joint|Mitre Joints]]''')''. | ||
Increased use of '''[[Manufactured Boards]]''', modern adhesives and the development of new technologies such as the '''[[Biscuit Joint]]''' makes the cutting of most traditional wood joints less cost effective, but hand-cut joints still have a place in high-quality cabinet work and especially if the joint is used as a signature part of the design or a decorative feature. The illustration shows '''Single''' and '''Multiple''' '''Dovetails''' and both '''Through Dovetails''' and '''Lap Dovetails'''. | Increased use of '''[[Manufactured Board|Manufactured Boards]]''', modern adhesives and the development of new technologies such as the '''[[Biscuit Joint]]''' makes the cutting of most traditional wood joints less cost effective, but hand-cut joints still have a place in high-quality cabinet work and especially if the joint is used as a signature part of the design or a decorative feature. The illustration shows '''Single''' and '''Multiple''' '''Dovetails''' and both '''Through Dovetails''' and '''Lap Dovetails'''. | ||
| Line 9: | Line 15: | ||
* the '''Pins''', which are cut into the [https://en.wikipedia.org/wiki/Wood_grain '''End Grain'''] of the other. | * the '''Pins''', which are cut into the [https://en.wikipedia.org/wiki/Wood_grain '''End Grain'''] of the other. | ||
In the case of both '''Through Dovetails''' and '''Lap Dovetails''' the shape of the '''Tails''' can be seen and used to decorative effect. This can be enhanced if the size and/or depth of '''Tails''' is varied, if narrow '''Pins''' are cut in relation to the width of '''Tails''' or if contrasting timbers are used. | In the case of both '''Through Dovetails''' and '''Lap Dovetails''' the shape of the '''Tails''' can be seen and used to decorative effect. This can be enhanced if the size and/or depth of '''Tails''' is varied, if narrow '''Pins''' are cut in relation to the width of '''Tails''' or if contrasting timbers are used. | ||
=====Marking Out===== | =====Marking Out===== | ||
* The joining pieces are prepared as normal and marked with '''[[Face Side and Face Edge]]''' marks. | * The joining pieces are prepared as normal and marked with '''[[Face Side and Face Edge]]''' marks. | ||
* The thickness of the timber to be joined is marked out across each board. | * The thickness of the timber to be joined is marked out across each board. | ||
* The '''Tails''' are set out and their angle marked with a '''[[Gauges|Bevel Gauge]]''' ''(alternatively, a '''[[Template|Dovetail Template]]''' may be used)'' and '''[Squareness|Squared]]''' across the end using a '''[[Try Square]]'''. | * The '''Tails''' are set out and their angle marked with a '''[[Gauges|Bevel Gauge]]''' ''(alternatively, a '''[[Template|Dovetail Template]]''' may be used)'' and '''[[Squareness|Squared]]''' across the end using a '''[[Try Square]]'''. | ||
* The distance between '''Tails''' ''(i.e. | [[File:DovetailMarkingOut.png|600px|right]] | ||
* The distance between '''Tails''' ''(i.e. the '''Pins''')'' can be about ¾ the thickness of timber and their width 3 times the thickness, but this is often varied - thinner '''Pins''' for aesthetics or equal '''Pins''' and '''Tails''' for maximum gluing area. | |||
* A '''[[Marking Knife]]''' is used with a '''[[Try Square]]''' ''(alternatively use a '''[[Gauges|Cutting Gauge]]''')'' to scribe an incised line across the waste marking the '''Pins''' to ensure a clean cut. | * A '''[[Marking Knife]]''' is used with a '''[[Try Square]]''' ''(alternatively use a '''[[Gauges|Cutting Gauge]]''')'' to scribe an incised line across the waste marking the '''Pins''' to ensure a clean cut. | ||
<div style="clear: both;"></div> | <div style="clear: both;"></div> | ||
=====Sawing the Tails===== | =====Sawing the Tails===== | ||
* Saw the down the waste side of the '''Tails''' using a '''[[Tenon Saw]]'''. | * Saw the down the waste side of the '''Tails''' using a '''[[Tenon Saw]]'''. | ||
[[File:DovetailSawingTails.png|500px|right]] | |||
* Position, re-position and reverse the work-piece in the '''[[Carpenters Vice|Vice]]''' to ensure the saw is used vertically and the waste is always on the blind side. | * Position, re-position and reverse the work-piece in the '''[[Carpenters Vice|Vice]]''' to ensure the saw is used vertically and the waste is always on the blind side. | ||
* Position the work-piece vertically in the '''[[Carpenters Vice|Vice]]''' and cut across the bottom of the waste using a '''[[Coping Saw]]'''. | * Position the work-piece vertically in the '''[[Carpenters Vice|Vice]]''' and cut across the bottom of the waste using a '''[[Coping Saw]]'''. | ||
| Line 35: | Line 36: | ||
=====Marking the Pins===== | =====Marking the Pins===== | ||
[[File:DovetailMarkingPins|400px|right]] | [[File:DovetailMarkingPins.png|400px|right]] | ||
* Hold the '''Tails''' on the end of the second piece of timber and use this as a '''[[Template]]'''. | * Hold the '''Tails''' on the end of the second piece of timber and use this as a '''[[Template]]'''. | ||
* Use a '''[[ | * Use a '''[[Scriber]]''', '''[[Marking Knife]]''', '''Penknife''', '''[[Craft Knife]]''' or very sharp pencil to mark the '''Pins''' on the [https://en.wikipedia.org/wiki/Wood_grain '''End Grain''']. | ||
* A traditional alternative is to delay cutting out the waste between the '''Tails''' and use their saw cuts to locate a '''[[Tenon Saw]]''' which is then drawn out to mark a line as shown. | * A traditional alternative is to delay cutting out the waste between the '''Tails''' and use their saw cuts to locate a '''[[Tenon Saw]]''' which is then drawn out to mark a line as shown. | ||
* ''(an even older method, is to use a [https://en.wikipedia.org/wiki/Pounce_%28art%29 '''Pounce-Bag'''] instead of a saw. This is a small, fine cloth bag filled with powdered chalk. When tapped on top of the saw cuts, chalk dust falls through and marks the lines required)'' | * ''(an even older method, is to use a [https://en.wikipedia.org/wiki/Pounce_%28art%29 '''Pounce-Bag'''] instead of a saw. This is a small, fine cloth bag filled with powdered chalk. When tapped on top of the saw cuts, chalk dust falls through and marks the lines required)'' | ||
| Line 44: | Line 45: | ||
<div style="clear: both;"></div> | <div style="clear: both;"></div> | ||
=====Cutting the Pins===== | =====Cutting the Pins===== | ||
[[File:DovetailSawingPins.png| | [[File:DovetailSawingPins.png|500px|right]] | ||
* Position the work-piece vertically in the '''[[Carpenters Vice|Vice]]''' and saw down the waste side of the '''Pins''' using a '''[[Tenon Saw]]'''. | * Position the work-piece vertically in the '''[[Carpenters Vice|Vice]]''' and saw down the waste side of the '''Pins''' using a '''[[Tenon Saw]]'''. | ||
* Cut across the bottom of the '''Pins''' using a '''[[Coping Saw]]'''. | * Cut across the bottom of the '''Pins''' using a '''[[Coping Saw]]'''. | ||
| Line 56: | Line 57: | ||
* '''Tails are cut as normal''' and marked on the [https://en.wikipedia.org/wiki/Wood_grain '''End Grain'''] of the second work-piece as before - but aligned with the '''''lap'''''. | * '''Tails are cut as normal''' and marked on the [https://en.wikipedia.org/wiki/Wood_grain '''End Grain'''] of the second work-piece as before - but aligned with the '''''lap'''''. | ||
* A '''[[Tenon Saw]]''' is used at an angle to saw along the lines marking the pins as far as possible. | * A '''[[Tenon Saw]]''' is used at an angle to saw along the lines marking the pins as far as possible. | ||
* The waste can then be removed by using a '''[[Chisels|Chisel]]''' and '''[[Mallets|Mallet]]''' - optionally, the end of the waste can be removed first drilling along the end with closely space holes. | * The waste can then be removed by using a '''[[Chisels|Chisel]]''' and '''[[:Category:Mallets|Mallet]]''' - optionally, the end of the waste can be removed first drilling along the end with closely space holes. | ||
* Finally, the '''Pins''' are '''[[Paring|Pared]]''' down to the lines. | * Finally, the '''Pins''' are '''[[Paring|Pared]]''' down to the lines. | ||
---- | ---- | ||
| Line 63: | Line 64: | ||
</span> | </span> | ||
---- | ---- | ||
{{Wood Joints Buyers Guide}} | |||
<div style="clear: both;"></div> | <div style="clear: both;"></div> | ||
| Line 78: | Line 81: | ||
<div style="clear: both;"></div> | <div style="clear: both;"></div> | ||
=====Other Types of Dovetail===== | =====Other Types of Dovetail===== | ||
* '''Secret Lap Dovetail''' | * '''Secret Lap Dovetail''' | ||
** ''(aka a '''Double Lap Dovetail''')'' these have '''''laps''''' covering both '''Tails''' and '''Pins''' such that only a thin strip of [https://en.wikipedia.org/wiki/Wood_grain '''End Grain'''] shows. | ** ''(aka a '''Double Lap Dovetail''')'' these have '''''laps''''' covering both '''Tails''' and '''Pins''' such that only a thin strip of [https://en.wikipedia.org/wiki/Wood_grain '''End Grain'''] shows. | ||
** Both '''Tails''' and '''Pins''' are cut in the same way as '''Pins''' are cut for a '''Lap Dovetail'''. | ** Both '''Tails''' and '''Pins''' are cut in the same way as '''Pins''' are cut for a '''Lap Dovetail'''. | ||
[[File:SecretDovetails.png|600px|right]] | |||
* '''Secret Mitred Dovetail''' | * '''Secret Mitred Dovetail''' | ||
** These are similar to '''Secret Lap Dovetails''' except both '''''laps''''' are extended and '''[[Mitre Joint|Mitred]]''' where they meet. | ** These are similar to '''Secret Lap Dovetails''' except both '''''laps''''' are extended and '''[[Mitre Joint|Mitred]]''' where they meet. | ||
| Line 87: | Line 90: | ||
Both these '''''secret''''' '''Dovetails''' are used | Both these '''''secret''''' '''Dovetails''' are used in the highest quality cabinet work and in jewellery boxes for example. | ||
{{Jig Buyers Guide}} | |||
[[Category:Wood Joints]] | [[Category:Wood Joints]] | ||
Latest revision as of 09:32, 29 October 2017
Description
Dovetail Joints are one of the strongest joints for box or carcass construction and can only be separated in one direction. There are Dovetail type variations for several framing joints (e.g.see Halving, Housing and Bridle Joints). In addition, Dovetail shaped Keys can be used to reinforce joints (e.g. Mitre Joints).
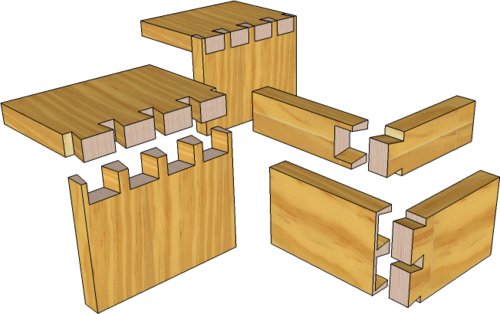
Increased use of Manufactured Boards, modern adhesives and the development of new technologies such as the Biscuit Joint makes the cutting of most traditional wood joints less cost effective, but hand-cut joints still have a place in high-quality cabinet work and especially if the joint is used as a signature part of the design or a decorative feature. The illustration shows Single and Multiple Dovetails and both Through Dovetails and Lap Dovetails.
The two main parts of the joint are:
- the Tails, which are cut with the Grain on the end of one of the joining pieces;
- the Pins, which are cut into the End Grain of the other.
In the case of both Through Dovetails and Lap Dovetails the shape of the Tails can be seen and used to decorative effect. This can be enhanced if the size and/or depth of Tails is varied, if narrow Pins are cut in relation to the width of Tails or if contrasting timbers are used.
Marking Out
- The joining pieces are prepared as normal and marked with Face Side and Face Edge marks.
- The thickness of the timber to be joined is marked out across each board.
- The Tails are set out and their angle marked with a Bevel Gauge (alternatively, a Dovetail Template may be used) and Squared across the end using a Try Square.
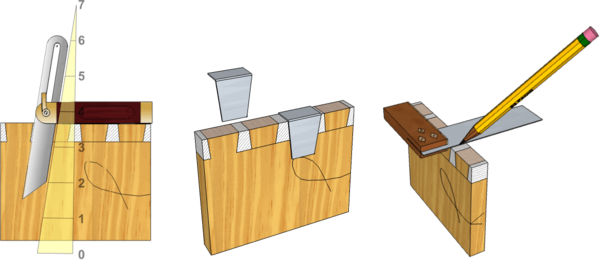
- The distance between Tails (i.e. the Pins) can be about ¾ the thickness of timber and their width 3 times the thickness, but this is often varied - thinner Pins for aesthetics or equal Pins and Tails for maximum gluing area.
- A Marking Knife is used with a Try Square (alternatively use a Cutting Gauge) to scribe an incised line across the waste marking the Pins to ensure a clean cut.
Sawing the Tails
- Saw the down the waste side of the Tails using a Tenon Saw.
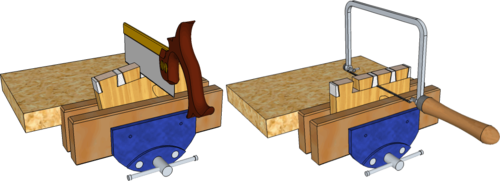
- Position, re-position and reverse the work-piece in the Vice to ensure the saw is used vertically and the waste is always on the blind side.
- Position the work-piece vertically in the Vice and cut across the bottom of the waste using a Coping Saw.
- Finish the Tails by scribing across the edges of the work-piece, Pare with a Chisel to cut a shallow 'Vee' groove across the line of the shoulders, and saw out with a Tenon Saw.
Marking the Pins
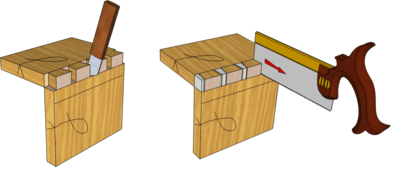
- Hold the Tails on the end of the second piece of timber and use this as a Template.
- Use a Scriber, Marking Knife, Penknife, Craft Knife or very sharp pencil to mark the Pins on the End Grain.
- A traditional alternative is to delay cutting out the waste between the Tails and use their saw cuts to locate a Tenon Saw which is then drawn out to mark a line as shown.
- (an even older method, is to use a Pounce-Bag instead of a saw. This is a small, fine cloth bag filled with powdered chalk. When tapped on top of the saw cuts, chalk dust falls through and marks the lines required)
Cutting the Pins
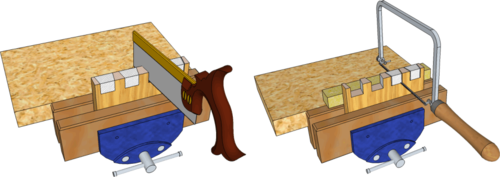
- Position the work-piece vertically in the Vice and saw down the waste side of the Pins using a Tenon Saw.
- Cut across the bottom of the Pins using a Coping Saw.
- If needed, line up the bottom of the Pins with a scrap of suitable thickness timber placed behind the work-piece and use this a a depth stop to guide the blind side of the saw.
Cutting Pins for a Lap Dovetail
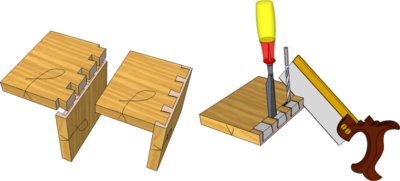
- Lap Dovetails are commonly used in drawer construction. The lap prevents End Grain showing on the drawer front and the Tails provide resistance to joint coming apart as the drawer is opened and closed.
- Tails are cut as normal and marked on the End Grain of the second work-piece as before - but aligned with the lap.
- A Tenon Saw is used at an angle to saw along the lines marking the pins as far as possible.
- The waste can then be removed by using a Chisel and Mallet - optionally, the end of the waste can be removed first drilling along the end with closely space holes.
- Finally, the Pins are Pared down to the lines.
Note: Whether Tails or Pins should be cut first is often a matter of debate and ultimately a matter of personal choice, but the view of DT Online is that it is easiest to cut Tails first for Through Dovetails and Lap Dovetails but Pins first for others.
- Good tools will last a lifetime - buy the best you can afford!
Using a Router and Dovetail Jig
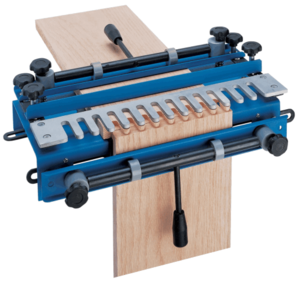
- Dovetail Jigs enable the two pieces of timber making the joint to be clamped together with a Template comprising a series of equally spaced guide slots. A Router equipped with a Dovetail Cutter is simply passed along each slot in turn to cut both halves of the eventual Dovetail Joint.
- The bottom of the Pins are left rounded by the action of the cutter which is hidden by the lap of Lap Dovetails.
- Dovetail Jigs produce equal size Pins and Tails.
Safety Point!
All high-speed woodcutting machinery is dangerous. Routers must only be used by trained adults or trainees under direct supervision by specifically trained staff.
Other Types of Dovetail
- Secret Lap Dovetail
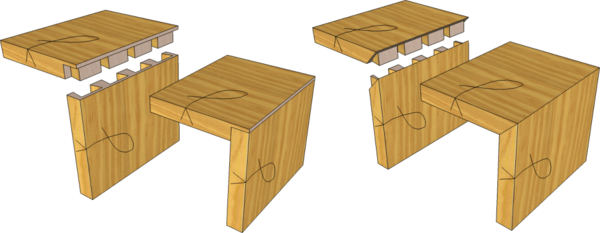
- (aka a Double Lap Dovetail) these have laps covering both Tails and Pins such that only a thin strip of End Grain shows.
- Both Tails and Pins are cut in the same way as Pins are cut for a Lap Dovetail.
- Secret Mitred Dovetail
- These are similar to Secret Lap Dovetails except both laps are extended and Mitred where they meet.
- In addition, an allowance is left on the edges of the work-pieces and this too is Mitred such that, on assembly, the Secret Mitred Dovetail looks just like a plain Mitred but is, of course, much stronger.
Both these secret Dovetails are used in the highest quality cabinet work and in jewellery boxes for example.
 |
 |
 |
 |
 |
 |
 |
| Dowel Jig |
Mobile Drilling Aid |
Dowel Master |
Pocket Hole Jig |
Dovetail Jig |
Kitchen Worktop Jig |
Jigs & Fixtures for the Table Saw & Router |


