Halving Joint: Difference between revisions
From DT Online
mNo edit summary |
m Added link |
||
| Line 2: | Line 2: | ||
They are used in low-cost frame-type constructions, especially those which are later skinned with | They are used in low-cost frame-type constructions, especially those which are later skinned with '''[[Manufactured Board|Ply]]''', '''[[Manufactured Board|Hardboard]]''', '''[[Manufactured Board|MDF]]''' or similar. | ||
Revision as of 15:41, 20 February 2016
Halving Joints are a type of Lap Joint in which the pieces of timber, which meet or cross each other, are halved in thickness so that when assembled, their faces are flush.
They are used in low-cost frame-type constructions, especially those which are later skinned with Ply, Hardboard, MDF or similar.
Halving Joints are relatively quick and easy to make and offer a reasonable degree of strength when glued (or glued and screwed).
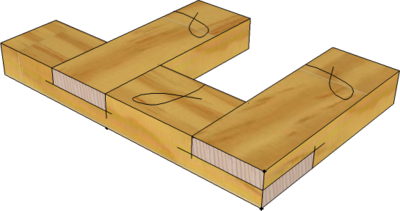
Marking Out
- The joining pieces are prepared as normal and marked with Face Side and Face Edge marks.
- The joint positions are marked out using a Pencil and Try Square.
- Half the timber thickness is scribed using a Marking Gauge.
- A Marking Knife is used with a Try Square to scribe an incised line along where the shoulders are to be cut.

Sawing the Shoulders
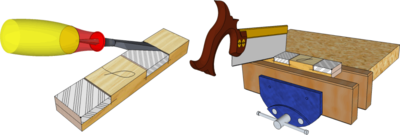
- Pare with a Chisel to cut a shallow 'Vee' groove across the line of the shoulders to guide the saw.
- If needed, on wider boards for example, a piece of scrap timber can be clamped along the line to be cut to guide the saw (see Corner Lap Joint).
- Saw all shoulders down to the gauge line using a Tenon Saw.
Note: Turn the work piece round in the vice to ensure it is the waste which is always on the 'blind side' of the saw.
Sawing the 'Cheeks'
- The sides (or cheeks) of the joint can be cut with a Tenon Saw.
- Arrange the work-piece in the Carpenters Vice at an angle with the waste on the blind side of the saw.
- Using a Tenon Saw carefully saw along the gauge lines along the side and across the end.
- Reverse the angle and saw position carefully to saw along the gauge lines along the other side and once again across the end.
- Arrange the work vertically in the Carpenters Vice and continue the cut down to the shoulders, using the previous angled cuts to guide the blade - and always with the waste on the blind side of the saw.

Note: The sides (or cheeks) of the joint can also be cut down to the 'shoulders' using a Bandsaw.
Removing Waste
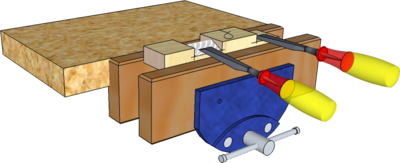
- For 'Tee' Halvings and Cross Halvings, grip a chisel with one hand and taking a Mallet in the other hand, gently tap in an upwards direction to remove the waste to half way across.
- Reverse the work-piece in the Carpenters Vice and repeat from the other side to complete waste removal.
- To complete all types of Halving Joint, some careful Paring with a sharp Chisel can be used to ensure all sides of the joint are levelled down to the gauge lines.
Using a Router
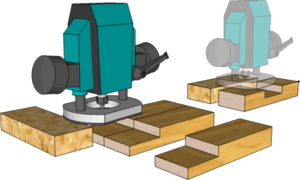
With the work-piece securely held, a Router can be used to cut the whole joint from the beginning. If required, additional pieces of equal thickness timber can be used to balance it and guides, Jigs or fences set up to obviate the need for any marking out.
It is possible also to clamp several work-pieces together to cut multiple joints in a single cut (but take care to ensure the depth of the 'shoulder' and the thickness of the 'cheek' is always gauged from the Face Side)
Safety Point! All high-speed woodcutting machinery is dangerous. Routers and Bandsaws must only be used by trained adults or trainees under direct supervision by specifically trained staff.
Halving Joint Configurations

Halving Joints can be used a general, low-cost joining method for all types of frame joint configurations (e.g. corners. angles, Tee's, cross-halving).
Halving Joint Variations
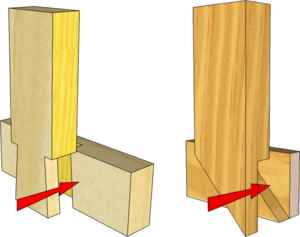
Both the shape of the shoulders and the shape of the cheeks can be varied to create Halving Joints with particular aditional features:
- The shoulders can be cut at an angle of 45 degrees to create a Mitred Corner Halving. The gluing area is reduced so they are loose some strength but they are very useful in situations where a Rebate or Moulding runs round a frame (e.g. as in a picture frame).
- The cheeks and matching shoulders of a Tee Halving can be cut as a Dovetail to create a Dovetail Halving Joint. This joint has the advantage of being able to resist forces tending to pull it apart and is useful on the central stretcher rails of a large frame for example.