Mortise and Tenon Joint
From DT Online
Mortise and Tenon Joints (aka Mortice and Tenon) are the most common and strongest framing joint. They can be used wherever a frame construction is required and have many variations.
The illustrations show the most conventional types but actual proportions and configurations of Mortise and Tenon Joints can be varied to suit the tasks in hand (e.g. joining at angles other than a right-angle or joining a rail on to a turned leg). They are commonly cut as Through Mortise and Tenons in which the Mortise passes completely through the material. Mortise and Tenon Joints may also be combined with Dowels or Housings to add strength to those joints.
The two main parts of the joint are:
- the Tenon, which is cut on the end of one joining piece (generally called the 'rail')
- the Mortise, which is a recess, slot or socket cut into the edge of the second piece (generally called the 'stile').
Where Mortise and Tenon Joints are used to create a frame corner (i.e. at the end of a 'stile') the Mortise is stopped short of the end and a Haunched Mortise and Tenon used. In high quality cabinet work, the Mortises may be stopped short of the width of the stile such that End Grain remains hidden. These are known as Stub Mortise and Tenons.
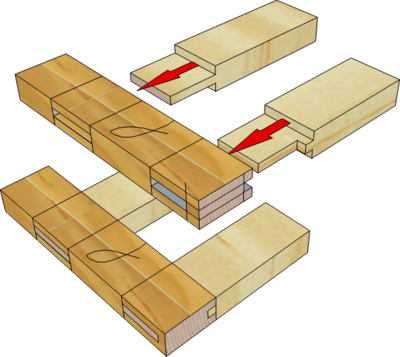
For extra strength, saw cuts are made down the Tenons which receive wedges when assembled. When wedges are used in a 'stopped' Mortise and Tenon Joint, it is known as Fox Wedging.
Marking Out
- The joining pieces are prepared as normal and marked with Face Side and Face Edge marks.
- The joint positions are marked out using a Pencil and Try Square.
- The pins of a Mortise Gauge are set to the width of a Mortise Chisel, chosen to be about one third the thickness of timber, and the Gauge Stock adjusted to scribe the double lines down the centre of the timber thickness.
- If required, a Marking Gauge is used to scribe the depth of any Haunches
- A Marking Knife is used with a Try Square to scribe an incised line along where the shoulders are to be cut.

Sawing the Shoulders
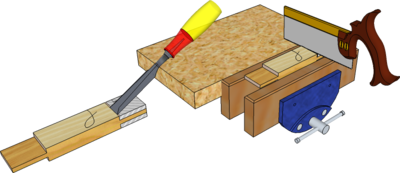
- Pare with a Chisel to cut a shallow 'Vee' groove across the line of the shoulders to guide the saw.
- If needed, on wider boards for example, a piece of scrap timber can be clamped along the line to be cut to guide the saw (see Corner Lap Joint).
- Saw all shoulders down to the gauge lines using a Tenon Saw.
Note: Turn the work-piece round in the vice to ensure it is the waste which is always on the 'blind side' of the saw.
Sawing the Tenons
- The sides (or cheeks) of the Tenons are cut with a Tenon Saw.
- Arrange the work-piece in the Carpenters Vice at an angle with the waste on the blind side of the saw.
- Using a Tenon Saw carefully saw along the gauge lines along the side and across the end.
- Reverse the angle and saw position carefully to saw along the gauge lines along the other side and once again across the end.
- Arrange the work vertically in the Carpenters Vice and continue the cut down to the shoulders, using the previous angled cuts to guide the blade - and always with the waste on the blind side of the saw.

Note: The sides (or cheeks) of Tenons can also be cut down to the shoulders using a Bandsaw.
- If required, the sawn Tenons can be Pared to the gauge lines with a sharp Chisel (but an experienced crafts-person will produce joints 'off the saw'!)
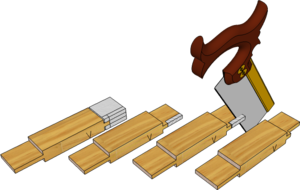
- For a Haunched Mortise and Tenon Joint, the Haunches are cut using a Tenon Saw.
Cutting Mortises
There are several ways to cut the Mortises:
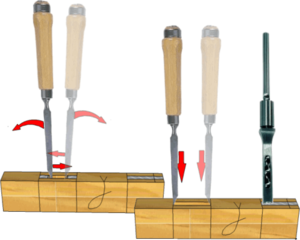
- Using a Mortise Chisel
- Grip the work firmly in a Carpenters Vice and set it deep in to the jaws to add side support as the joint is cut (if needed, scap wood could also be placed under the work-piece to add support under).
- Position the Mortise Chisel a few millimetres in from the centre of the Mortise and work each way towards the end the blade bevel is facing (this is so that when struck with a Mallet, the Chisel will be driven not only downwards but also towards the centre of the Mortise).
- Once the bulk of the waste is cleared out, reverse the Mortise Chisel such that its blade bevel is facing the centre of the Mortise and finished to size with vertical cuts.
- Drilling and Paring
- Drill holes close together along the length of the Mortise - use a drill diameter slightly less than the finished width (to allow for cleaning up by Paring after).
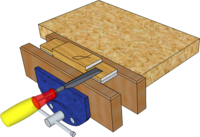
- Clear out the waste using Chisels (see Bridle Joint).
- Hollow Chisel Mortiser
- Cut along the length of the Mortise with repeated cuts from a Hollow Chisel Mortiser to remove all waste (see Bridle Joint).
Using a Router
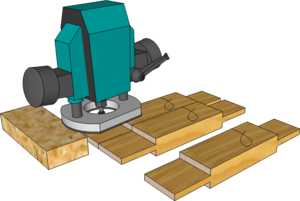
With the work-piece securely held, a Router can be used to cut Tenons from the beginning. If required, additional pieces of equal thickness timber can be used to balance it and guides, Jigs or fences set up to obviate the need for some marking out.
It is possible also to clamp several work-pieces together to cut multiple Tenons in a single cut (but take care to ensure the depth of the 'shoulder' and the thickness of the 'cheek' is always gauged from the Face Side)
Safety Point! All high-speed woodcutting machinery is dangerous. Routers and Bandsaws must only be used by trained adults or trainees under direct supervision by specifically trained staff.
Types of Mortise and Tenon Joint
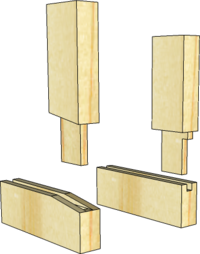
- Haunched Mortise and Tenon
- These are used where the rail meets a stile or leg near the end.
- The Mortise is cut a litle narrower than the width of the rail except for a portion which receives the base of the Tenon and forms the Haunch.
- The purpose of the Haunch is to maintain support across the full width of the Tenon to help prevent any twisting.
- A Haunched Mortise and Tenon also has the advantage that it can usefully close off a Groove where these run round the inside edge of a frame.
- Where it is undesirable to show the Haunch at the end, the Tenon shoulder can be sloped and this also can close off a Groove.
- Tenons with such sloping shoulders are also known as Gunstock Mortise and Tenons.
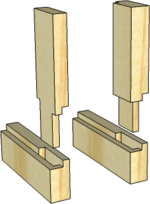
- Barefaced and Long and Short Shouldered Mortise and Tenon
- Used in situations where it is a Rebate (aka Rabbet) running round the inside of a frame.
- A Barefaced Tenon enables a single panel to be fitted to a frame where cross rails or end rails would normally prevent this.
- To close off the end of a Rebate, one shoulder of the Tenon can be made to extend in to it to create a Long and Short Shoulder Mortise and Tenon.
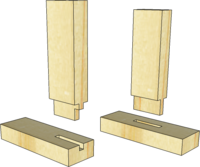
- Tenoned Rails
- Mortises may be cut through the face of a stile as well as the edge and may also be Haunched if near the end.
- This orientation can be useful where table cross-rails meet end frames for example.
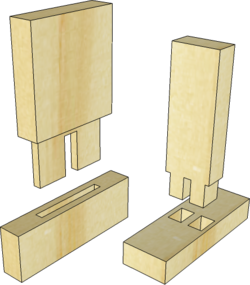
- Double and Twin Tenons
- Double Tenons are useful where the rail is very wide since an over-wide Mortise may weaken the stile and such a wide Tenon may become loose because of shrinkage.
- The two Tenons can be connected by a Haunch type connecting piece to help prevent the rail twisting.
- Twin Tenons are used on thick timber and are also a useful joint to connect wide rails to end frames as shown.
- Twin Tenons can be used on the end of a shelf for example, perhaps which is also Housed into the carcass sides, and if Through Tenons, can be used with contrasting wedges to create a decorative effect on the outside of the cabinet. When used in this way with equal size pins and sockets, they can be regarded as a type of Comb Joint.
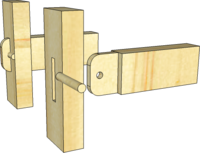
- Tusk Tenon
- Through Tenons can be extended beyond the thickness of the stile and shaped for decoration.
- They may also have pegs or wedges inserted to pull them tighter into the Mortise' - these are known as Tusk Tenons.
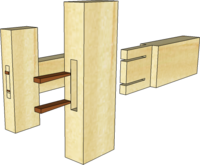
- Wedging Tenons
- Saw cuts can be made down the Tenons to receive wedges on assembly.
- Through Tenons may have wedges of a contrasting timber and used to add some decoration.
- Care must be taken to ensure the wedges are positioned across the Tenon, or on a diagonal, to avoid any sideways forces acting on the Mortise when they are driven in.
- Stub Tenons may also be wedged. The wedges are positioned into the saw cuts before the Tenon is driven into the stopped (or blind) Mortise.
- This is known as Fox Wedging and care must be taken to ensure the wedges are accurately cut to ensure the joint closes completely on assembly.