Viking Longhouse
From DT Online
(Redirected from How to Make a Viking Longhouse Model)

Description
Throughout the northern reaches of Viking settlements (e.g. Norway, Iceland, Newfoundland) communities lived together in Longhouses. Several families would live together in one Longhouse which, typically, were 5 to 7 metres wide and between 15 to 75 metres long.
They were built around a main timber frame laid on a stone footing which was clad in wood (where it was available), Wattle and Daub, or turf. Turf was particularly good where timber was scarce and in cold areas because it provided very good insulation. The roof would be thatched or it too could be covered with turf.

A large central living space was organised around fire-pits down the centre of the room with sleeping spaces along one side and work areas along the other. Some separation between spaces could be provided by Wattle Hurdles. The roof would include some smoke holes above the central firepits. Domestic farm animals would be kept in their own space at one end of the house and there would be a storage area at the other.

There were few pieces of furniture. Some occupants may have had a simple Box-bed but the sleeping space for most would be a low shelf covered with animal skins. People would sit on chests or benches which had space under for possessions. Raised wooden benches provided a surface for eating and working (e.g. Weaving). There would also be small three legged stools and perhaps larger boards and trestles stored in the roof beams and brought down for feasts and special occasions.
Model Longhouse (Version 1)
A basic model of a Viking Longhouse can be made using Stripwood techniques and card. This is very suitable as group project since separate frames can be made by different teams then brought together to assemble at the end. The models as described here would be over 1 metre in length and suitable therefore for a project centre piece.

- Start by drawing main frame full-size (e.g. on squared paper) and use this to mark the lengths of 8mm or 10mm square Stripwood pieces needed (Note: the example described is based on 10mm square timber with a central living space 125-150mm wide - this can be reduced to, say, 100mm wide if 8mm square wood is used).
- Cut the strips of timber to length (i.e. using a Junior Hacksaw) and lay them over the drawing, using small weights to hold them in place.
- Cut cardboard triangles and squares from 30mm wide strips of medium card and glue them over each joint with P.V.A. Adhesive (it is advisable first to cover the drawing with tracing paper to avoid excess glue sticking to it).
- Allow the glue to set then lift the frame, turn over and add card triangles to the other side.
- Construct as many frames as are required and mark their positions on a base cut out from thick card.
- Glue the frames down on to the base card and use weights to hold them in position until the glue dries.
- Mark the length of the ridge beam (as the total length of Longhouse on the base card) and glue in place, adding card triangles to reinforce and use Pegs or Bulldog clips as temporary clamps.
- Cut two middle beams the same length as the ridge beam and glue them in position.
- Cut thick card to model the turf wall and cover the roof as shown. Use paper print-offs, paint or print representations of the stone footings and turf coverings (the turf roof could be modelled by cutting ‘tiles’ out of rubber backed carpet - either green or painted so).
- Leave one side uncovered to reveal the inside.
- Add furniture and fittings as required.

Model Longhouse (Version 2)
Version 2 is modelled using similar Stripwood techniques but is based on a more detailed main frame. The main difference is that this model attempts to reflect the typical 'hump-back' shape of a traditional Viking Longhouse and the varied angles of their roofs.

- Produce a full-size drawing on which to cut and position frame members as for Version 1. (Note: the end two frames are made progressively narrower than the central frames. Since roof angles stay the same, this means they are also lower).
- Assemble vertical and horizontal frame members only by gluing on card triangles.
- The varied roof angles are achieved by using 3 separate lengths for the ‘Rafters’.
- Work clockwise round the frame and glue alternate ‘Rafters’ on to one side the main frame.
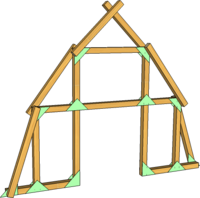
- Let the glue set then turn over and glue on the reamaining ‘Rafters’.
- Add ridge and middle beams as before but note that only the centre section has continuous straight beams and the end sections are made up from short lengths (because the house is narrower and lower at the ends).
- Cut thick card to make side panelling (aka Wainscot) and either paint, print or cover with Lolly Sticks to model the panelling.
- Add entrance ways using card and Stripwood.
- Build the stone ‘Footings’ out of painted balsa wood blocks and add ‘tiles’ of green rubber backed carpet on top to create the turf wall.


Note:
The turf walls were sometimes built in two rows and the gap between filled with rubble. In some Longhouses the turf sods were arranged in a Herringbone fashion and this can be modelled with carpet pieces if required
- Use real straw or art-straws to model a thatched roof or cover with overlapping carpet ‘tiles’.
- Leave one side uncovered to reveal the inside and add furniture as needed.

Safety Point! Take great care with hot glue guns and all hot-melt glues. The melted glue can stick to the skin and cause severe burns.


