Model Sundial: Difference between revisions
From DT Online
(Created article) |
(Added text) |
||
| Line 20: | Line 20: | ||
* Glue lengths of '''[[:Category:Stripwood Technology|Stripwood]]''' along each side to secure it. | * Glue lengths of '''[[:Category:Stripwood Technology|Stripwood]]''' along each side to secure it. | ||
* The '''[[Paper and Card|A4 Thick Card]]''' will form the 'dial' of the completed '''Sundial'''. | * The '''[[Paper and Card|A4 Thick Card]]''' will form the 'dial' of the completed '''Sundial'''. | ||
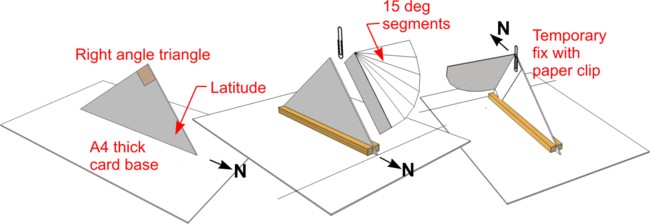
* Mark out 15<small><sup>0</sup></small> segments around a quarter circle ''(or quadrant)'' made from '''[[Paper and Card|Medium Card]]''' and fold a tab down one edge so it can be attached to the '''[[Sundials and Gnomons|Gnomon]]''' triangle with a paper clip ''(or similar)'' as shown ''(alternatively mark segments around a semi-circle and devise some other means of fixing it temporarily to the '''[[Sundials and Gnomons|Gnomon]]''' triangle)''. | |||
[[File:SundialModelPreparation.png|650px|center]] | [[File:SundialModelPreparation.png|650px|center]] | ||
| Line 25: | Line 26: | ||
=====Setting Out the Hour Lines===== | =====Setting Out the Hour Lines===== | ||
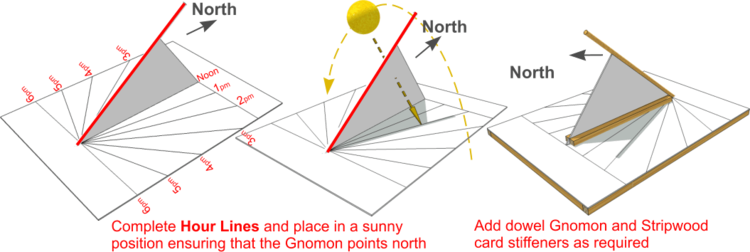
* Place the '''Dial Plate''', with '''[[Sundials and Gnomons|Gnomon]]''' triangle and quadrant attached, on a large sheet of paper or other surface on which you can make marks. | |||
* Extend the segments drawn on the quarter circle 'quadrant' ''(or semi-circle if chosen)'' down on to the flat sheet of paper - for guidance all points should lie in a straight line across the paper sheet which touches the angle of the triangle opposite the '''[[Latitude]]''' angle. | |||
* If just a 'quadrant' is used, the projected points will need to be copied to the other side of the '''[[Sundials and Gnomons|Gnomon]]''' - '''Sundials''' are symetrical about Noon. | |||
* The projected points mark where the Sun's shadow will strike the paper sheet each hour. | |||
* Draw lines connecting each of these hour marks back to where the '''[[Sundials and Gnomons|Gnomon]]''' intersects the A4 'Dial Plate'. | |||
* The parts of the lines actually contained within the A4 'Dial Plate' are the '''Hour Lines''' and may be labelled or marked with times accordingly. | |||
[[File:SundialModelSettingOut.png|850px|center]] | [[File:SundialModelSettingOut.png|850px|center]] | ||
=====Completing the Model Sundial===== | =====Completing the Model Sundial===== | ||
* Use '''[[Printers|Computer Print-outs]]''', [https://en.wikipedia.org/wiki/Collage '''Collage'''] or '''[[Decoupage]]''' for example, to add numbers, labels or images to enhance the appeareance and readability of your 'Dial Plate'. | |||
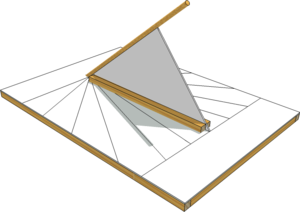
* Position the completed '''Sundial''' in a sunny position, on a flat surface with the '''[[Sundials and Gnomons|Gnomon]]''' pointing '''[[True North|North]]'''. | |||
* This model '''Sundial''' is not weather resistant, so use only on sunny days or indoors on a sunlit window sill. | |||
[[File:StripwoodSundialModel.png|750px|center]] | [[File:StripwoodSundialModel.png|750px|center]] | ||
=====Questions===== | |||
* Does your '''Sundial''' give the correct time? | |||
* If not, why do you think this might be so? ''(think about daylight saving times)''. | |||
* How did you ensure your '''Sundial''' '''[[Sundials and Gnomons|Gnomon]]''' is pointing to '''[[True North]]'''? | |||
* How did you find your '''[[Latitude]]''' and is the '''[[Sundials and Gnomons|Gnomon]]''' fixed at that angle to the horizontal? | |||
* How can you make your '''Sundial''' more weather resitant? | |||
* What different materials and process might you choose to make a '''Sundial''' which remains outside all year long? | |||
---- | |||
<span style="color: green">'''Note:''' | |||
To check your '''Hour Lines''', a [https://docs.google.com/spreadsheets/d/1rdxuEJJgqAk4VXVkqeqxUDnfm2TNRz9pe9VwKzB6tLI/edit?usp=sharing '''DT Online Tool'''] is available [https://docs.google.com/spreadsheets/d/1rdxuEJJgqAk4VXVkqeqxUDnfm2TNRz9pe9VwKzB6tLI/edit?usp=sharing '''here'''] which completes the calculation of the angle of each '''''hour line''''' for any given '''[[Latitude]]''' which is input. | |||
</span> | |||
---- | |||
| Line 34: | Line 64: | ||
[[Category:Primary]] | [[Category:Primary]] | ||
[[Category:Primary Technology]] | |||
[[Category:Graphics and Modelling Tasks]] | [[Category:Graphics and Modelling Tasks]] | ||
[[Category:Ancient Egypt]] | [[Category:Ancient Egypt]] | ||
[[Category:Sundials]] | [[Category:Sundials]] | ||
Revision as of 19:38, 21 October 2016
Introduction
Sundials (or Shadow Clocks) are perhaps the oldest scientific instruments. They are thought to have been developed by the ancient civilisations of Babylonia, Egypt, Greece and Rome. They were used by Viking and Medieval navigators and are still in use today.
One of the most common types of sundial is a Horizontal Sundial and a fully working model can be constructed using Stripwood Technology materials and techniques. Sundials are based on the apparent movement of the Sun across the sky. Making a model can lead to an understanding of our Solar System and terms such as Latitude.
Sundials have two basic parts: there is a sloping rod (or edge of a plate) which casts the shadow and plate, or 'dial', on which the shadow falls to indicate the time. The sloping rod is known as a Gnomon. The Gnomon should always point North (in the northern hemisphere) and be set at an angle which is equal to the Latitude of the Sundial's location.
Preparing the Materials
- To make the Gnomon, cut a right-angle triangle out of Thick Card which has the Sundial's location Latitude set as one of the oher two angles.
- Position the card Gnomon vertically down the centre of a sheet of A4 Thick Card such that the right-angle is uppermost (i.e. fix along the Hypotenuse).
- Glue lengths of Stripwood along each side to secure it.
- The A4 Thick Card will form the 'dial' of the completed Sundial.
- Mark out 150 segments around a quarter circle (or quadrant) made from Medium Card and fold a tab down one edge so it can be attached to the Gnomon triangle with a paper clip (or similar) as shown (alternatively mark segments around a semi-circle and devise some other means of fixing it temporarily to the Gnomon triangle).
Setting Out the Hour Lines
- Place the Dial Plate, with Gnomon triangle and quadrant attached, on a large sheet of paper or other surface on which you can make marks.
- Extend the segments drawn on the quarter circle 'quadrant' (or semi-circle if chosen) down on to the flat sheet of paper - for guidance all points should lie in a straight line across the paper sheet which touches the angle of the triangle opposite the Latitude angle.
- If just a 'quadrant' is used, the projected points will need to be copied to the other side of the Gnomon - Sundials are symetrical about Noon.
- The projected points mark where the Sun's shadow will strike the paper sheet each hour.
- Draw lines connecting each of these hour marks back to where the Gnomon intersects the A4 'Dial Plate'.
- The parts of the lines actually contained within the A4 'Dial Plate' are the Hour Lines and may be labelled or marked with times accordingly.
Completing the Model Sundial
- Use Computer Print-outs, Collage or Decoupage for example, to add numbers, labels or images to enhance the appeareance and readability of your 'Dial Plate'.
- Position the completed Sundial in a sunny position, on a flat surface with the Gnomon pointing North.
- This model Sundial is not weather resistant, so use only on sunny days or indoors on a sunlit window sill.
Questions
- Does your Sundial give the correct time?
- If not, why do you think this might be so? (think about daylight saving times).
- How did you ensure your Sundial Gnomon is pointing to True North?
- How did you find your Latitude and is the Gnomon fixed at that angle to the horizontal?
- How can you make your Sundial more weather resitant?
- What different materials and process might you choose to make a Sundial which remains outside all year long?
Note: To check your Hour Lines, a DT Online Tool is available here which completes the calculation of the angle of each hour line for any given Latitude which is input.
- Structures and Frames can also be modelled using the Construction Kits listed in the Truss Bridges and Looking at Bridges articles.
Safety Point! Take great care with hot glue guns and all hot-melt glues. The melted glue can stick to the skin and cause severe burns.
 |
 |
 |
 |
 |
 |
 |
 |
 |
 |
 |
| Junior Hacksaw |
Clamp-on Hobby Vice |
Stripwood |
Balsa Wood |
Medium card coloured |
Thick card coloured |
Cutting Mat |
10mm Squared Paper |
PVA glue |
Glue Gun |
Bamboo Flower Sticks |
Notes:
- Choose metal cutting hacksaw blades - the teeth are small which suits this scale of work and they are safer for young children
- School PVA glue is best for young children because it is non-toxic and washes off : PVA Wood Glue is strongest but must be used with care.
- Try to get natural Flower Sticks or wear gloves because the green stain comes off on hands!


