Raising: Difference between revisions
From DT Online
mNo edit summary |
mNo edit summary |
||
| Line 17: | Line 17: | ||
=====Features and Applications===== | =====Features and Applications===== | ||
Starting from the centre then working outwards, it may initially take two or three blows with the hammer to set the metal down on to the '''[[:Category:Stakes|Raising Stake]]''' after which the work is rotated as the metal is struck by subsequent hammer blows until a full circle is completed. Continue the process until within 6mm ''(1/4")'' of the top and finish the last course with a '''[[ | Starting from the centre then working outwards, it may initially take two or three blows with the hammer to set the metal down on to the '''[[:Category:Stakes|Raising Stake]]''' after which the work is rotated as the metal is struck by subsequent hammer blows until a full circle is completed. Continue the process until within 6mm ''(1/4")'' of the top and finish the last course with a '''[[:Category:|Boxwood or Rawhide Mallet]]''' to avoid stretching. | ||
This process is repeated, and the metal frequently '''[[Heat_Treatment#Annealing|Annealed]]''', until the desired shape is achieved. If required, the slightly '''[[Hollowing|Hollowed]]''' centre can be | This process is repeated, and the metal frequently '''[[Heat_Treatment#Annealing|Annealed]]''', until the desired shape is achieved. If required, the slightly '''[[Hollowing|Hollowed]]''' centre can be flattened using a '''[[:Category:Mallets|Boxwood or Rawhide Mallet]]''' against a '''[[:Category:Stakes|Bottoming Stake]]'''. | ||
Once a satisfactory raised form has been achieved, it can be trued, the metal '''[[Crystalline_Structures#Work_Hardening|Work Hardened]]''' and polished, by a process known as [https://en.wikipedia.org/wiki/Planishing '''Planishing''']. It is important that the metal is thoroughly cleaned before '''[[Planishing]]''' ''(e.g. by '''[[Pickling]]''' and/or scouring)'' to avoid any grit, oxides or other contaminants being hammered into the surface. | |||
Latest revision as of 09:01, 5 July 2017

Description
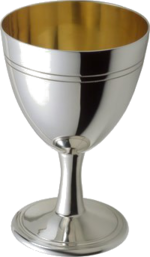
Raising is a process which is used to produce deeper forms (without seams) than can be created by Hollowing (e.g. for deeper bowls, vases, trophy cups, goblets and challises).
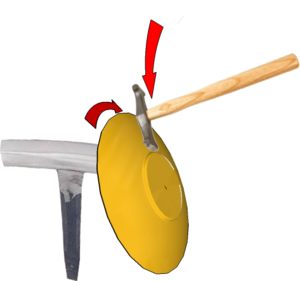
A disc of Annealed metal is marked with concentric guidelines and slightly Hollowed. It is then presented at a steep angle to the end of a Raising Stake and struck down on to it with a Raising Hammer. The hammer is similar to a Collet Hammer but heavier (e.g. 0.25 kilogramme (8 oz.)) and both it and the Raising Stake have all edges rounded and polished to avoid cutting the metal.
For production items, Spinning has superseded Raising for repetitive articles, which may then be finished by hand.

Features and Applications
Starting from the centre then working outwards, it may initially take two or three blows with the hammer to set the metal down on to the Raising Stake after which the work is rotated as the metal is struck by subsequent hammer blows until a full circle is completed. Continue the process until within 6mm (1/4") of the top and finish the last course with a [[:Category:|Boxwood or Rawhide Mallet]] to avoid stretching.
This process is repeated, and the metal frequently Annealed, until the desired shape is achieved. If required, the slightly Hollowed centre can be flattened using a Boxwood or Rawhide Mallet against a Bottoming Stake.
Once a satisfactory raised form has been achieved, it can be trued, the metal Work Hardened and polished, by a process known as Planishing. It is important that the metal is thoroughly cleaned before Planishing (e.g. by Pickling and/or scouring) to avoid any grit, oxides or other contaminants being hammered into the surface.
- 12oz Hammers (0.45kg) are a good useful size for general work in Design and Technology.
- Larger 2lb hammers (1kg) are used for heavier work such as Blacksmithing for example.
- Smaller hammers (e.g. 4oz and 8oz) are suitable for jewellery work and model engineering applications.
- Brick Hammers between 1lb and 1.5lb weight (450g to 700g) are suitable for school use and are available also with a Scutch Comb Chisel at one end which can be used for shaping brick and masonry.
- A 2lb Lump Hammer (0.9kg) is a good useful size for general work in Design and Technology and home maintenance tasks.
- 2lb to 4lb Sledge Hammers (1-2kg) are a suitable size for general forge-work in Design and Technology since hammers heavier than 4lb would be difficult for students to use.
 |
 |
 |
 |
 |
 |
 |
 |
| Ball Pein Hammer |
Blacksmiths Hammers |
Brick Hammer |
Claw Hammer |
Cross Pein Hammer |
Lump (or Club) Hammer |
Pin Hammer |
Sledge Hammer |